Migrating your data to Salesforce should be considered a serious task. Migrating bad data causes adoption problems, customer relationship issues, decrease review and diagnostic problems. A data migration strategy should be put into place that includes stakeholders that understand the data and will be available throughout all stages.
Other things to note include common data migration issues that contain poor quality data, insufficient tools and human resources to do the work. Also, failure to translate data into a new structure and format correctly. And of course, lack of testing which will prevent new and existing data in Salesforce.

Here are some additional tips for migrating your data to Salesforce:
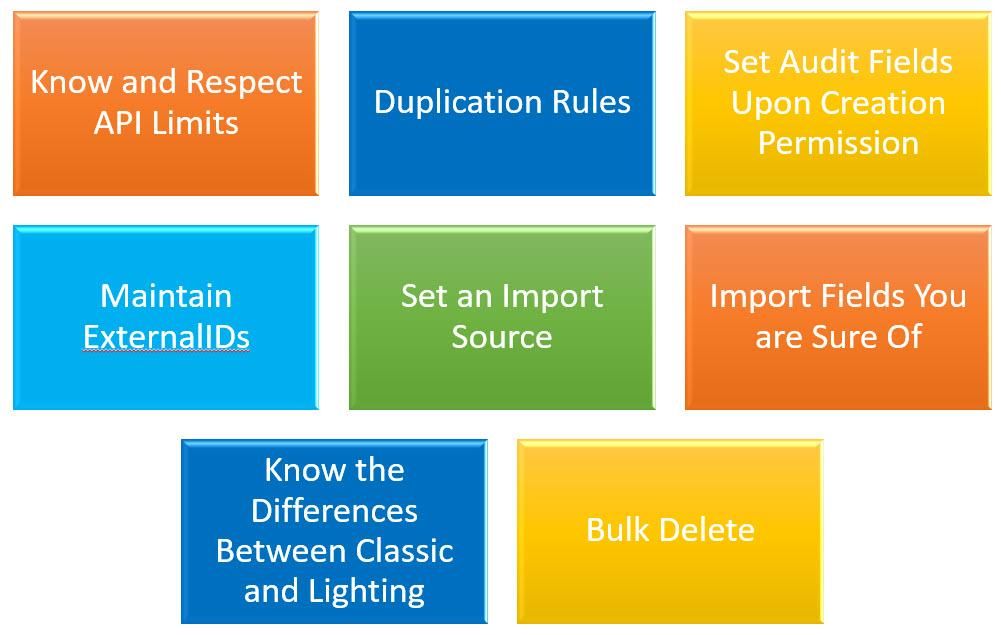
1. Know and Respect the API limits – Salesforce ensures it’s system runs optimally by limiting the number of API calls each customer can make in a 24 hour period. While some larger enterprises do have virtually unlimited API calls, you may not be so fortunate! When migrating data, you will need to be aware of the number of API calls being used.
Thankfully Salesforce does have a bulk API which is what is the recommended way of making large inserts and updates of data into Salesforce, so wherever possible, use the Bulk API.
Another tip would be to download frequently looked up object records to an offline location which can be used to lookup data instead of utilizing an API call every time.
Note: API usage can be monitored under the Company Information page under the Setup menu.
2. Duplication Rules – Salesforce has a few out-of-the-box duplicate rules defined to help keep your data clean and warn or prevent users from entering duplicate data. Unfortunately, this great feature can also be a pain point when importing large volumes of data from a legacy system that may not necessarily have clean data. If the duplicate rules are left active in Salesforce, any records matching the criteria will not be imported. These rules can be temporarily disabled as part of the import process to avoid this issue from occurring.
3. Set Audit Fields upon Creation Permission – when migrating data from another system, it’s particularly useful to set fields like the CreatedDate and CreatedBy. By default, if you insert data into Salesforce, it will set the CreatedDate to the current date. All your data will seem like it was added on the same day, which isn’t optimal.
Thankfully there is a setting called “Set Audit Fields upon Record Creation”. If you enable this setting, Salesforce lets you write the CreatedDate and CreatedBy field values via an import.
Note: One downside of this is that at the time of writing this, these fields cannot be updated when using the Bulk API and unfortunately need to use the regular API.
However, the Salesforce platform is constantly improving and in a few releases, this is not likely to be an issue.
4. Maintain ExternalIDs – If you are importing data from another system, it is a good practice to ensure the unique identifier from the other system is added to a Salesforce field which is defined as an ExternalID. This will allow you to make updates based on this unique identifier and also correct any issues you may have encountered with the first round of your data migration.
5. Set an Import Source – Whenever possible, write a unique IMPORTSOURCE field value to the object you are importing data to. The advantage here is that it gives you an easy way to isolate the data you’ve imported and update it or delete and re-import it if needed. An example of this use case is provided below as well.
6. Import Fields You are Unsure Of – If you’re unsure if you need a field from your source system, it’s a good practice to import it anyway. It does not consume additional space on your Salesforce org (each record consumes 2 kb regardless of whether it has 10 fields or a 100 fields) and the field can be hidden or deleted later on if not needed. However, it’s a lot harder to re-run and re-import certain fields later on if they are deemed necessary.
7. Differences between Classic and Lightning When it Comes to Related Objects – The lightning interface changes how certain related objects are displayed and it’s important to be aware of these nuances. For instance, if an Attachment record was added to an Opportunity record, its roll-up behavior works differently in Classic vs Lightning
a. In Classic, the attachment in question would show up under both the Opportunity and its Account
b. In Lightning, the attachment in question would only show up under the Opportunity. It does not show at the Account level.
8. Bulk Delete – You’ve imported 100,000 rows of data. You look at it in Salesforce and realize some glaring issues with it. You really want to delete the data and re-import it to ensure its clean. Well if you’re dealing with a large volume of records, you have a problem on your hands because the Mass Delete only lets you delete 250 records at a time.
You can, however, use the Developer console to run a SOQL query and delete records in larger quantities.
Assuming, for example, you want to delete all the Opportunities you imported (using the IMPORTSOURCE of MyImport
a. On the developer console, click on the Debug menu and choose Open Execute Anonymous Window
b. Enter your Apex code like this:
List<Opportunity> opps = [Select Id from Opportunity where Importsource__c = ‘MyImport’ Limit 9500];
delete opps;
This will bulk delete all Opportunities where the IMPORTSOURCE field is set to MyImport
Hope you found these handy! Good luck with your next data migration to the Salesforce platform!
When you are ready to migrate your data contact our team at www.remoteCRM.com, powered by XTIVIA, we can help. We will partner with you on the migration process to ensure both a smooth transition and that your team can take advantage of our expertise and have a successful migration.

