With the Winter ’24 release, Salesforce has brought a new feature called Reactive Screen Components. Reactive Screens are a feature that will take Flow screen building to the next level. Previously, when building a screen flow, the user would have to create additional screens and rely on the Next button for the next component to react to another component. With the evolution of technology today, users expect processes to be more innovative and dynamic. The way that users are used to creating screens has developed an overreliance on the Next button, which makes a lot of clicks and sometimes causes confusion when troubleshooting.
With Reactive Components, when you enter data into your screen, it will dynamically update the data instead of needing to click the Next button and allow each screen component to interpret the data and logic. All in real time! The need to create multiple screens is now over with this new feature, and it will change the user experience for both the user and administrator. This feature will be generally available(GA) in the Winter ’24 release.
Did you want to test this out before the Winter ’24 release? Below are the steps to turn on this feature.
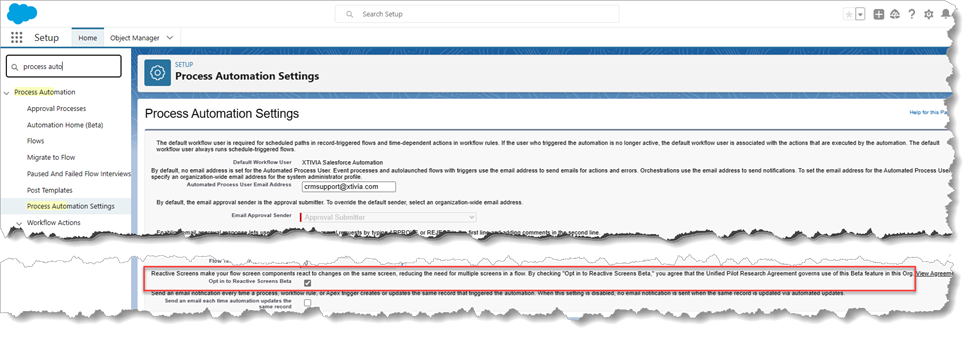
- Go to Setup and type Process Automation Settings in the quick-find
- Click on Process Automation Settings
- Near the bottom of the screen, check where it says, “Reactive Screen make your flow screen component react…”
Note: By checking Opt into Reactive Screens Beta, you agree that the Unified Pilot Research Agreement governs using this Beta feature in this Org.
Click Save

The next step is to create a new Screen Flow.
- In Setup, search for Flows in the quick find box
- Click on Flows
- Click New Flow
- Click Screen Flow and click Create
- Click the “+” to add a new element and click on Screen
- Label your screen
- Drag a Number component to the screen, and we’ll label it: Sales Goal
- Drag another Number component and label it Total Sales
- Drag a Display Text component to the screen, title it CommissionTier, and paste it into the body of the text :
- 100% to Goal = $5000
- 90% to Goal = $4000
- 80% to Goal = $3000
- Every 1% over 100% is an extra $100
- *No commission for anything below 80%
- Drag a number component to the screen and label it Commission Payout
- Click New Resource and choose Formula as the Resource Type
- Label your resource Commission Payout
- Choose Number as Data Type
- Keep 2 for Decimal Places
- Click into the formula text box and paste:
IF(
   Total_Sales > Sales_Goal,
   5000 + ((Total_Sales - Sales_Goal) / 100),
   IF(
  	Total_Sales = Sales_Goal,
  	5000,
  	IF(
     	Total_Sales >= Sales_Goal * 0.9,
     	4000,
     	IF(
        	Total_Sales >= Sales_Goal * 0.8,
        	3000,
        	0
     	)
  	)
   )
)- Click Check Syntax to see if the formula you entered has any errors
- Click Done
- Activate your flow
- Go to your Homepage
- Click on any object in your tabs
- Open a record
- Click the Cog on the upper right
- Click Edit Page
- Drag Flow component to the page
- Click on the Flow component, click on the Flow dropdown, and select the newly created screen flow.
- Click Save
- Enter numbers into your screen component and see the magic of Reactive Screens!

For screen flows configured to run on API version 59.0 and later, you don’t need to take any extra steps to access reactive components.
For screen flows configured to run on API versions 57.0 and 58.0, select Enable Reactive Components for Screen Flows running API Version 57.0 and 58.0 on the Process Automation Settings page. Add components to your screen and save and run your flows as usual.
The Enable Reactive Components for Screen Flows running API Version 57.0 and 58.0 setting expires in Winter ’25. Before that release, upgrade your flows to run on API version 59.0 or later to take advantage of reactive components.
Let XTIVIA help you with your Reactive Scree Components with our certified Salesforce experts. Don’t forget to ask us about our Salesforce Admin On-Demand service– contact us today!

