DBT (Data Build Tool) became a popular open-source ELT tool within the last three to four years. It is a framework facilitating the development of modular ELT code, writing documentation, and implementing CI/CD. However, it only allows ELT (not ETL).
DBT has two products – DBT Core and DBT Cloud. DBT Core is an open-source tool, whereas DBT Cloud comes with bells and whistles of IDE, scheduler, easy-to-configure notifications, etc.
The purpose of this blog is to demonstrate how easy it is to implement ELT code using DBT. We used screenshots from our test using DBT Core and Snowflake adapter for this blog. Setting up the environments, installation, configuration, Snowflake account setup, and CI/CD are not in this blog’s scope.
Configuring ELT Project (Key Files and Folders)
ELT processing in DBT has three essential elements. They are Profiles, Project directory, and dbt_project.yml file.
Profiles:
In DBT, we can create as many profiles as we need. The common practice is to create one profile file for each database. For example, we need two profile files if a company has two targets (Teradata and Snowflake). Within each profile file, we can describe the list of environments and the credentials for running the ELT scripts.
Project or Working Directory:
Contains ELT and other template scripts. We created this directory as part of the DBT configuration. The following folders and files are automatically created.
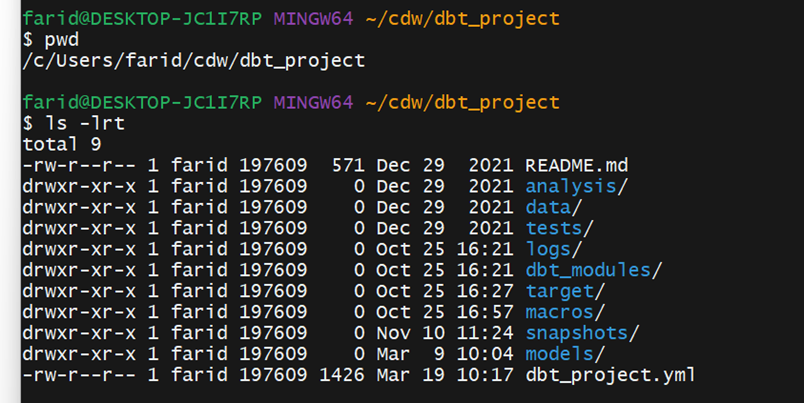
dbt_project.yml:
dbt_project.yml file helps us tie the profile file with the project directory and its subfolders. This is also known as a bridge file. DBT expects this file to be under the user’s current working directory. We can also specify the path of this file using the –profile option when running the scripts.
So far, we have seen the basics of DBT. Now let us understand how easily we can make a template for SCD (Slowly Changing Dimension) type 2. Of course, other options exist to do the same, but we are demonstrating one of the simple ways.
The following are the steps we are targeting. These are common steps in most of the data pipelines development:
- Load the landing table.
- Load the landing backup table to store the golden copy of the data going daily into the DW.
- Create a view that covers the transformation logic. It may not be templatized because transformation logic is usually different for different data. Here, we are trying to templatize the transformation logic for a dimension table.
- Load into the staging table to facilitate CDC.
- Load data into another staging table to carry the CDC flag.
- Load the core table i.e., our target table.
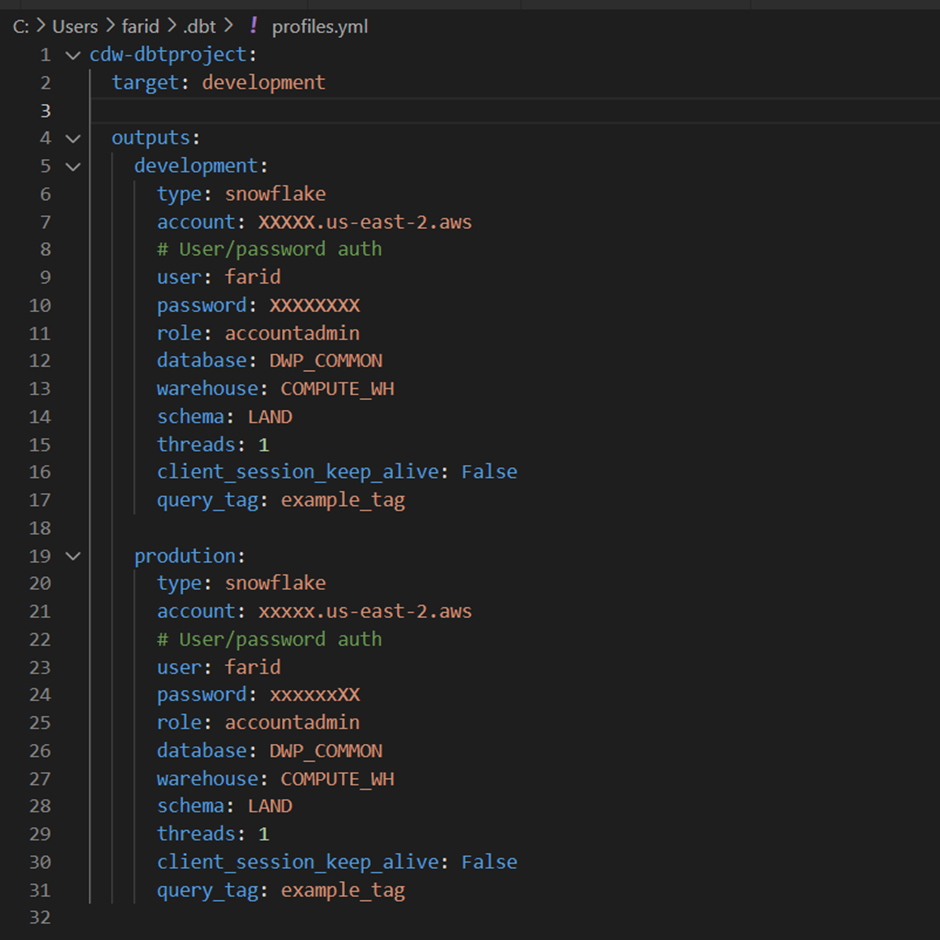
Let us first focus on the profiles.yml (see the screenshot below). We are defining the environment and snowflake connections. For example, we defined two environments – development and production (see the screenshot below). Set the current environment by assigning its value to the tag target.
Next, let us look at the dbt_project.yml.
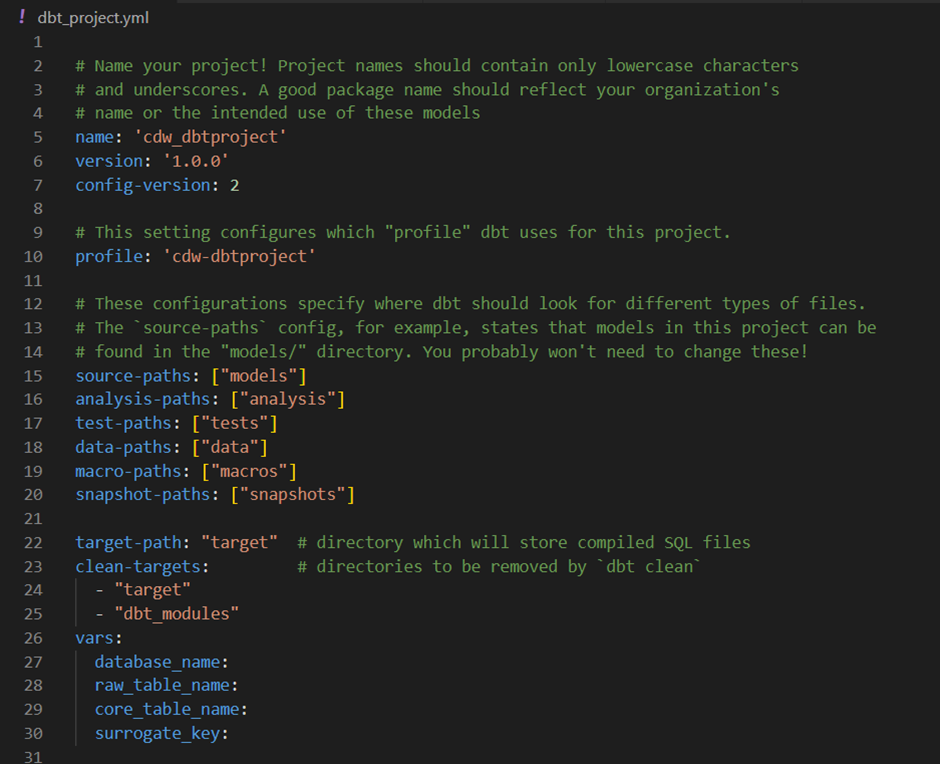
If we observe here, we are configuring the dbt_project.yml to use the above profiles.yml file by specifying the profile name (cdw-dbtproject) in the first line. Apart from that, we have created a few global variables. We can create variables that are local to a specific model. Currently, I am using global variables for this working example.
Loading the Landing Table
Here is the DDL for the raw table.
create or replace TABLE DWP_HVR.COMMON.HVR_DEPT (
            	DNO NUMBER(38,0),
            	DNAME VARCHAR(16777216),
            	LOCATION VARCHAR(16777216),
            	REGION_ID NUMBER(10,0),
            	SRC_LAST_UPD_DATETIME TIMESTAMP_NTZ(9),
            	LOADER_DATETIME TIMESTAMP_NTZ(9)
);
INSERT INTO DWP_HVR.COMMON.HVR_DEPT SELECT 10, 'FINANCE', 'CHENANI', 1, CURRENT_TIMESTAMP, DATEADD('HOUR', 1, CURRENT_TIMESTAMP);INSERT INTO DWP_HVR.COMMON.HVR_DEPT SELECT 20, 'ACCOUNTS', 'DELHI', 2, CURRENT_TIMESTAMP, DATEADD('HOUR', 1, CURRENT_TIMESTAMP);
Config portion: In this portion, we need to specify the details of the target table. Here, I intend to create the landing table in the DWP_COMMON.LAND Snowflake schema. Alias specifies the target table to be created when the above script runs. By default, the script name is the target table name. We usually configure the alias in generic scripts.
DBT allows four types of materialization. They are:
1. Table: This creates a table when we run the script.
2. View: This creates a view when we run the script.
3. Incremental: It helps to insert only the changed records into the existing table. But we need to configure the logic to identify the inserts and updates. This option enables loading changes into tables.
4. Ephemeral: This option allows us to use the result of another script in the current script. This option does not create any object or insert records into the table. The result of the Ephemeral script is CTE. This will be created and used during the execution.
If the table already exists, to delete the existing data before loading the current days data, we use the pre_hook option. To use this option, we need to pass the truncate table statement. The current table will be referred to with {{ this }} jinja construct.
Important Note: DBT looks for the schema <target_schema>_<schema_name>. We can modify the macro generate_schema_name if we want to use custom schema names.
I used the dbt-jinja function adapter.get_columns_in_relation to provide the list of columns from a given view or table. We can use the Table materialization with no pre_hook option if we want to create a landing table each time to automatically adopt the DDL changes in the raw table.
Here is the DDL for the landing table:
create or replace TRANSIENT TABLE DWP_COMMON.LAND.LND_DEPT (
            	ETL_CREATE_DATE TIMESTAMP_LTZ(9),
            	DNO NUMBER(38,0),
            	DNAME VARCHAR(16777216),
            	LOCATION VARCHAR(16777216),
            	REGION_ID NUMBER(10,0)
);
Loading the Landing Backup Table
Maintaining the landing backup table is an essential practice to keep track of the data we are pushing into CDW. The following code uses Incremental materialization to do this, and no pre_hook is needed as we append the delta records daily.

Here is the DDL for the landing backup table:
create or replace TRANSIENT TABLE DWP_COMMON.LBKP.LND_DEPT (
            	ETL_CREATE_DATE TIMESTAMP_LTZ(9),
            	DNO NUMBER(38,0),
            	DNAME VARCHAR(16777216),
            	LOCATION VARCHAR(16777216),
            	REGION_ID NUMBER(10,0)
);
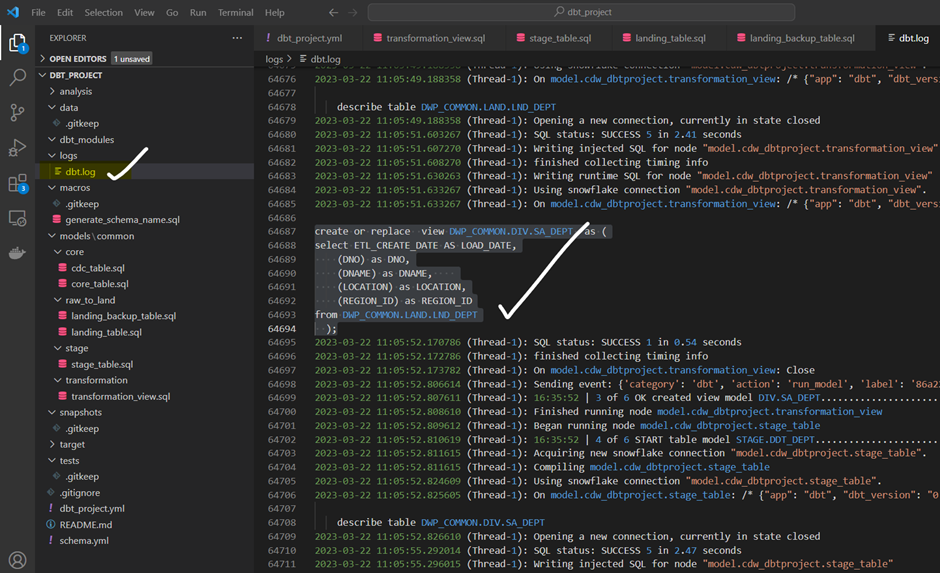
Transformation View
We use the transformation view to apply the transformation rules and surrogate key logic in a single place. The following code can be used to create views for most of the dimension tables. It is a common practice to use a core table-specific transformation view.
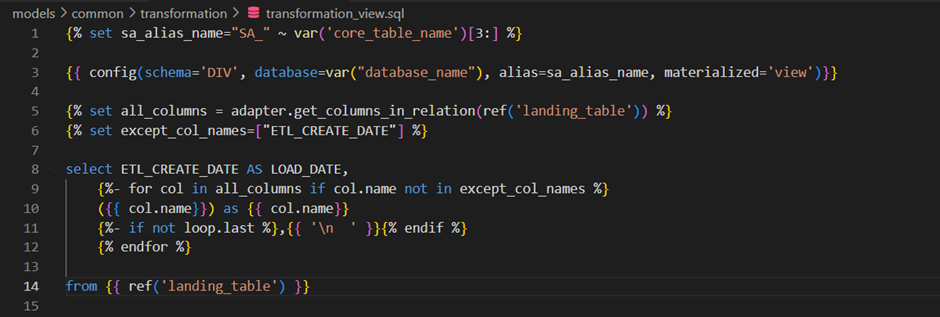
When the model runs, we can check the generated view definition in the DBT log as follows:
Stage Table
Used a stage or temporary table to facilitate the change data capture. We are loading this temporary table from the transformation view. This table is truncated and loaded by every run. We used Incremental materialization and a pre_hook option here.
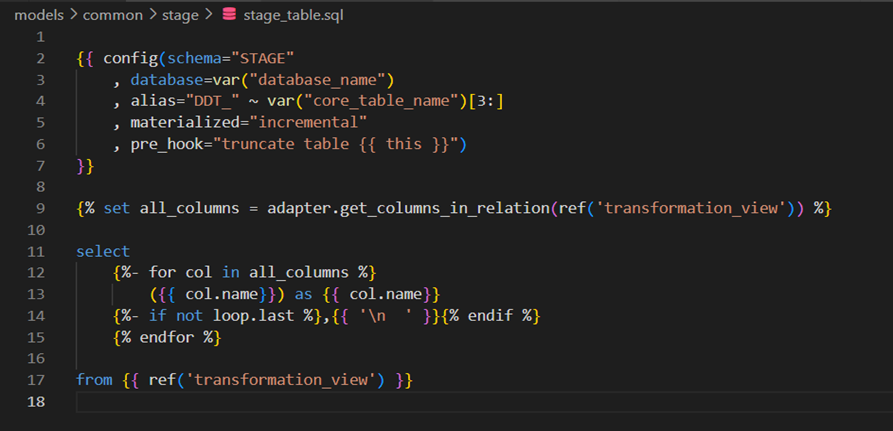
Here is the DDL for the stage table:
create or replace TRANSIENT TABLE DWP_COMMON.STAGE.DDT_DEPT (
            	LOAD_DATE TIMESTAMP_LTZ(9),
            	DNO NUMBER(38,0),
            	DNAME VARCHAR(16777216),
            	LOCATION VARCHAR(16777216),
            	REGION_ID NUMBER(10,0)
);
CDC Table
This table has an additional column CHG_FLG which indicates the new and modified records by comparing the keys of stage and core tables.
In the next step, we are performing the following actions based on the CHG_FLG value:
- If the value is ‘I’, we insert the record into the core table.
- If its value is ‘U’, we update the LAST_UPDATE column of the existing record with the current timestamp.
This table needs to be truncated and loaded during every run. So, we used Incremental materialization and the pre_hook option.
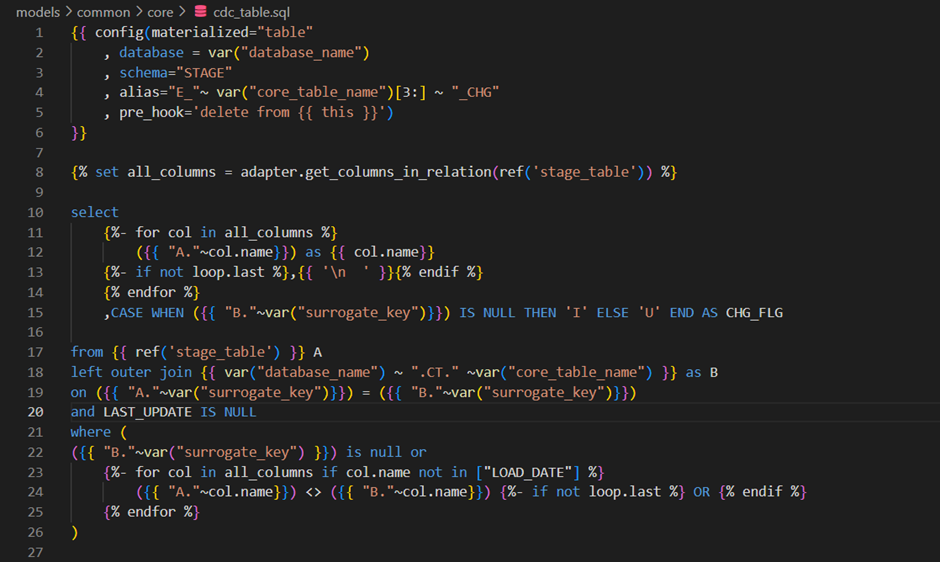
Here is the DDL for the CDC table:
create or replace TRANSIENT TABLE DWP_COMMON.STAGE.E_DEPT_CHG (
            	LOAD_DATE TIMESTAMP_LTZ(9),
            	DNO NUMBER(38,0),
            	DNAME VARCHAR(16777216),
            	LOCATION VARCHAR(16777216),
            	REGION_ID NUMBER(10,0),
            	CHG_FLG VARCHAR(1)
);
Loading the Core Table
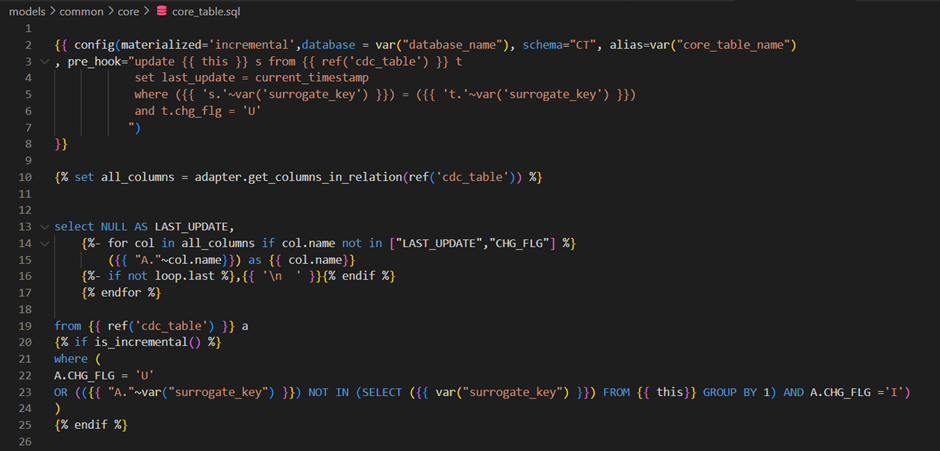
Here is the DDL for the core table:
create or replace TABLE DWP_COMMON.CT.DW_DEPT (
            	LOAD_DATE TIMESTAMP_NTZ(9),
            	LAST_UPDATE TIMESTAMP_NTZ(9),
            	DNO NUMBER(38,0),
            	DNAME VARCHAR(16777216),
            	LOCATION VARCHAR(16777216),
            	REGION_ID NUMBER(38,0)
);
If you notice, all the scripts are under the same parent folder (common). Under that, we have subfolders for specific steps such as raw_to_land, transformation, stage, core, etc.
DBT is intelligent enough to recall the dependencies between the steps/tables or models by constructing a DAG during the run time.
Let us start running the whole pipeline by submitting the simple command. We used the –vars option to pass the values to the variables we have defined in the dbt_project.yml file.
$dbt run -m models/common/ --vars '{key: database_name, database_name: 'DWP_COMMON', key: raw_table_name, raw_table_name: 'DWP_HVR.COMMON.HVR_DEPT', key: core_table_name, core_table_name: 'DW_DEPT', key: surrogate_key, surrogate_key: 'DNO'}'Here is the console output:
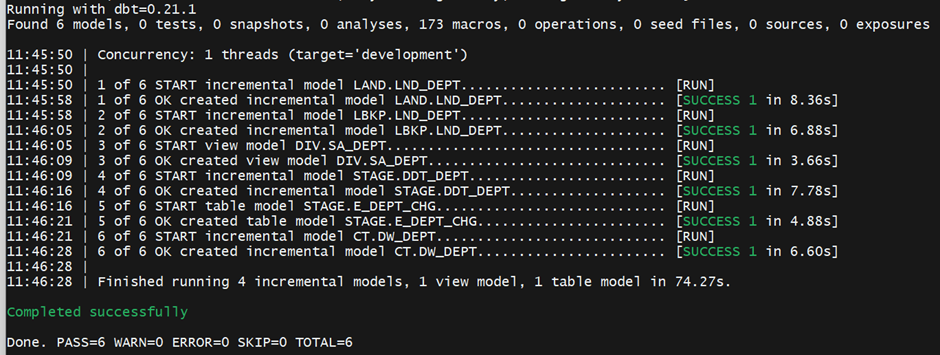
Let us check the core table now.
SELECT * FROM DWP_COMMON.CT.DW_DEPT;
Let us update a record in the raw table, re-run our pipeline and check the results.
UPDATE DWP_HVR.COMMON.HVR_DEPT
SET LOCATION = 'HYDERABAD'
WHERE DNO = 10;
If we want to use the same model for another table, for example, the DW_PRODUCT_CLASS table, we can create the required database objects and use the following command to load data. We do not need to write any new script.
$dbt run -m models/common/ --vars '{key: database_name, database_name: 'DWP_COMMON', key: raw_table_name, raw_table_name: 'DWP_HVR.COMMON.HVR_PRODUCT_CLASS', key: core_table_name, core_table_name: 'DW_PRD_CLS', key: surrogate_key, surrogate_key: 'Q_PRD_CLS_ID'}'If you have any questions regarding this blog or need help with DBT or other DataOps/Data Engineering services, please contact us.

