Recently I have worked on a project with Contentful and NextJS.
For those of you who don’t know, Contentful is a headless CMS created in Berlin that has been around for about 10 years, while NextJS is a 5 year old open-source development framework built on top of React.js.
So, we thought it was a good idea to match the kids in 2022 and have fun with them! But of course, the kids will always need a playground. As we are the grown ups, we chose it for them.
The Playground
Let’s be honest. My first option was, and will always be, The City Museum in St Louis. It is educational (It is a museum… is it?), fun (You can climb around! There are secret passages!), for all ages (Yeah, I am not a kid anymore… am I?), attractive (see pictures) and it has a bus on the rooftop. In any case, always ask for other opinions!
But someone told me it wasn’t a good idea for our particular kids. So, we decided to try something different: AWS Amplify. “AWS Amplify is a set of purpose-built tools and features that lets frontend web and mobile developers quickly and easily build full-stack applications on AWS, with the flexibility to leverage the breadth of AWS services as your use cases evolve”. Well, sounds like Amplify will make our lives easier!
Great, so I have my data (Contentful), I have my application (built in NextJS and stored in Github) and I will put them together on the internet with Amplify. Let’s see how. Also, in case you need it, having the general user guide handy is helpful. But to make things easy I will explain it with my own words.
Create the Playground
1. Sign in to https://aws.amazon.com/console/. You will have to create an account and provide payment information if you don’t have an account.
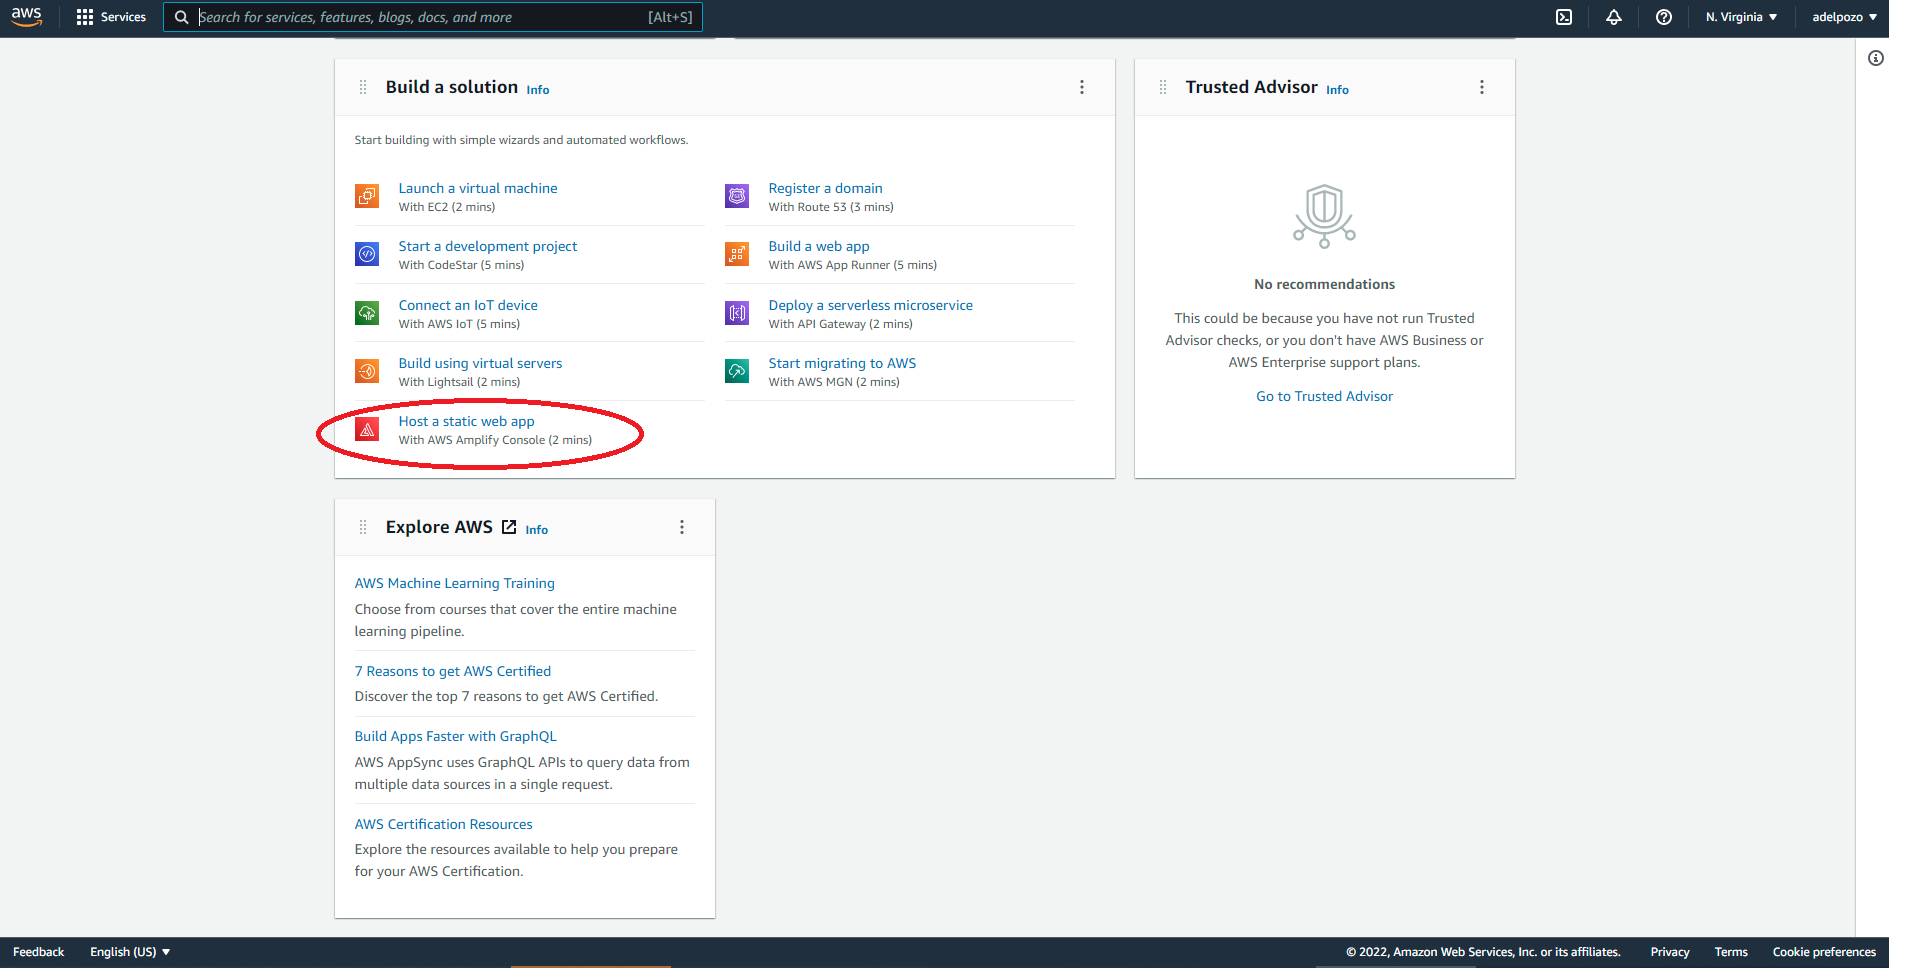
2. Once you sign in to the AWS Console, look for the “Build a solution section”, and click on the “Host a static web app” link to configure your application.
![AWS Amplify Contentful NextJS tutorial host static web app screenshot](https://www.xtivia.com/wp-content/uploads/aws-amplify-contentful-nextjs-tutorial-host-static-web-app-screenshot1-.png)
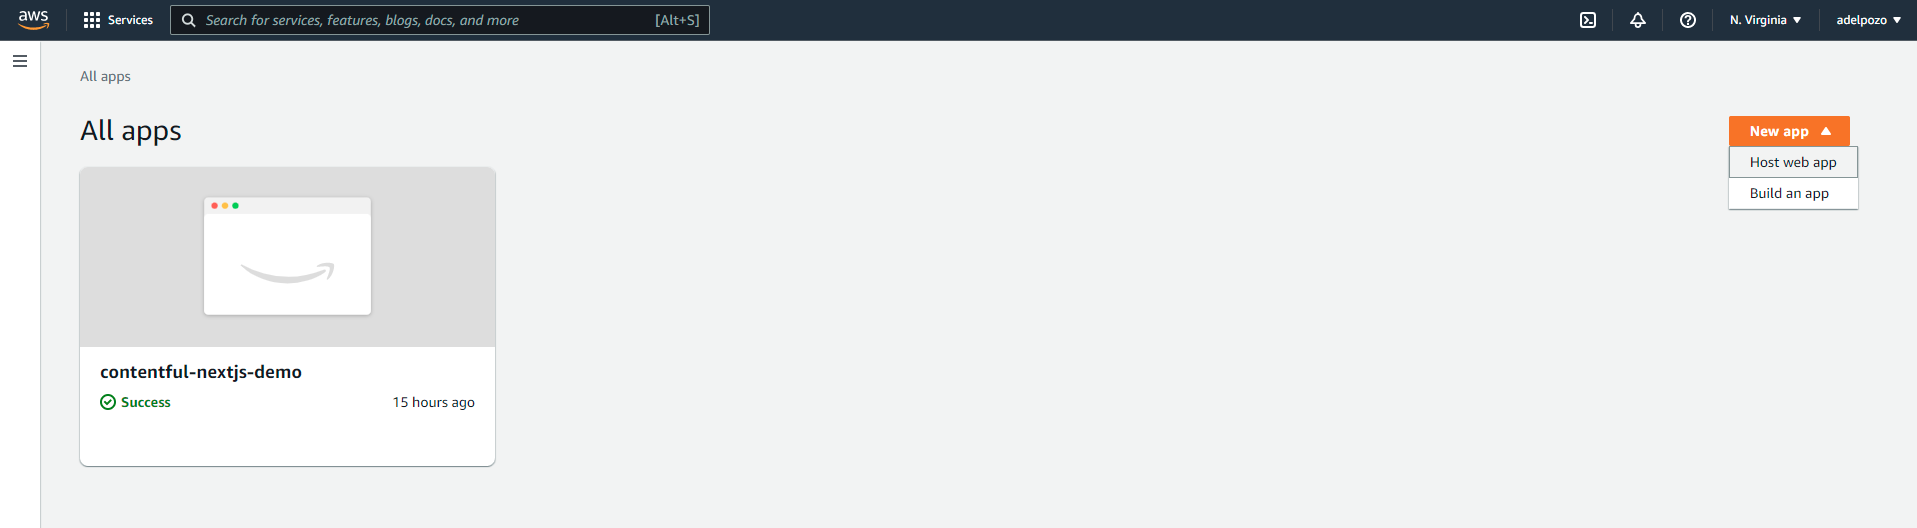
3. Once in Amplify, click on “New app” and then “Host web app” to add your application.
![AWS Amplify Contentful NextJS tutorial new app screenshot](https://www.xtivia.com/wp-content/uploads/aws-amplify-contentful-nextjs-tutorial-new-app-screenshot2.png)
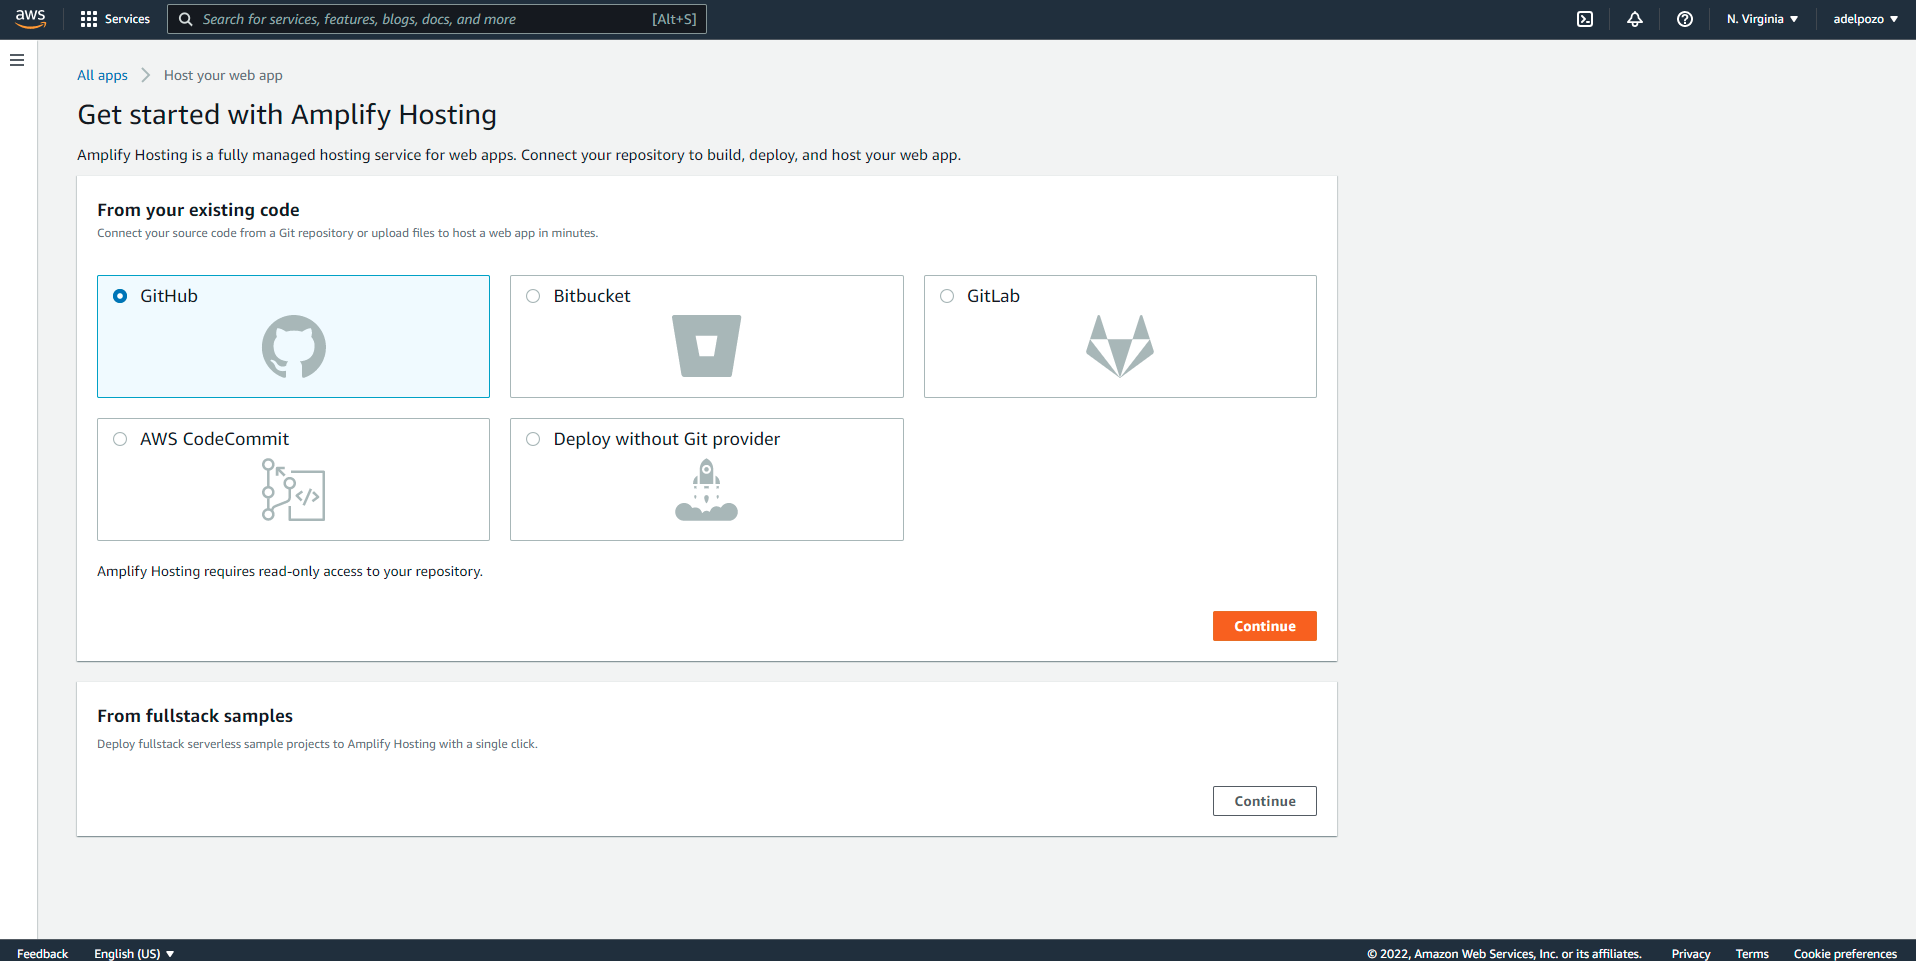
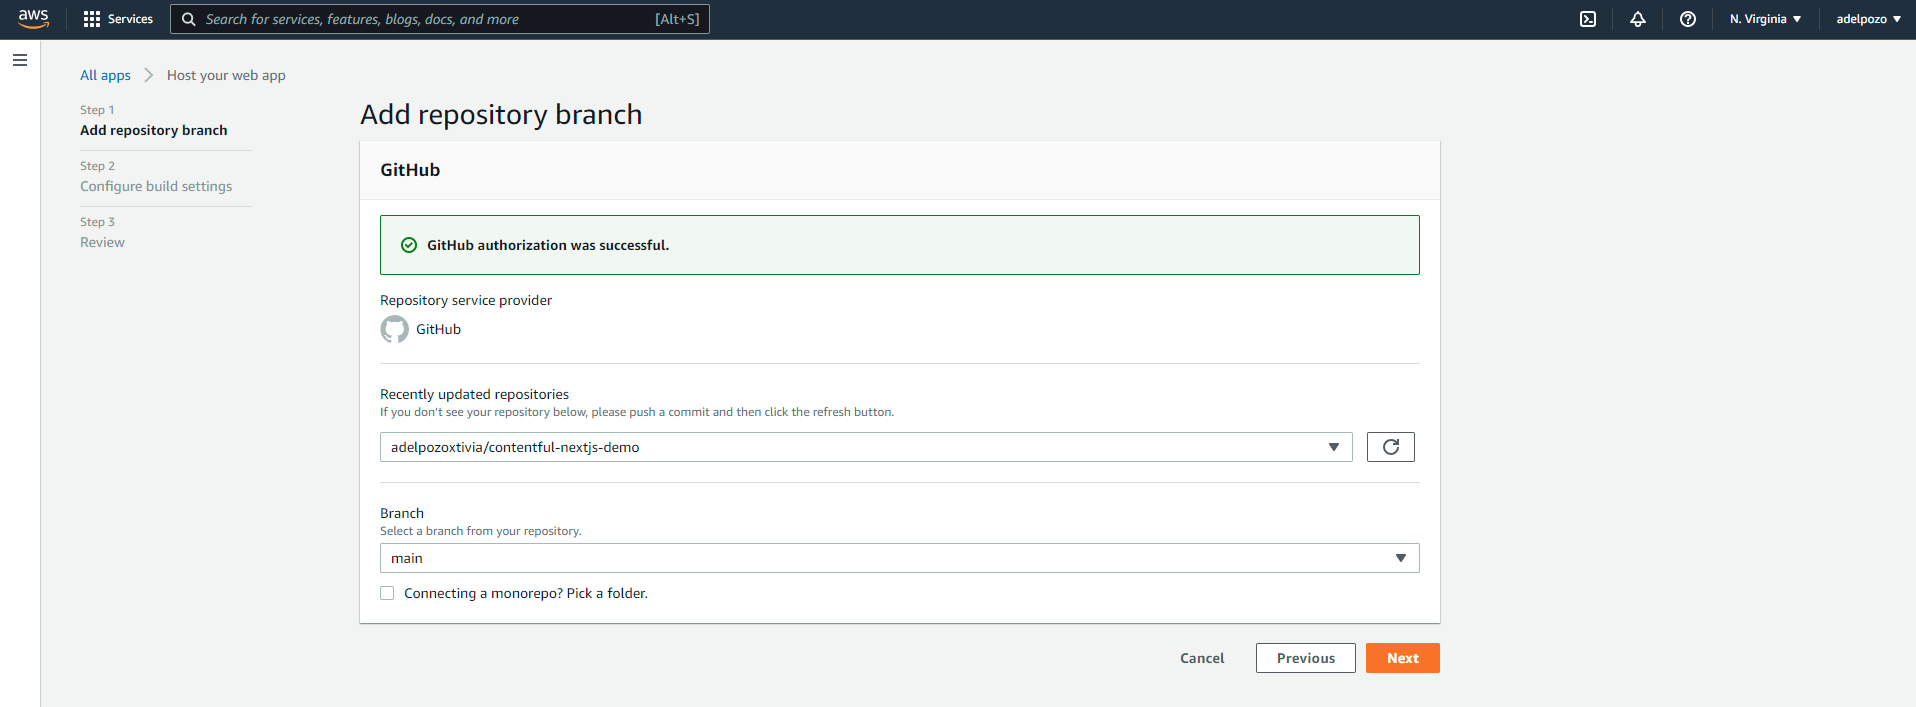
4. The host wizard will guide you through the process. In our case, we will link the Github account, for what you will need to sign in with your account.
![AWS Amplify Contentful NextJS tutorial GitHub linked account screenshot](https://www.xtivia.com/wp-content/uploads/aws-amplify-contentful-nextjs-tutorial-github-linked-account-screenshot3.png)
5. Once the Github account is linked, you will need to select the particular repository and branch that will be used.
![AWS Amplify Contentful NextJS tutorial repository branch screenshot](https://www.xtivia.com/wp-content/uploads/aws-amplify-contentful-nextjs-tutorial-repository-branch-screenshot4.png)
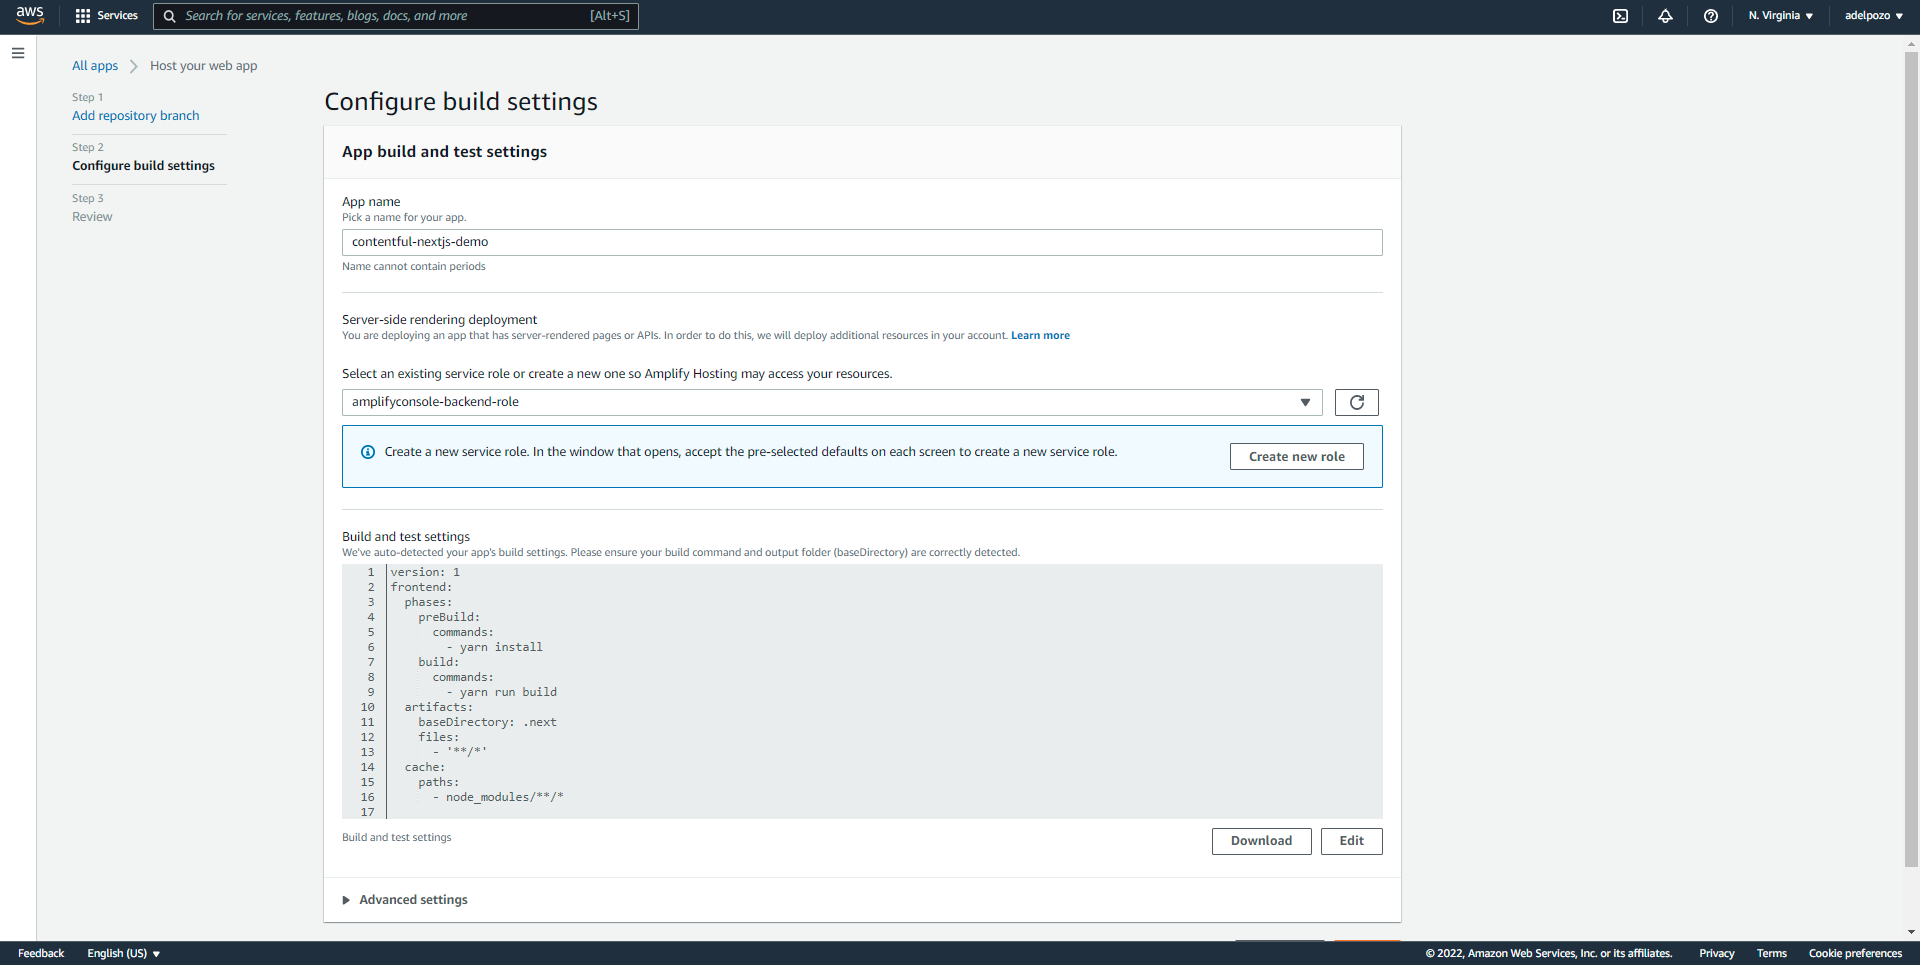
6. Then, you will be asked to name your app, select or create a new service role, and add environment variables as needed.
![AWS Amplify Contentful NextJS tutorial configure build settings screenshot](https://www.xtivia.com/wp-content/uploads/aws-amplify-contentful-nextjs-tutorial-configure-build-settings-screenshot5.png)
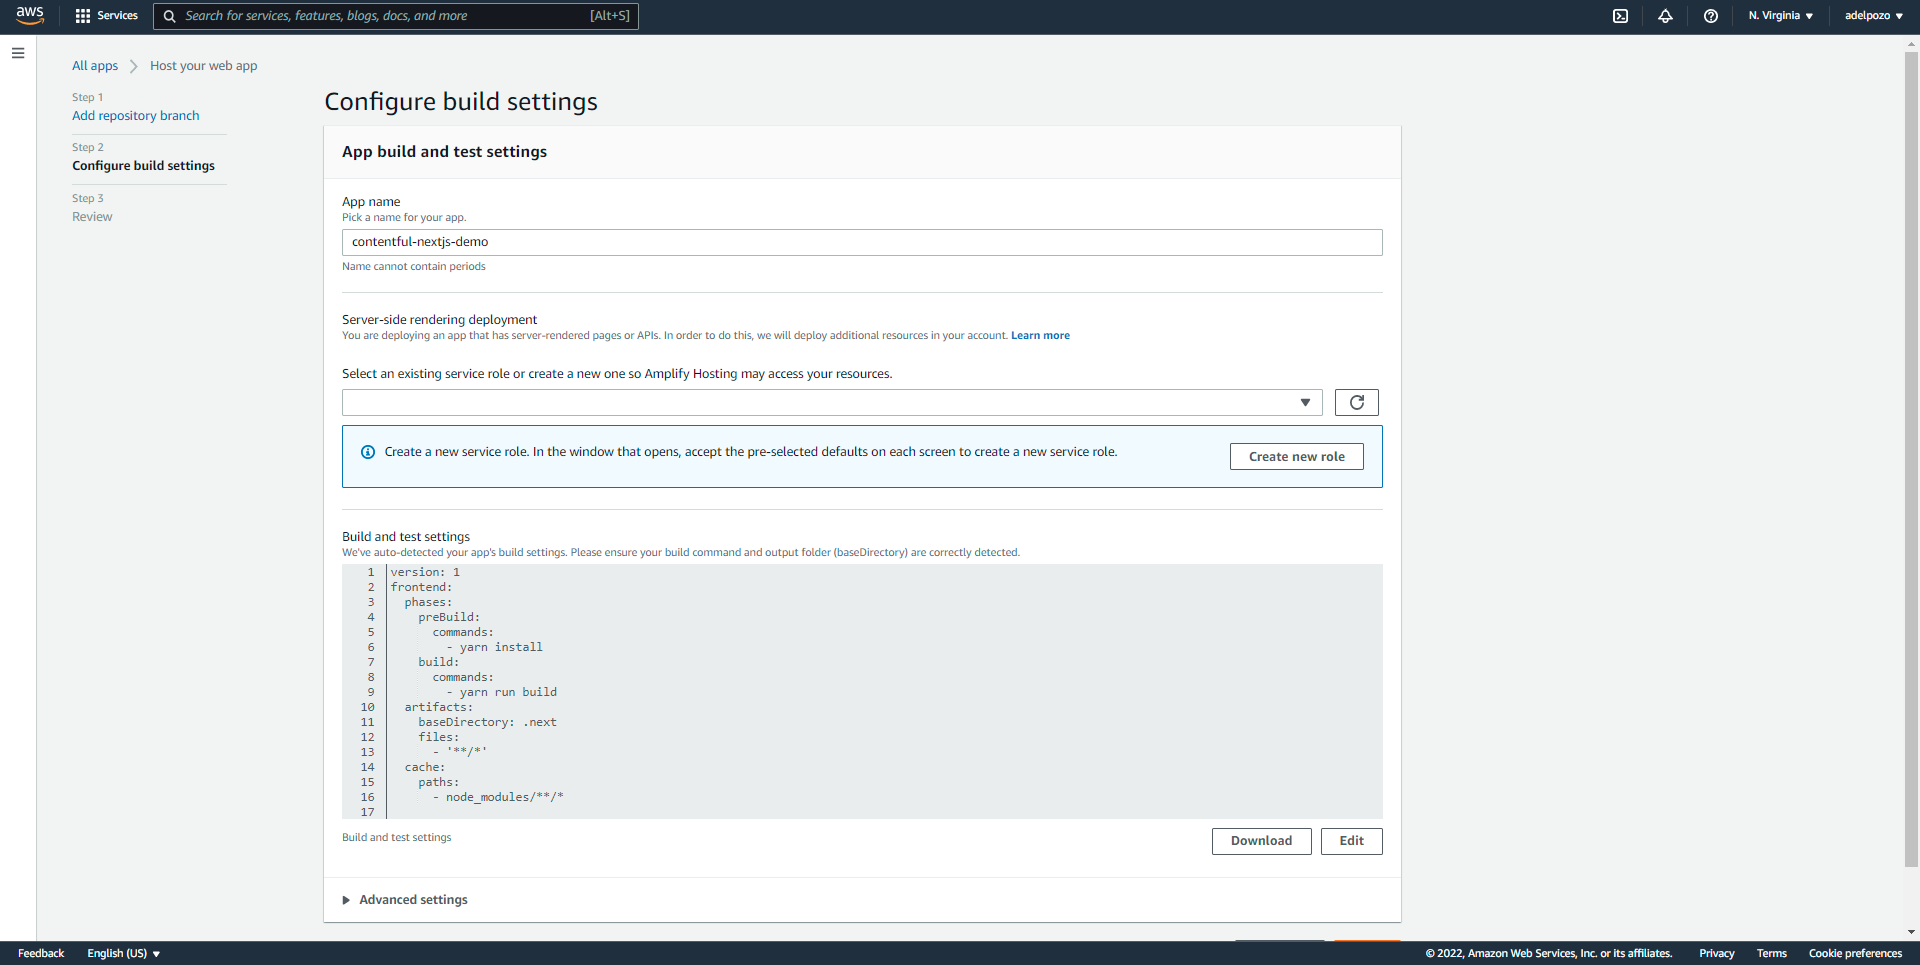
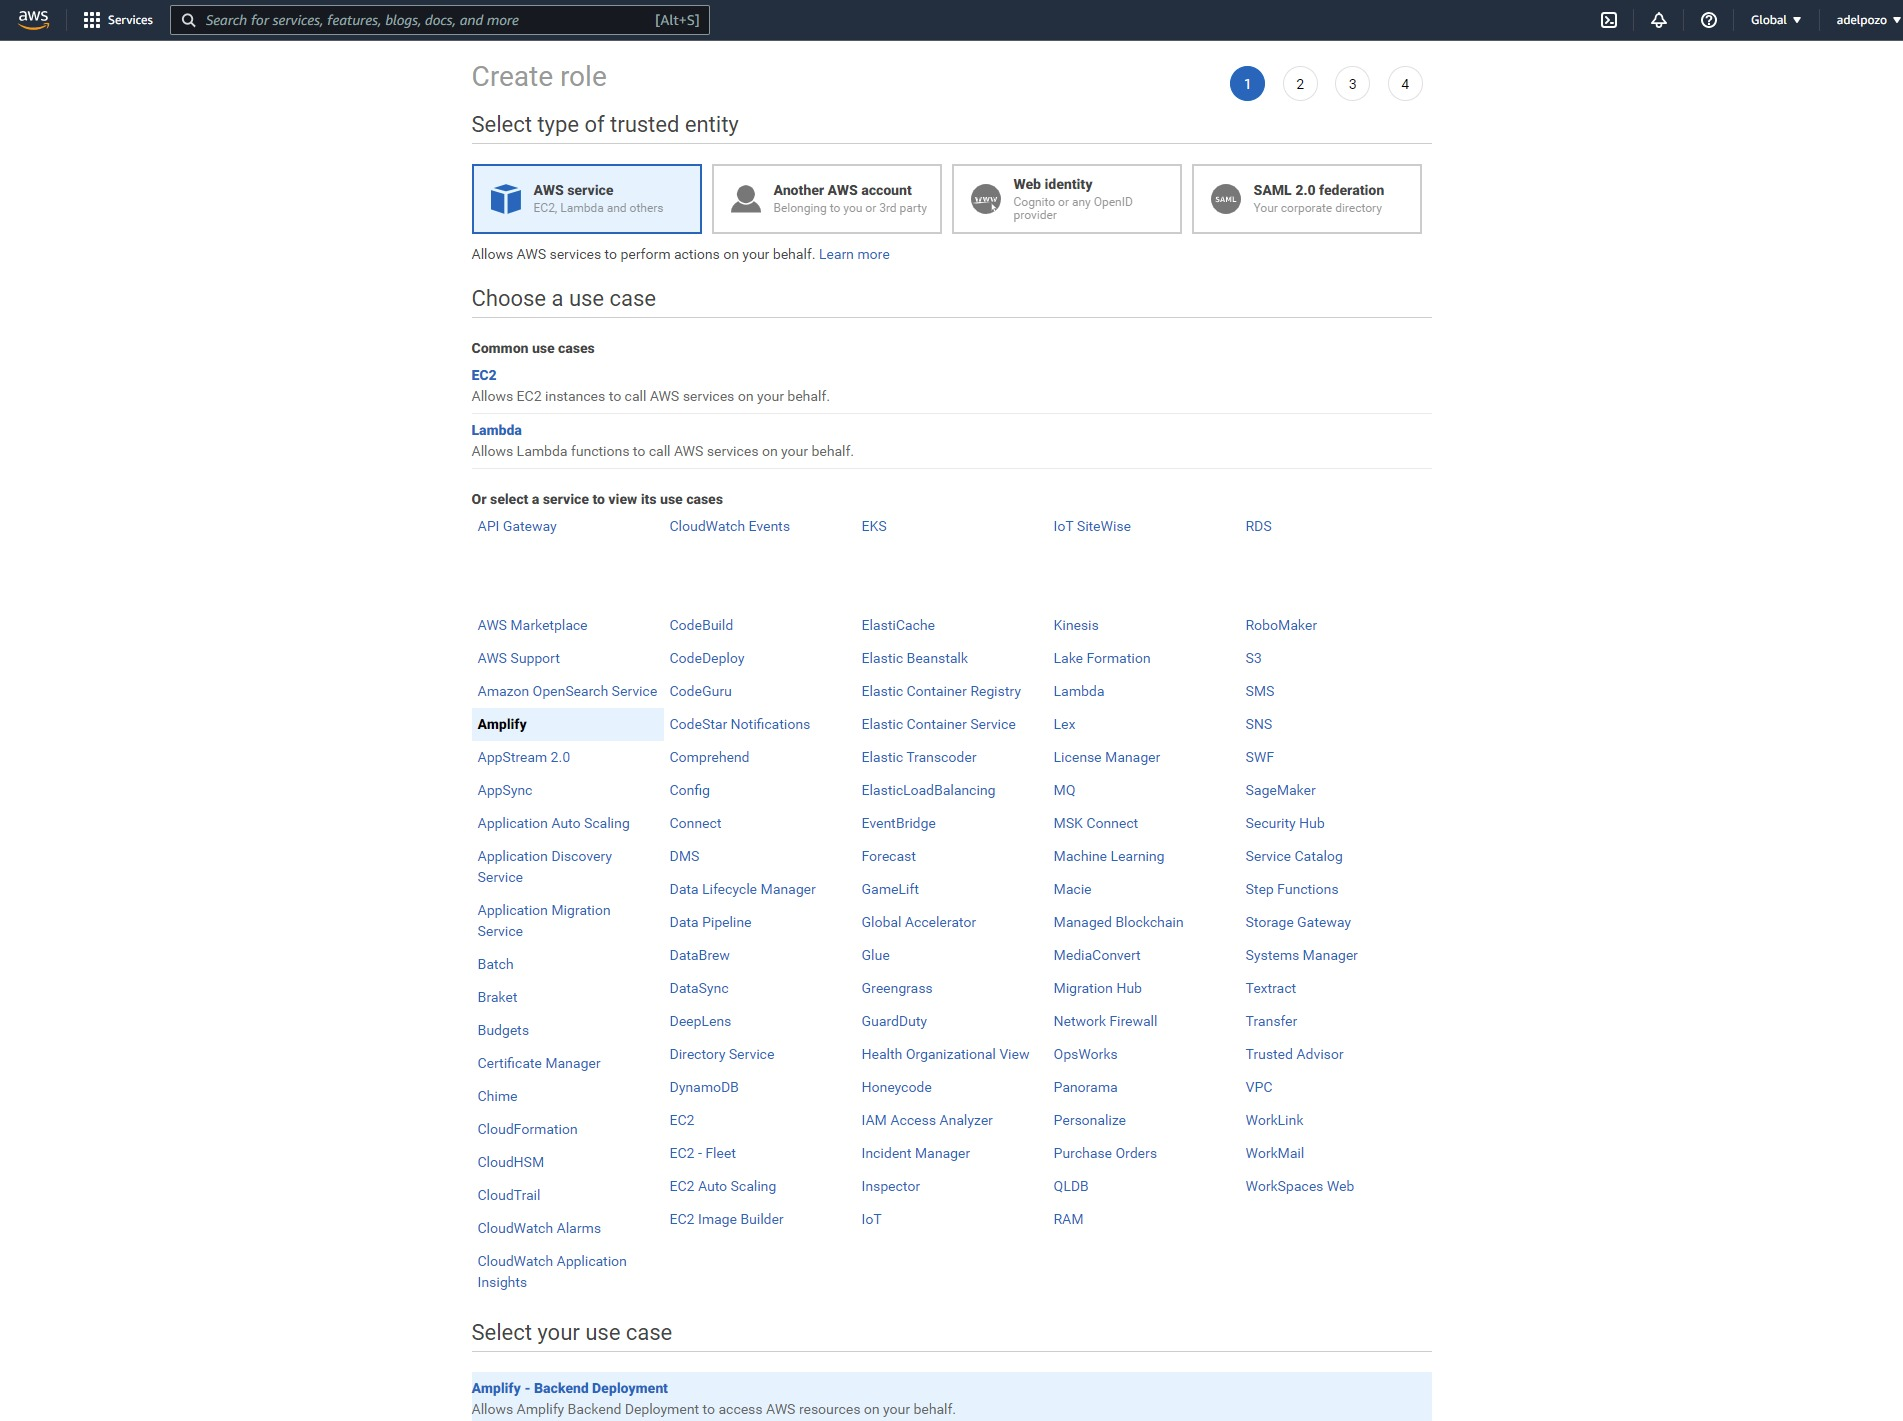
7. If it is the first time you configure Amplify, you may need to create or select a new role, so Amplify can access the resources.
![AWS Amplify Contentful NextJS tutorial create role screenshot](https://www.xtivia.com/wp-content/uploads/aws-amplify-contentful-nextjs-tutorial-create-role-screenshot6.png)
Make sure that the role is for Amplify, and that it has AdministratorAccess-Amplify permissions.
![AWS Amplify Contentful NextJS tutorial AdministratorAccess Amplify permissions screenshot](https://www.xtivia.com/wp-content/uploads/aws-amplify-contentful-nextjs-tutorial-administratoraccess-amplify-permissions-screenshot7.png)
![AWS Amplify Contentful NextJS tutorial AdministratorAccess Amplify permissions screenshot](https://www.xtivia.com/wp-content/uploads/aws-amplify-contentful-nextjs-tutorial-administratoraccess-amplify-permissions-screenshot8-1920x615.png)
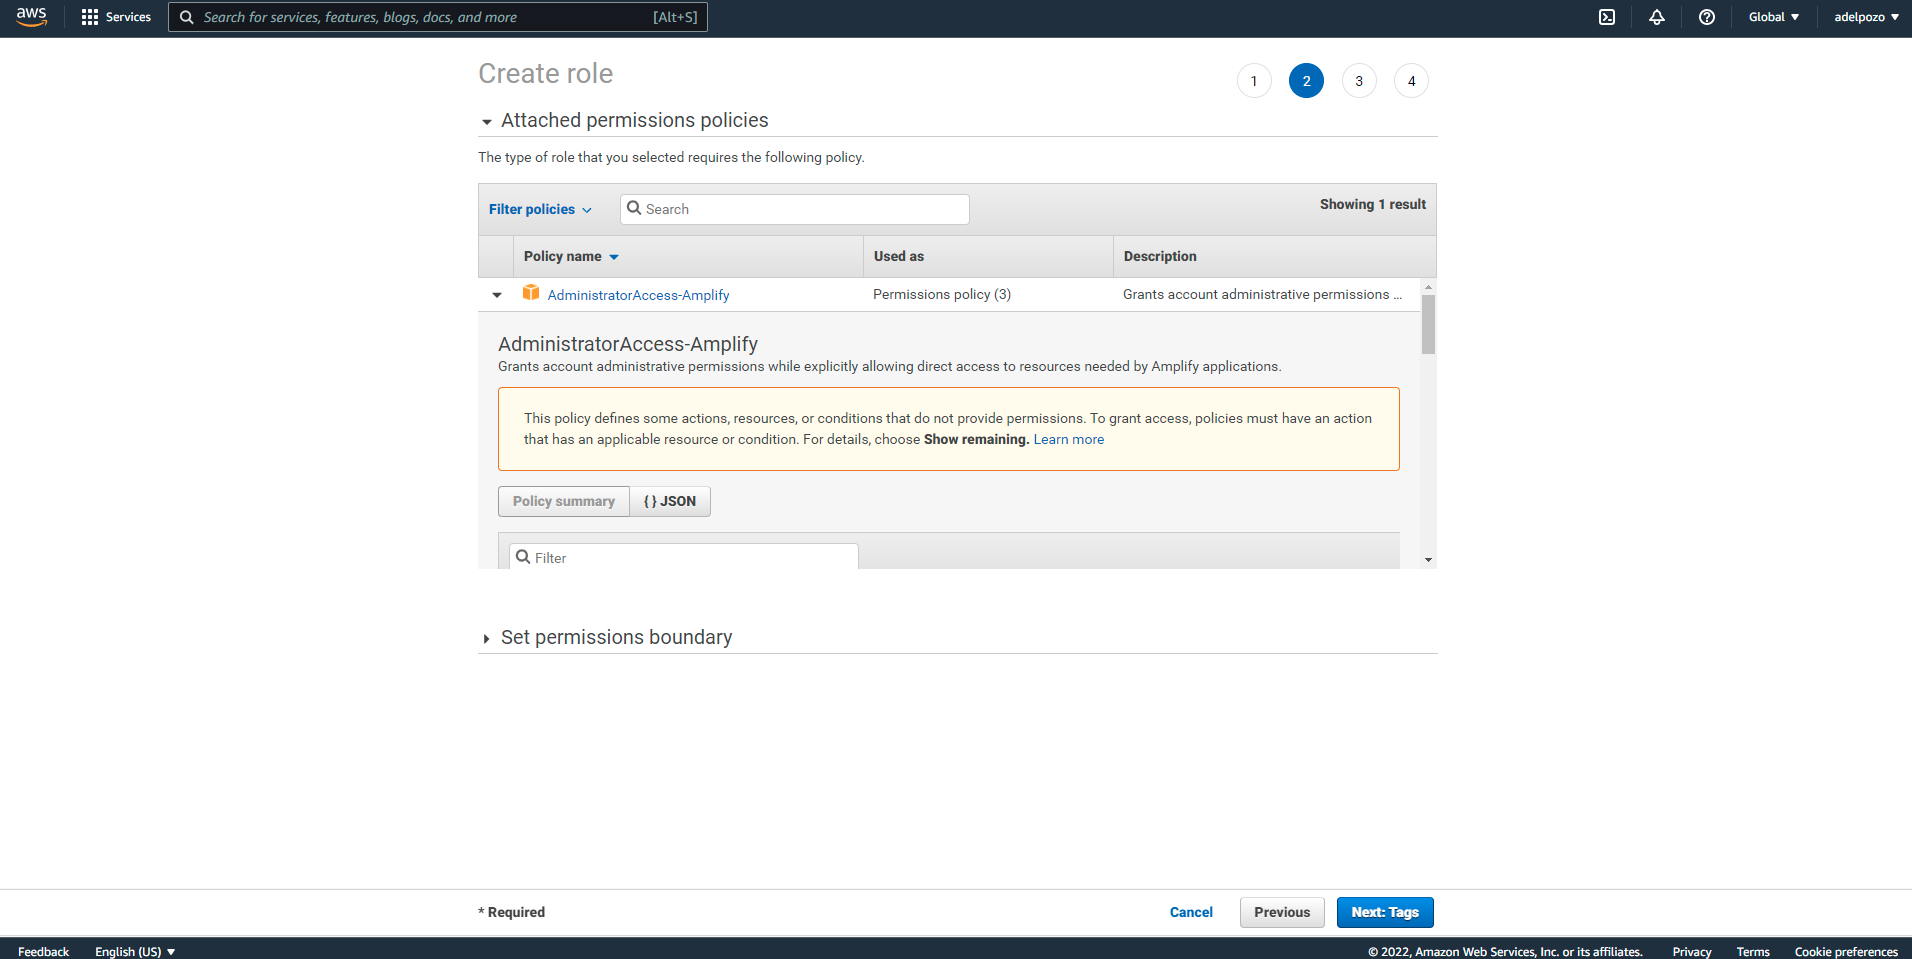
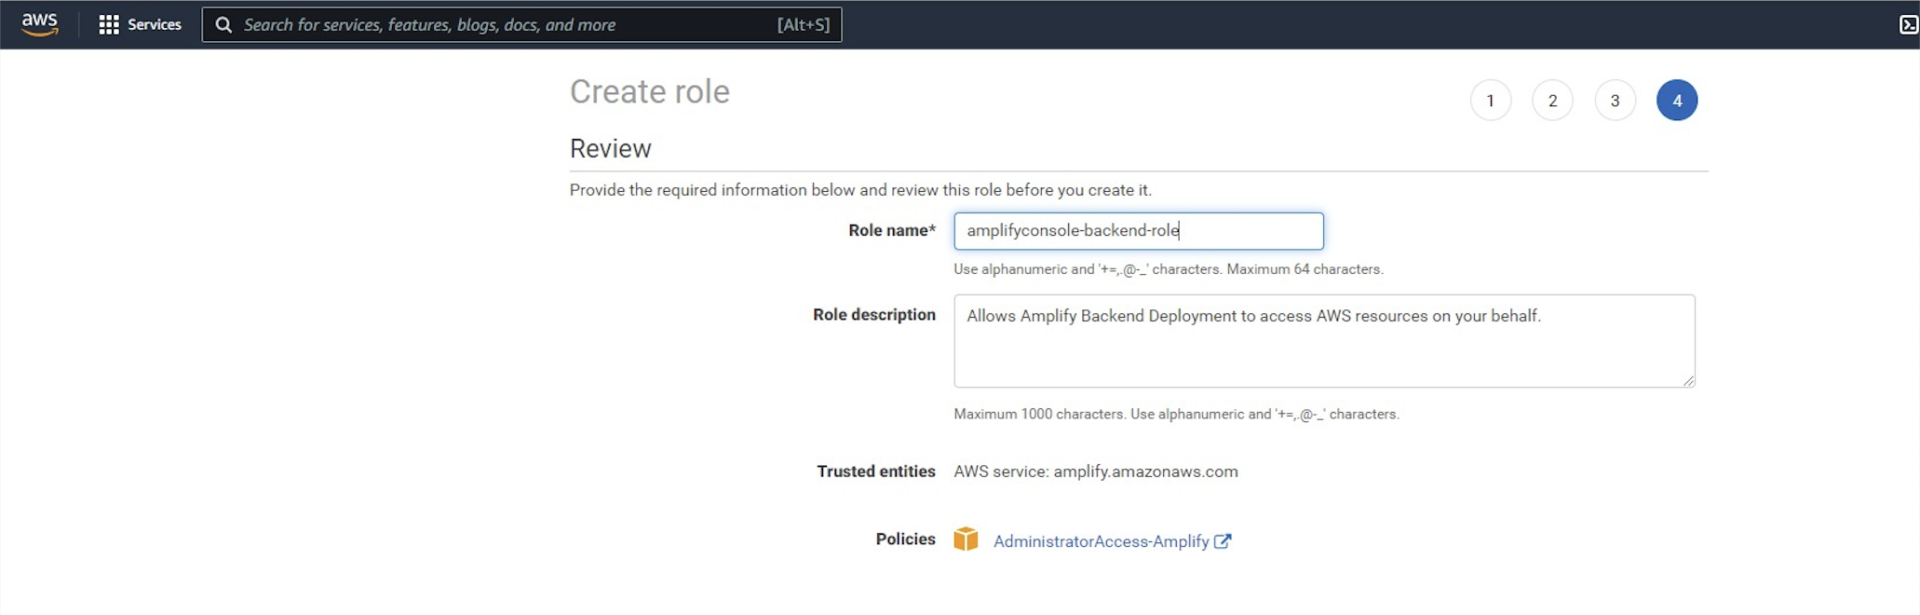
Once that is set, select the recently created role in Amplify.
![AWS Amplify Contentful NextJS tutorial select created role screenshot](https://www.xtivia.com/wp-content/uploads/aws-amplify-contentful-nextjs-tutorial-select-created-role-screenshot9.png)
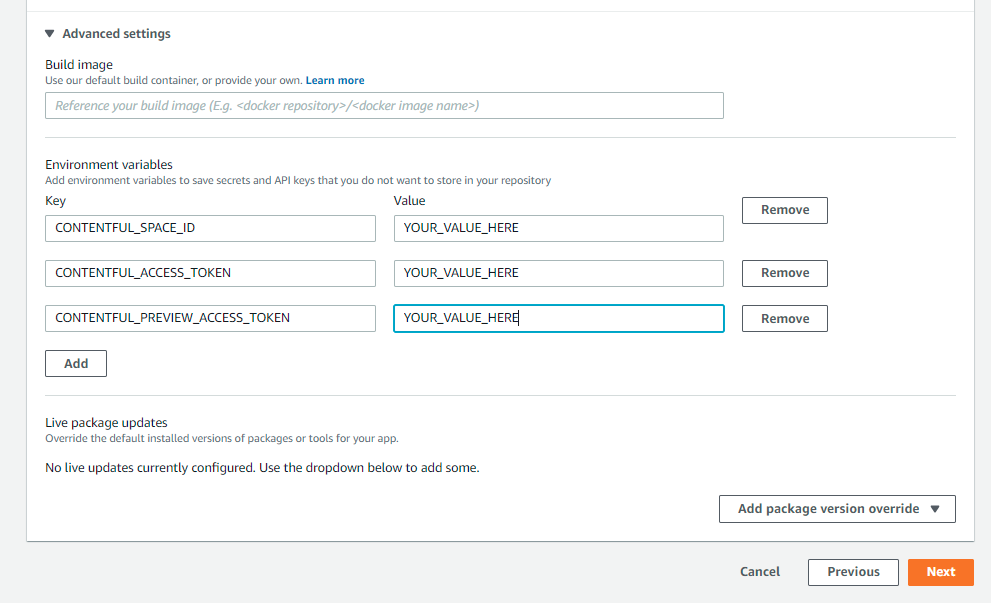
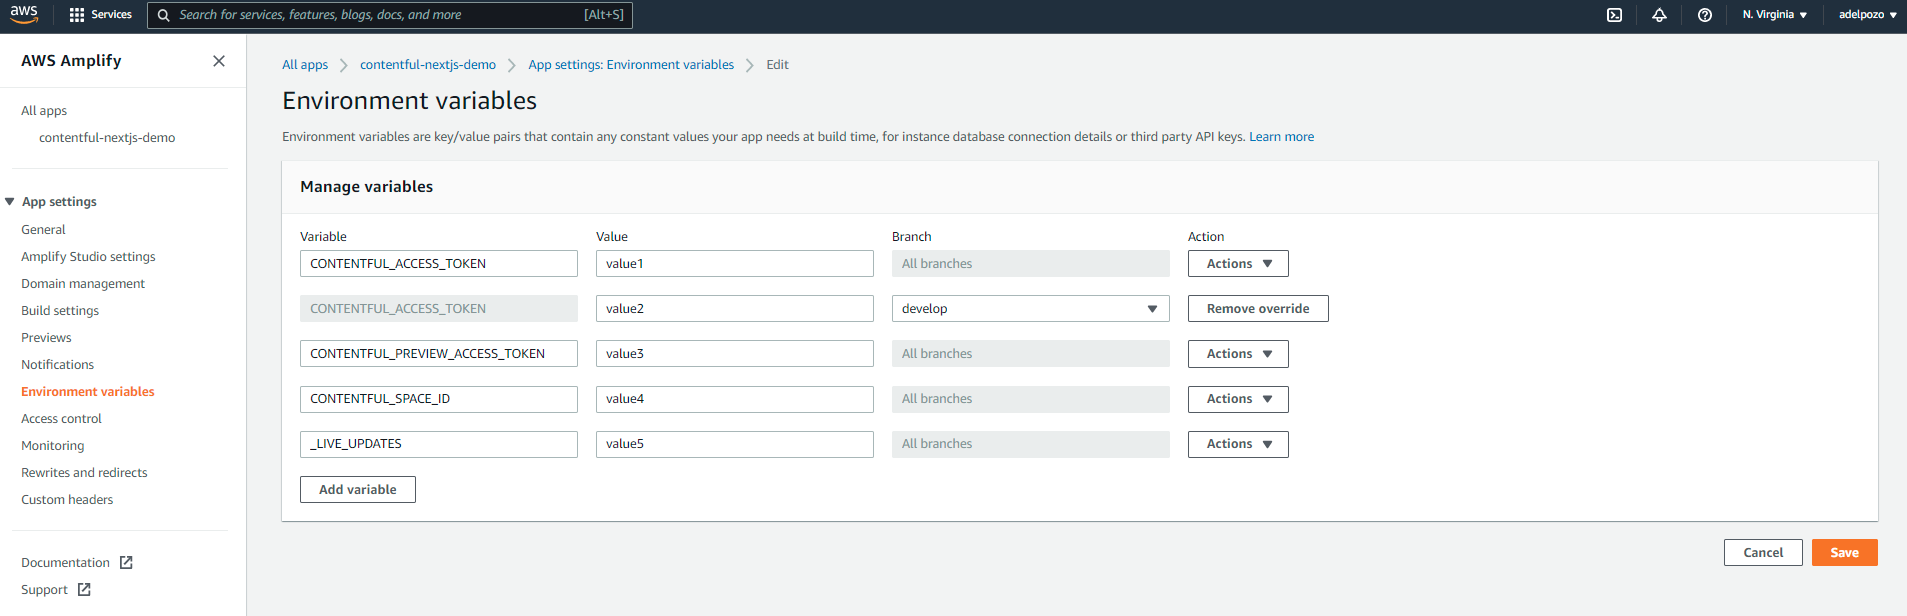
For the Next.js application to work with Contentful, we also need to configure the environment variables. For this, use the Advanced Settings option, adding ids and tokens as needed:
![AWS Amplify Contentful NextJS tutorial configure environment variables screenshot](https://www.xtivia.com/wp-content/uploads/aws-amplify-contentful-nextjs-tutorial-configure-environment-variables-screenshot10.png)
8. Once that is completed, review and save.
![AWS Amplify Contentful NextJS tutorial review screenshot](https://www.xtivia.com/wp-content/uploads/aws-amplify-contentful-nextjs-tutorial-review-screenshot11.png)
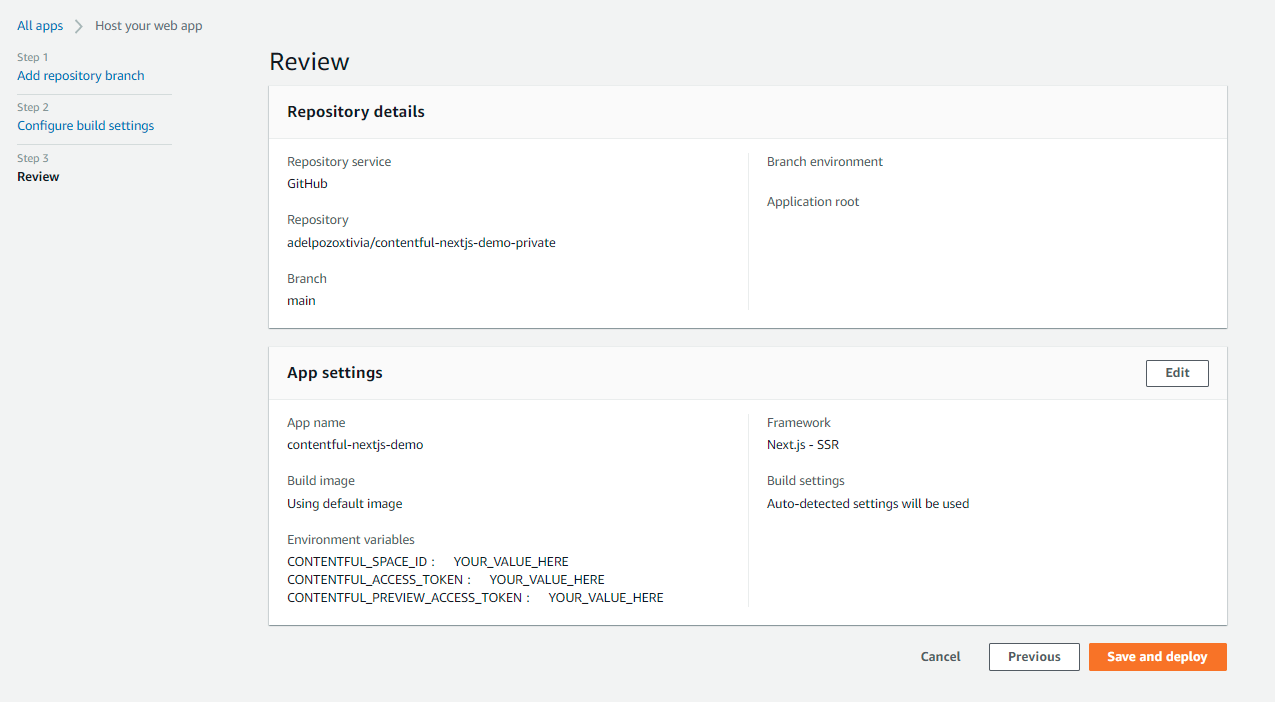
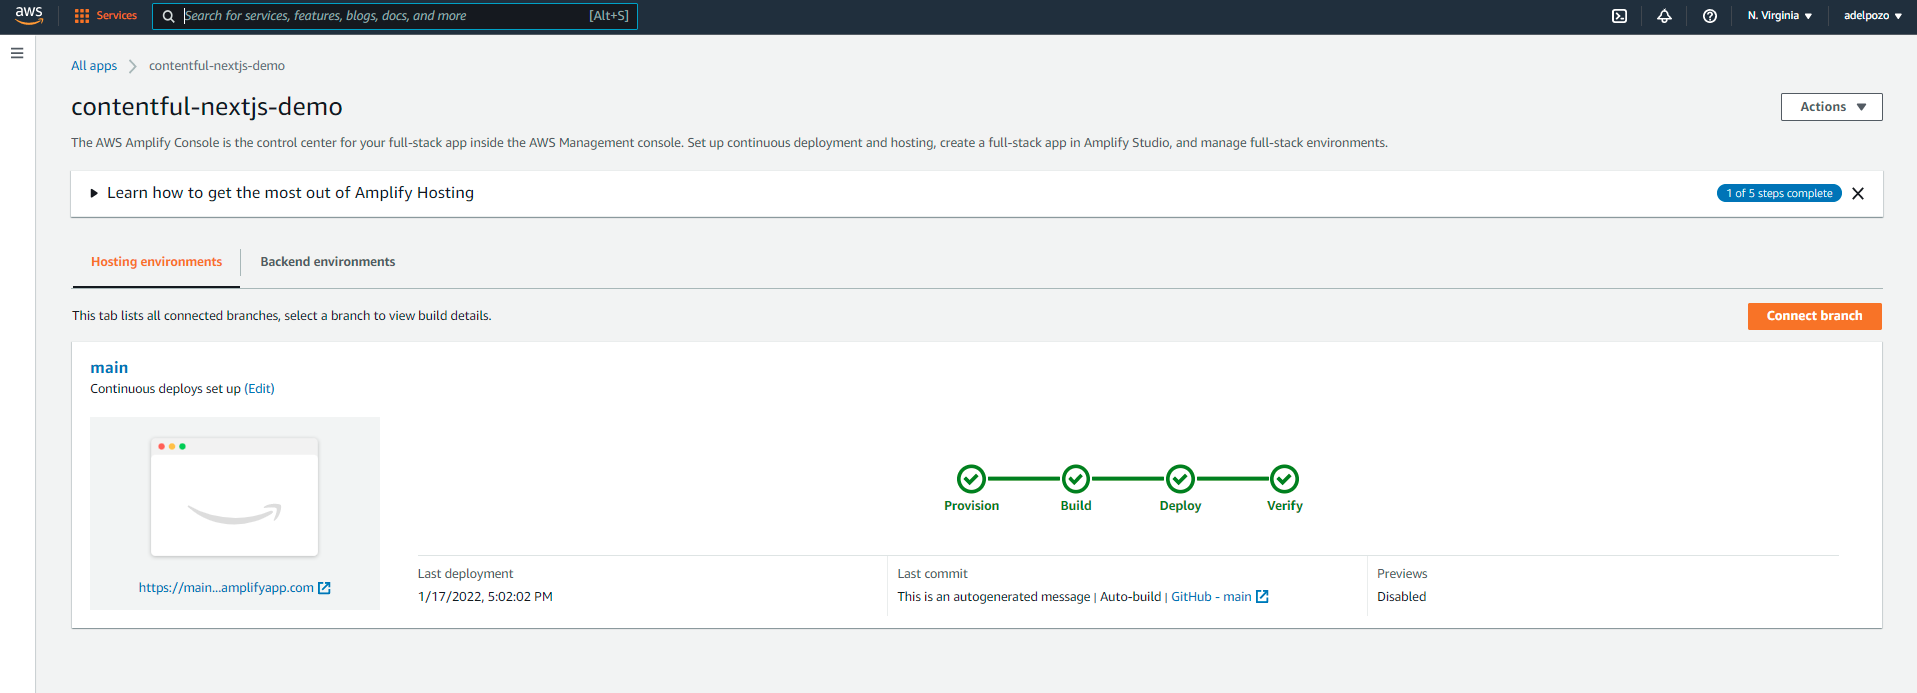
Once clicked on the “Save and deploy” button, Amplify will connect to the Github repository, build and deploy the application.
![AWS Amplify Contentful NextJS tutorial connecting screenshot](https://www.xtivia.com/wp-content/uploads/aws-amplify-contentful-nextjs-tutorial-connecting-screenshot12.png)
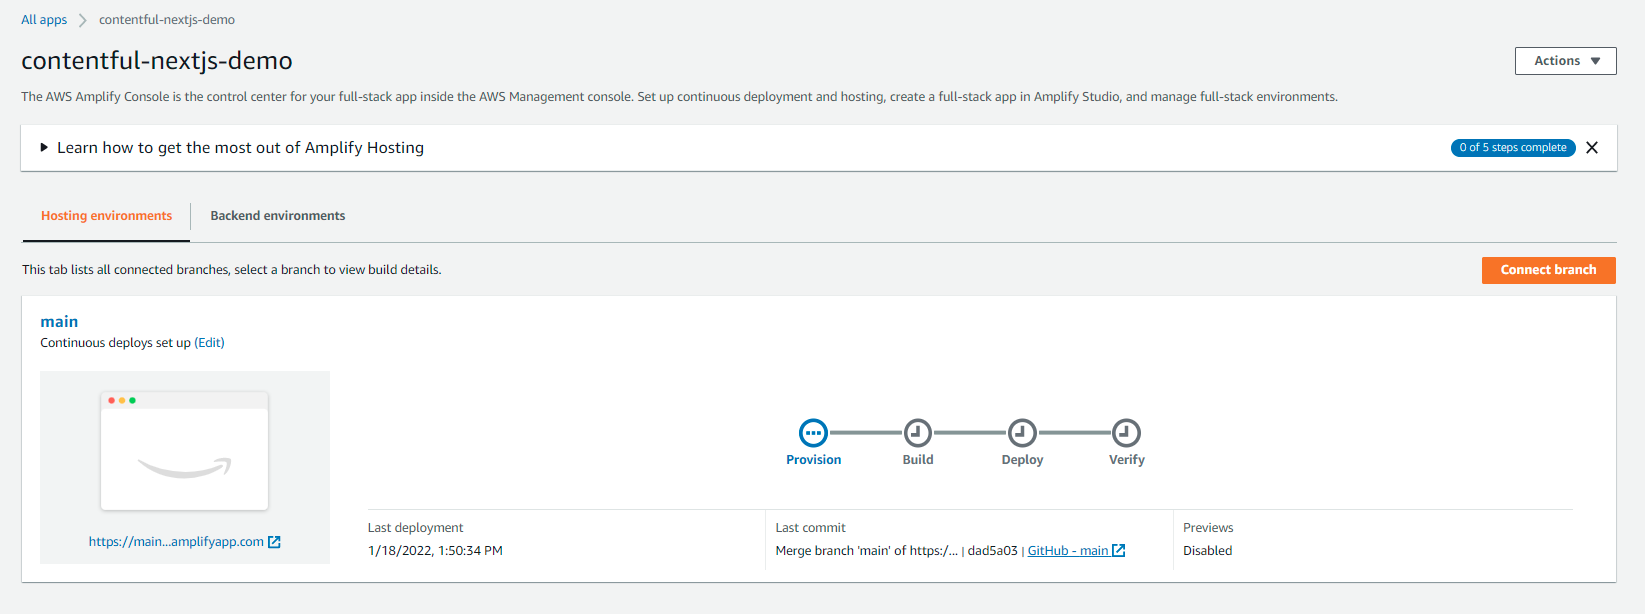
Once the process is completed, the application will be automatically available at an automatically created production branch URL, similar to https://main.q1w2e3r4t5y6u7i8o9p0.amplifyapp.com.
![AWS Amplify Contentful NextJS tutorial](https://www.xtivia.com/wp-content/uploads/aws-amplify-contentful-nextjs-tutorial-completed-screenshot13.png)
Build the Playground Automatically
Creating the application as explained above will allow for automatic deployment. This means that every time a commit is pushed to the repository, the application will be built.
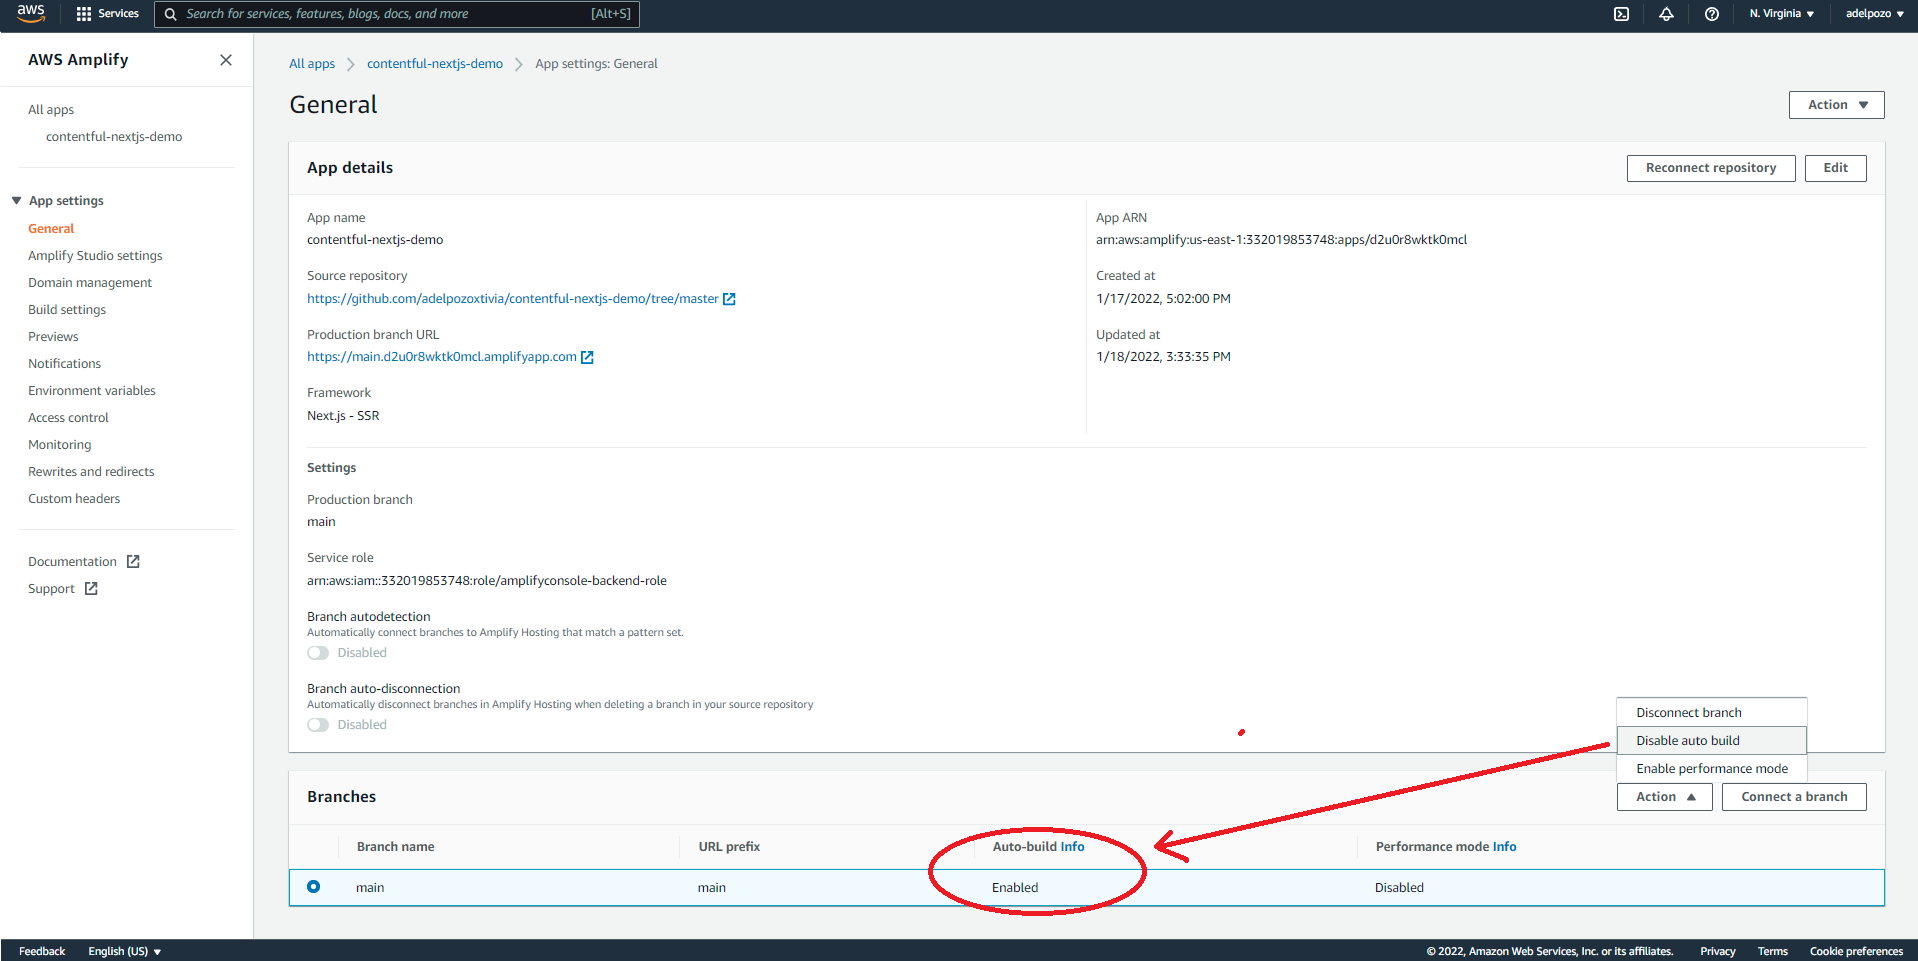
To check this configuration, go to Actions > App settings:
![AWS Amplify Contentful NextJS tutorial app settings screenshot](https://www.xtivia.com/wp-content/uploads/aws-amplify-contentful-nextjs-tutorial-app-settings-screenshot14.png)
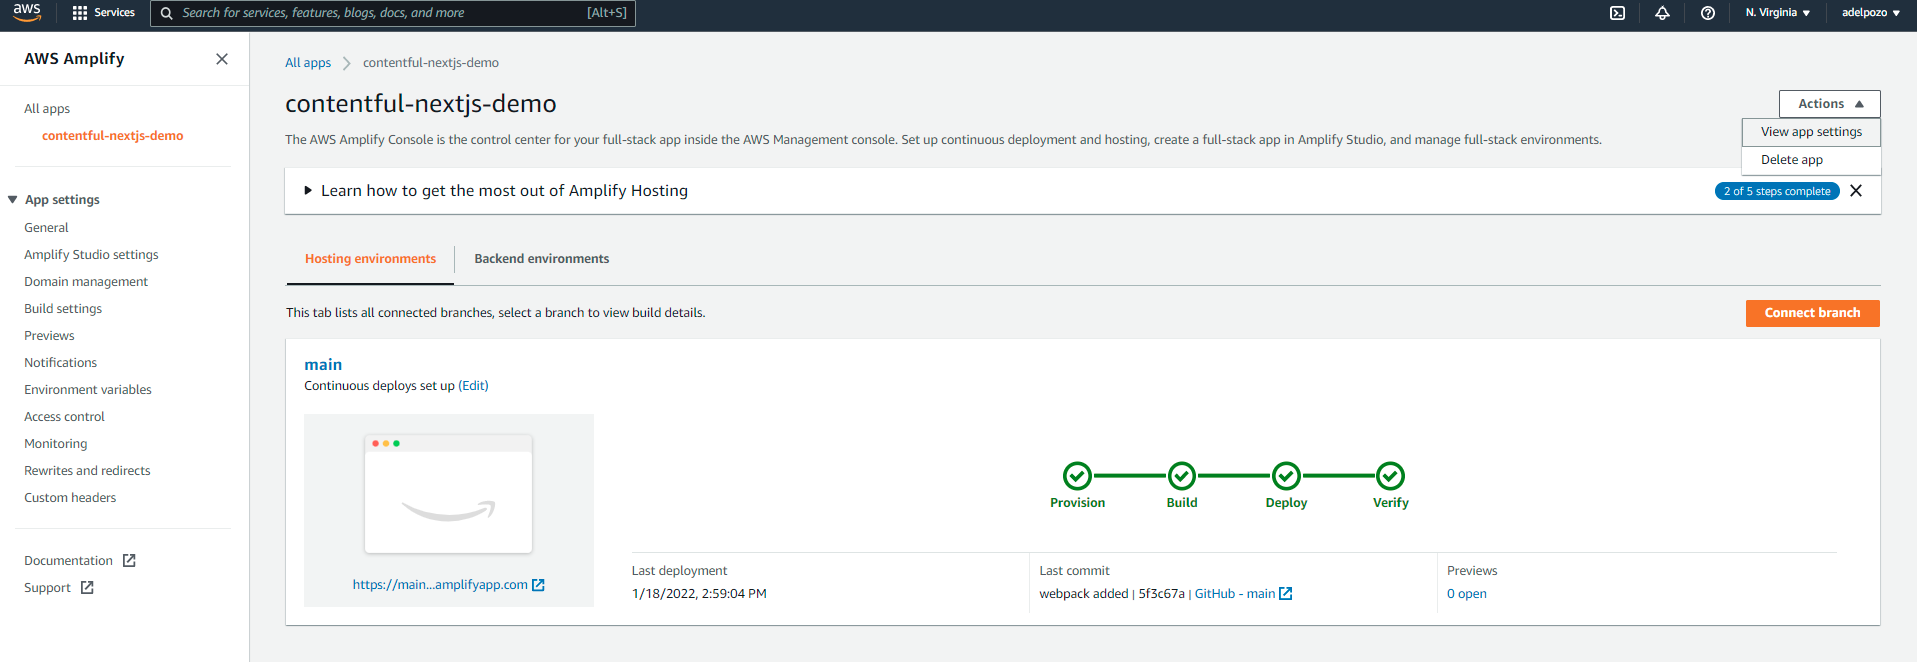
There, it is possible to enable/disable the continuous integration feature.
![AWS Amplify Contentful NextJS tutorial continuous integration feature screenshot](https://www.xtivia.com/wp-content/uploads/aws-amplify-contentful-nextjs-tutorial-continuous-integration-feature-screenshot15.png)
However, in my particular case, working with a forked project, it has been noticed that if the Github fork is updated with the code from the original repository, using the fetch-upstream option, the build is not triggered.
![AWS Amplify Contentful NextJS tutorial Fetch upstream screenshot](https://www.xtivia.com/wp-content/uploads/aws-amplify-contentful-nextjs-tutorial-fetch-upstream-screenshot16.png)
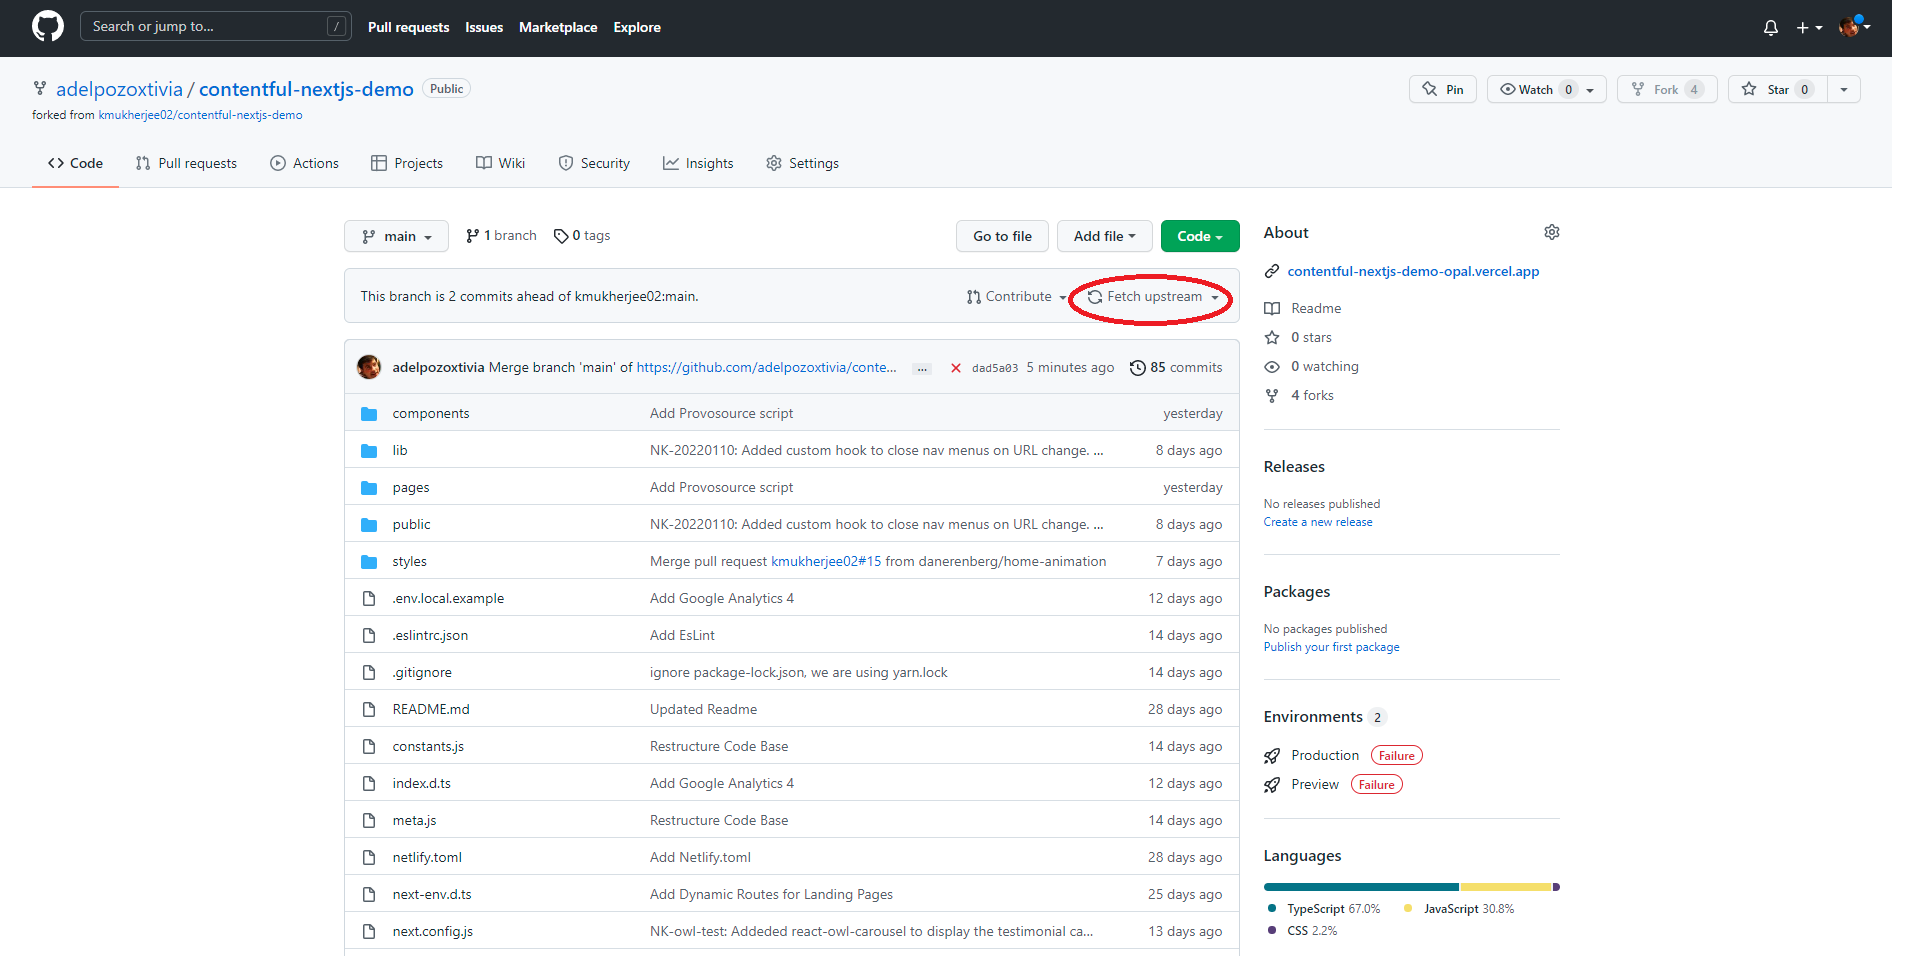
You need to actually pull the code locally, commit something and push it, for the trigger to happen.
Name Your Playground
Amplify builds automatically a default URL for the app, but it is possible to add a custom domain with a free SSL certificate to it.
![AWS Amplify Contentful NextJS tutorial custom domain screenshot](https://www.xtivia.com/wp-content/uploads/aws-amplify-contentful-nextjs-tutorial-custom-domain-screenshot17.png)
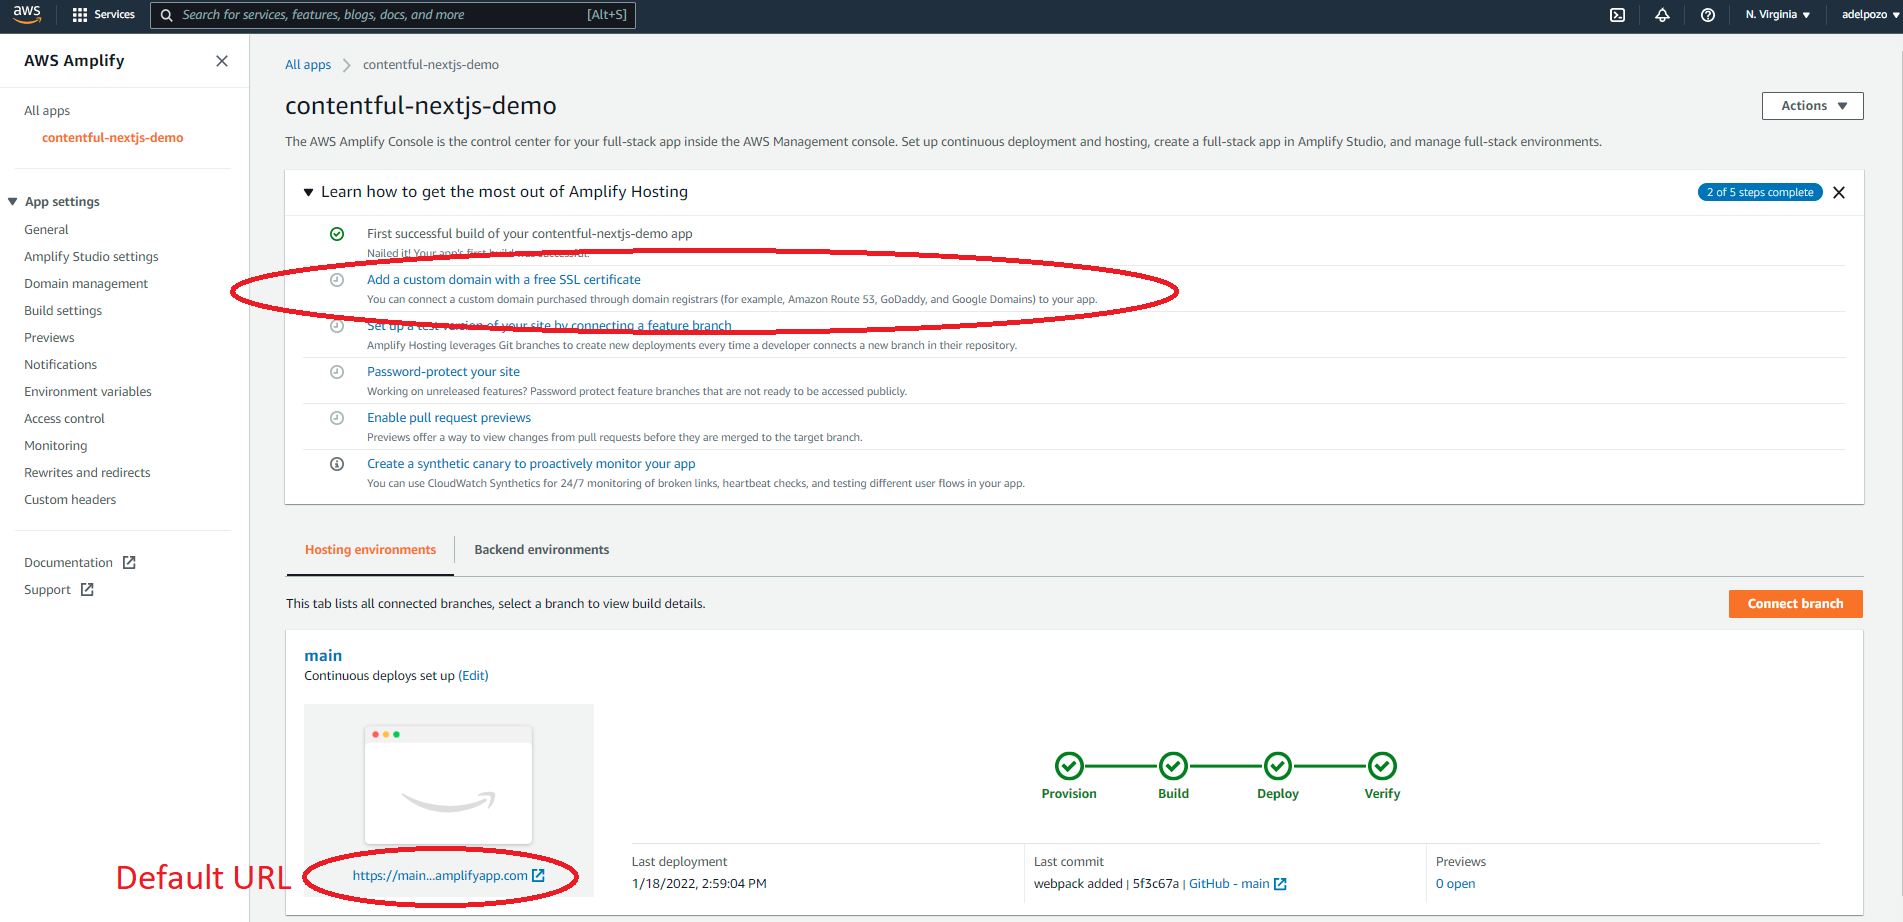
The process seems to be simple, and can be started from the main view or the “Domain management” section from the App settings menu:
![AWS Amplify Contentful NextJS tutorial domain management screenshot](https://www.xtivia.com/wp-content/uploads/aws-amplify-contentful-nextjs-tutorial-domain-management-screenshot18.png)
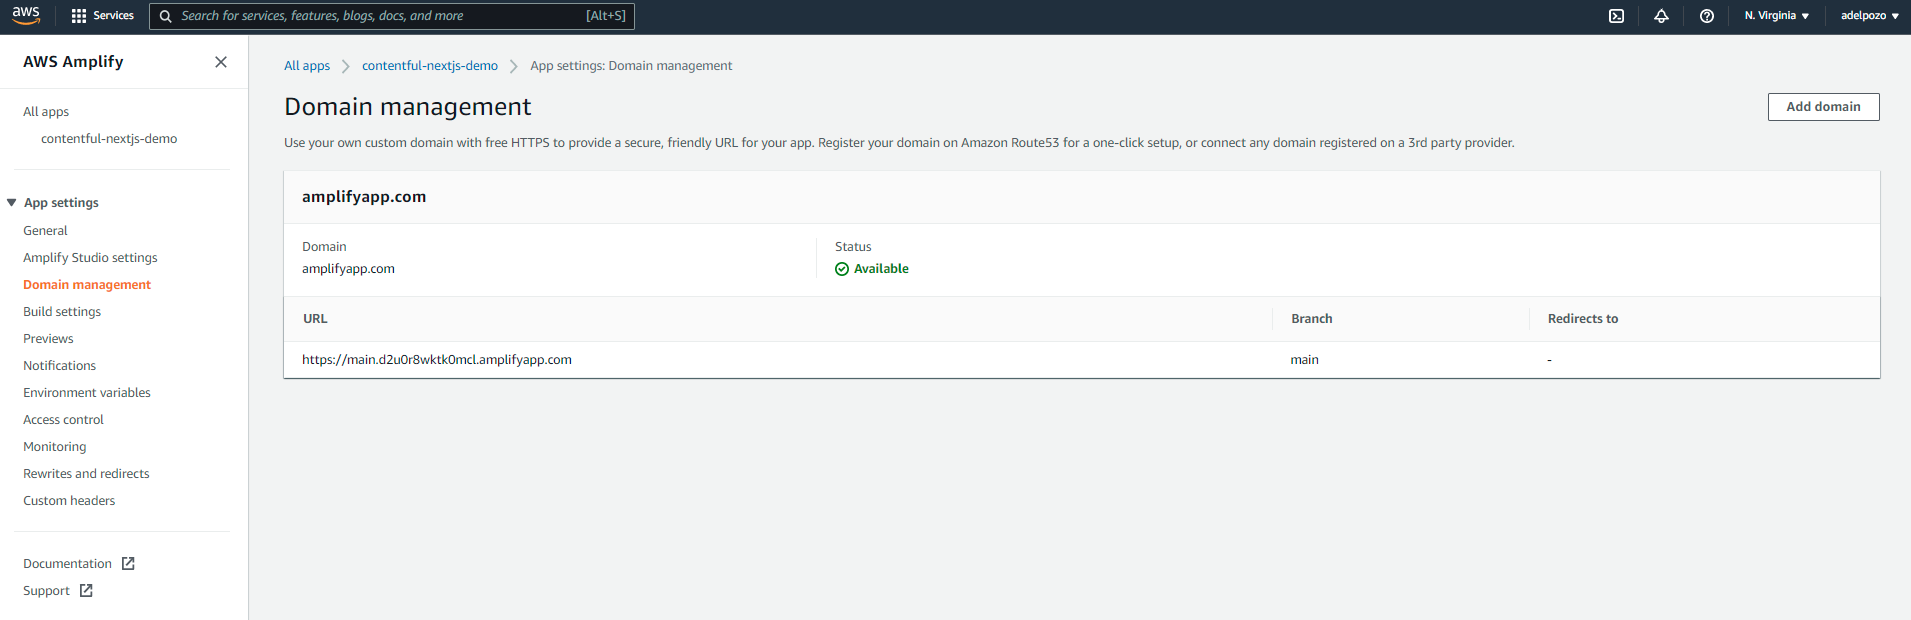
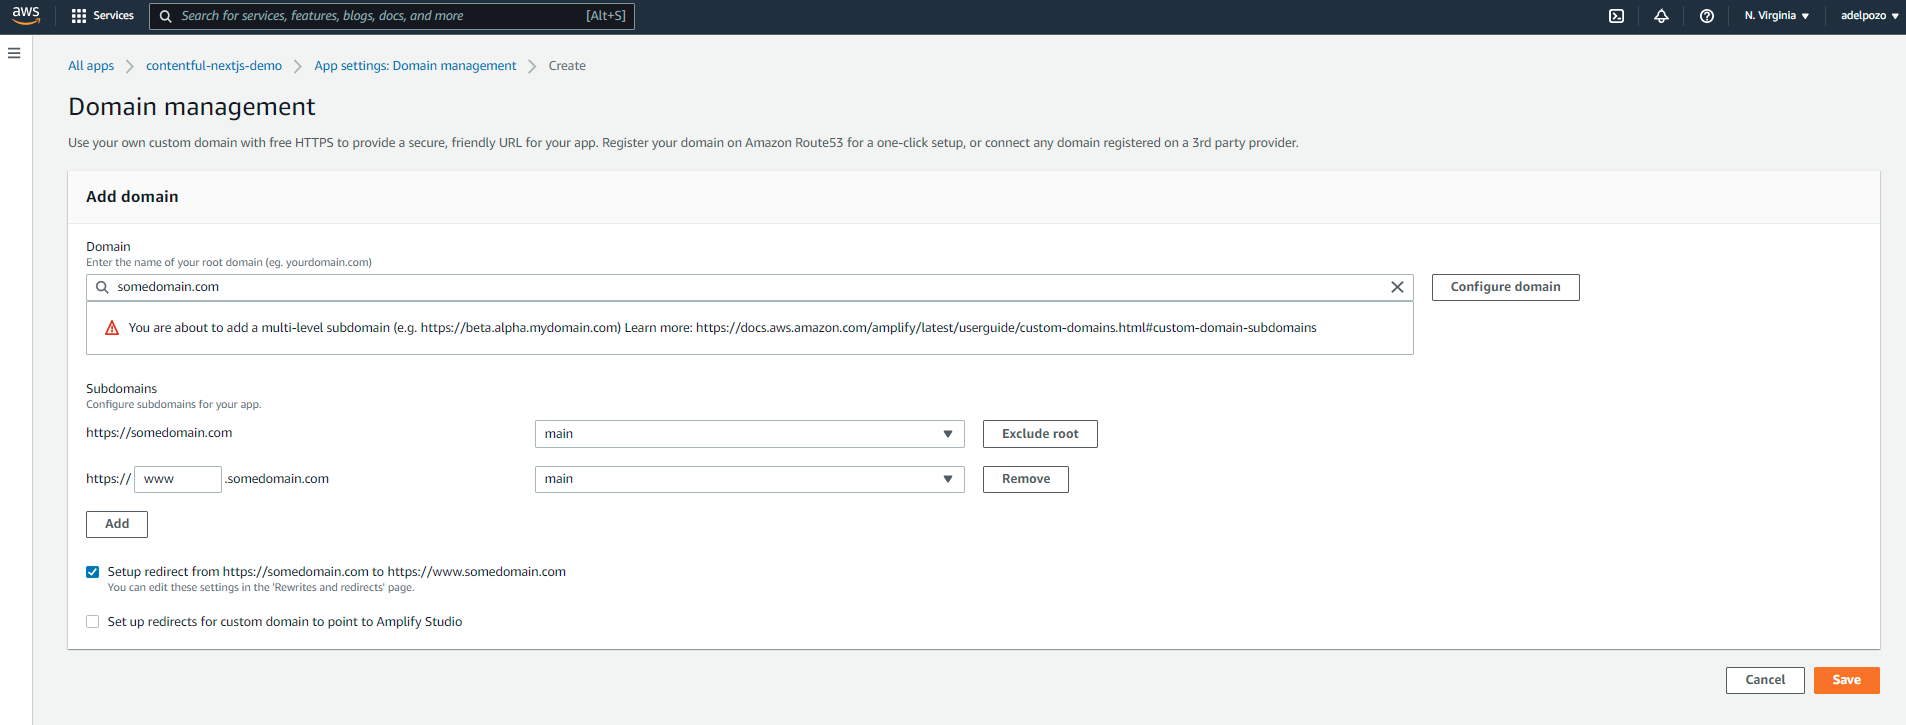
Click on add domain to access to the domain management section, where you can add and manage custom domains. Subdomains can be added also for branches if using multiple branch app hosting. Which would be a good idea, right? So you can actually push code to the development environment, test it, merge to main, and have production built automatically.
![AWS Amplify Contentful NextJS tutorial add domain screenshot](https://www.xtivia.com/wp-content/uploads/aws-amplify-contentful-nextjs-tutorial-add-domain-screenshot19.png)
More information can be found here: https://docs.aws.amazon.com/amplify/latest/userguide/custom-domains.html.
Check that the Playground Works
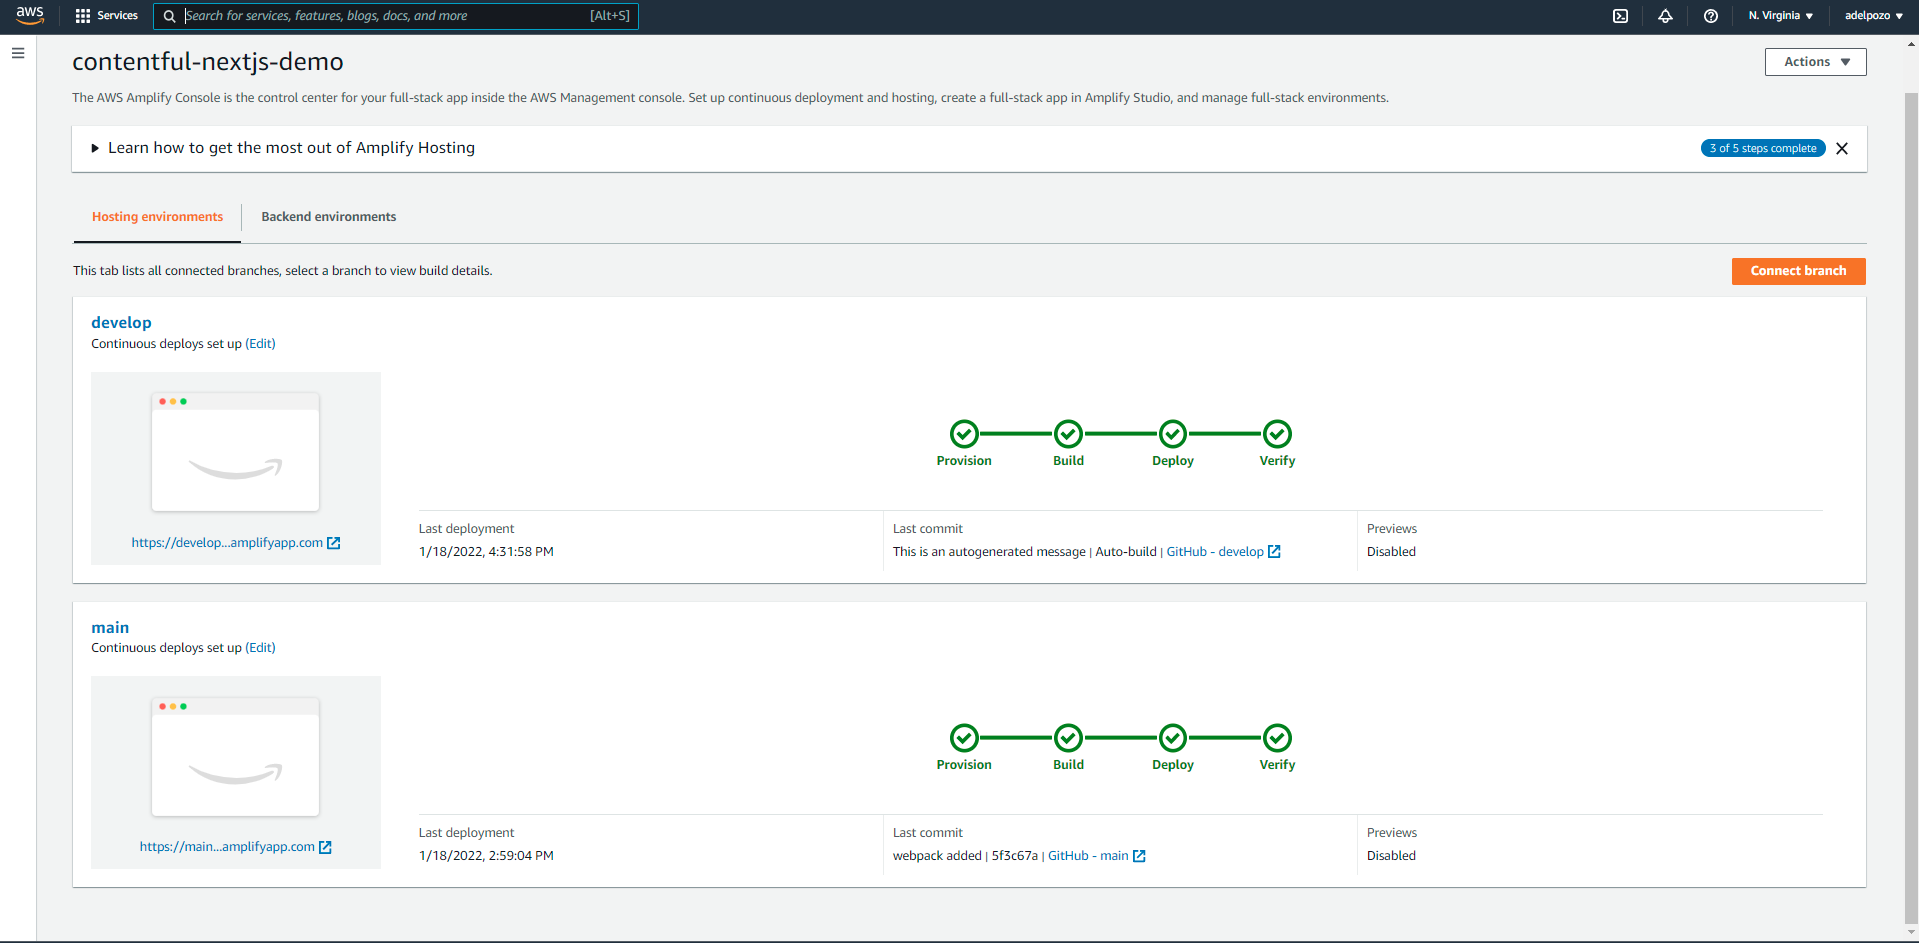
Once the application is created, it is possible to create multiple environments within the same app, using subdomains that Amplify provides, or custom ones through the custom domain feature.
Create A New Test Environment
For this, click on the “Connect Branch” feature:
![AWS Amplify Contentful NextJS tutorial connect branch screenshot](https://www.xtivia.com/wp-content/uploads/aws-amplify-contentful-nextjs-tutorial-connect-branch-screenshot20.png)
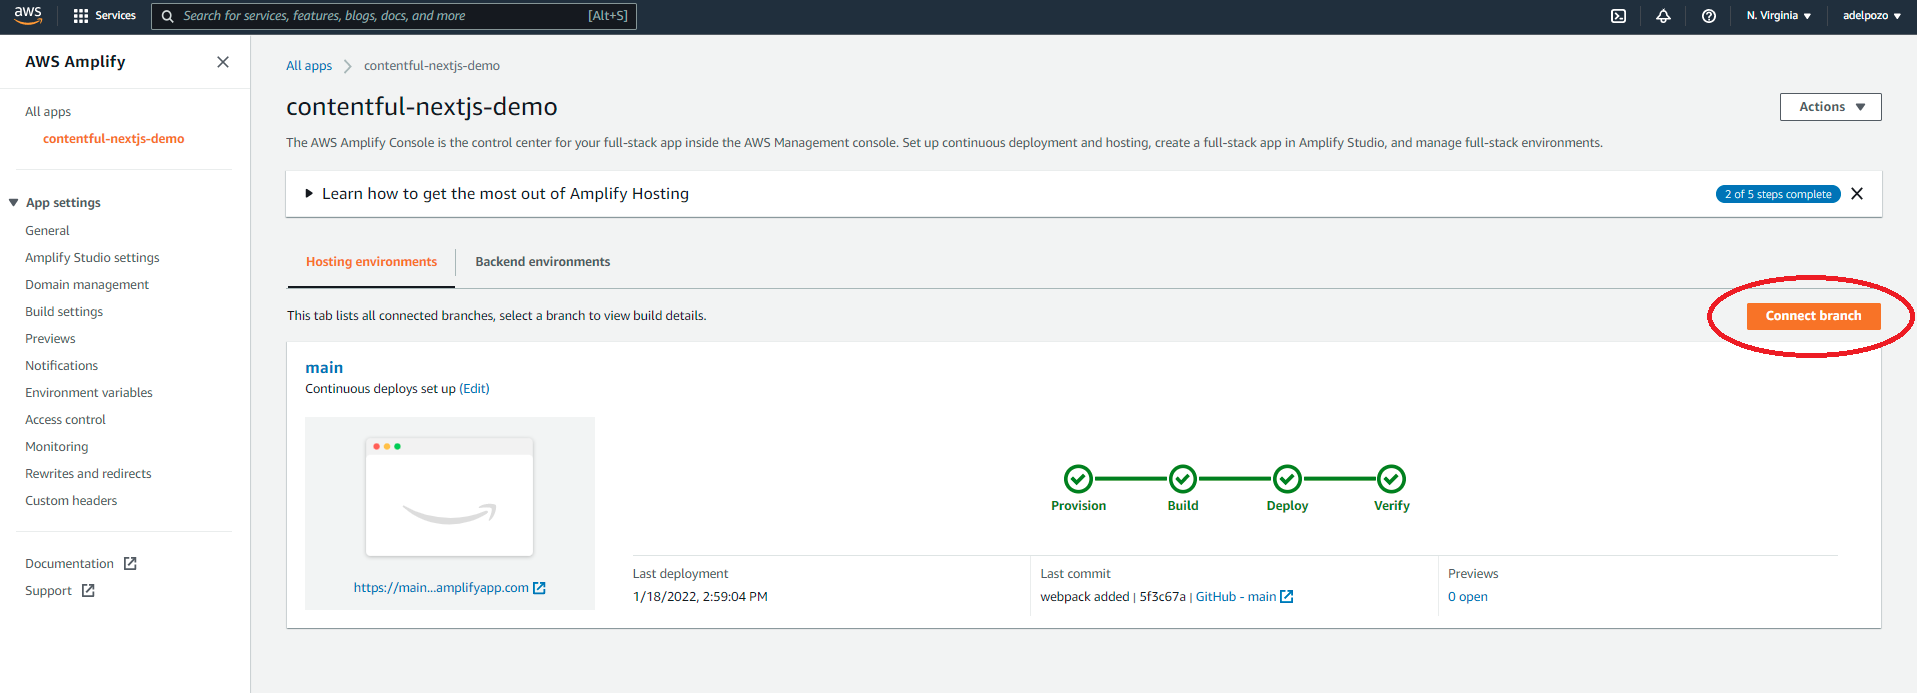
Select the branch you want to link (in this case, “develop”), and review and save.
![AWS Amplify Contentful NextJS tutorial add repository branch screenshot](https://www.xtivia.com/wp-content/uploads/aws-amplify-contentful-nextjs-tutorial-add-repository-branch-screenshot21.png)
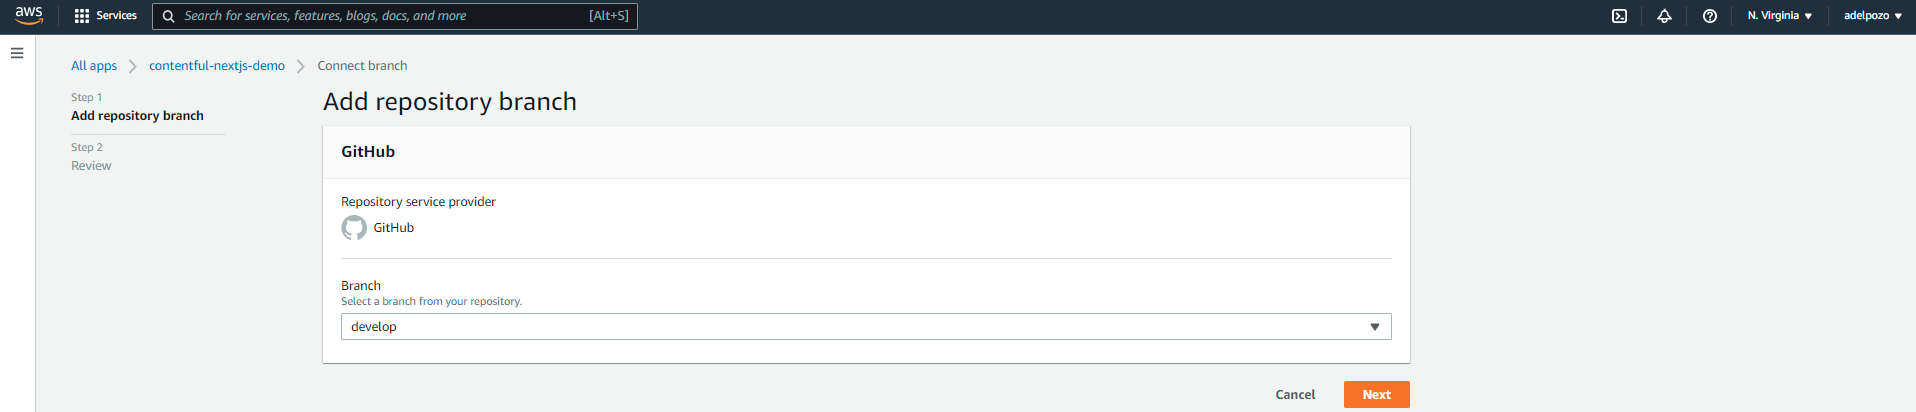
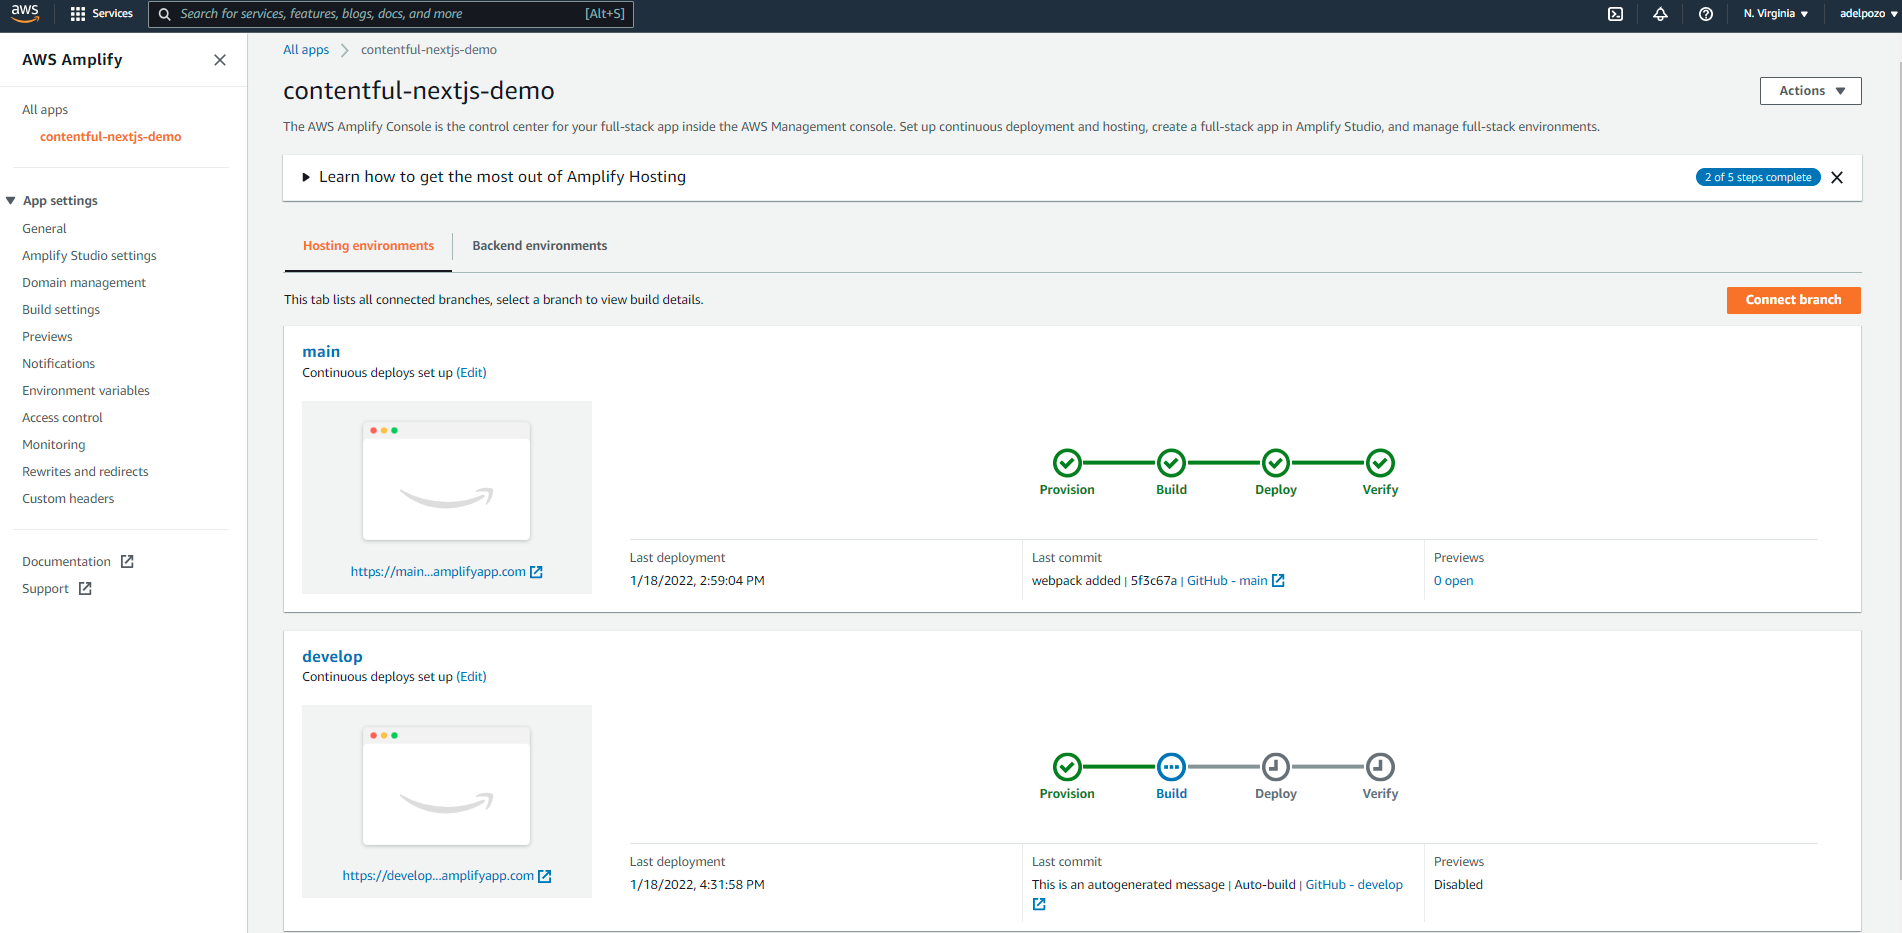
A new hosting environment will be created, built and deployed.
![AWS Amplify Contentful NextJS tutorial new hosting environment deployed screenshot](https://www.xtivia.com/wp-content/uploads/aws-amplify-contentful-nextjs-tutorial-new-hosting-environment-deployed-screenshot22.png)
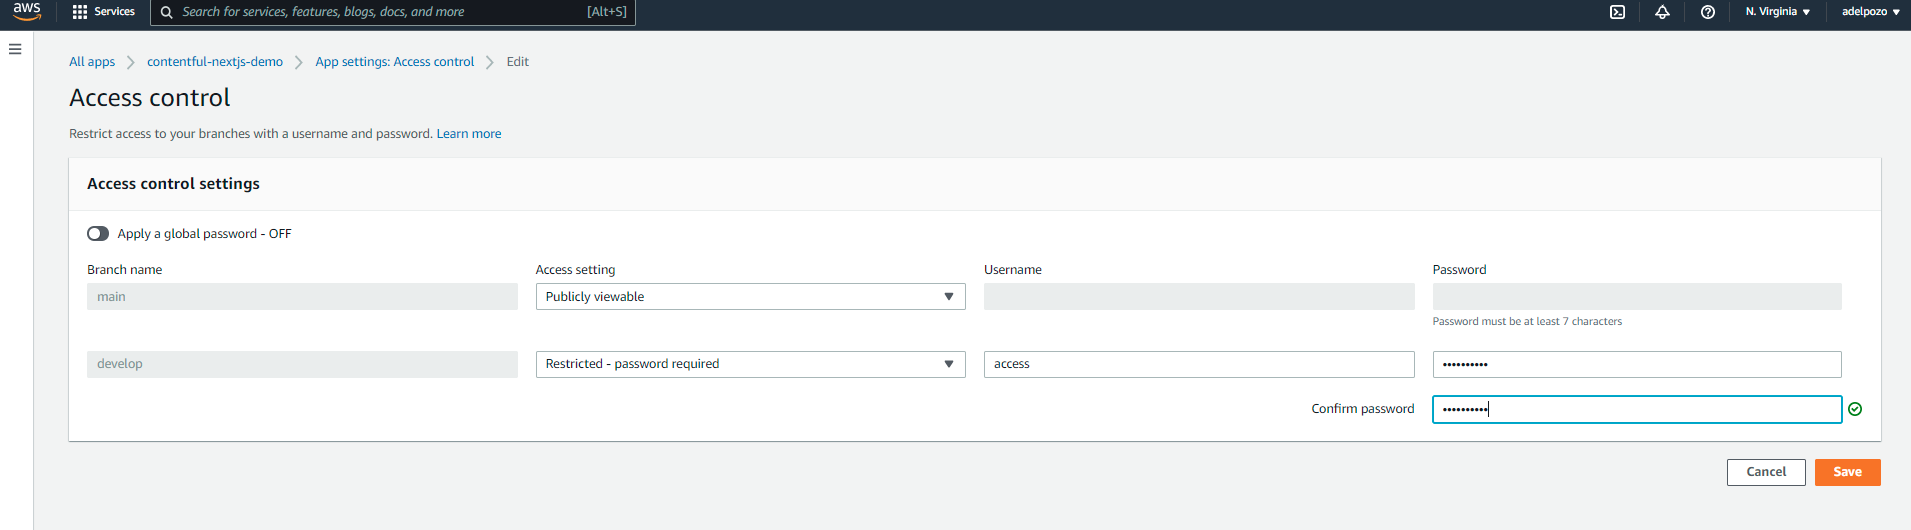
Simple Access Control
Once this environment is created, it is possible to add some access control for it, adding a user and password to be able to access it. For this, click on Access control > Manage access, set the access level for each environment and provide a user and password for access to be granted:
![AWS Amplify Contentful NextJS tutorial access control screenshot](https://www.xtivia.com/wp-content/uploads/aws-amplify-contentful-nextjs-tutorial-access-control-screenshot23.png)
Multiple Backend Environments
Once a second hosting environment has been created linked to a new branch, it is possible to manage environment variables and override them depending on the branch. This way, it should be possible to link the development hosting environment to a different Contentful backend.
![AWS Amplify Contentful NextJS tutorial tutorial multiple backend environments screenshot](https://www.xtivia.com/wp-content/uploads/aws-amplify-contentful-nextjs-tutorial-multiple-backend-environments-screenshot24.png)
Pre-Production Releases
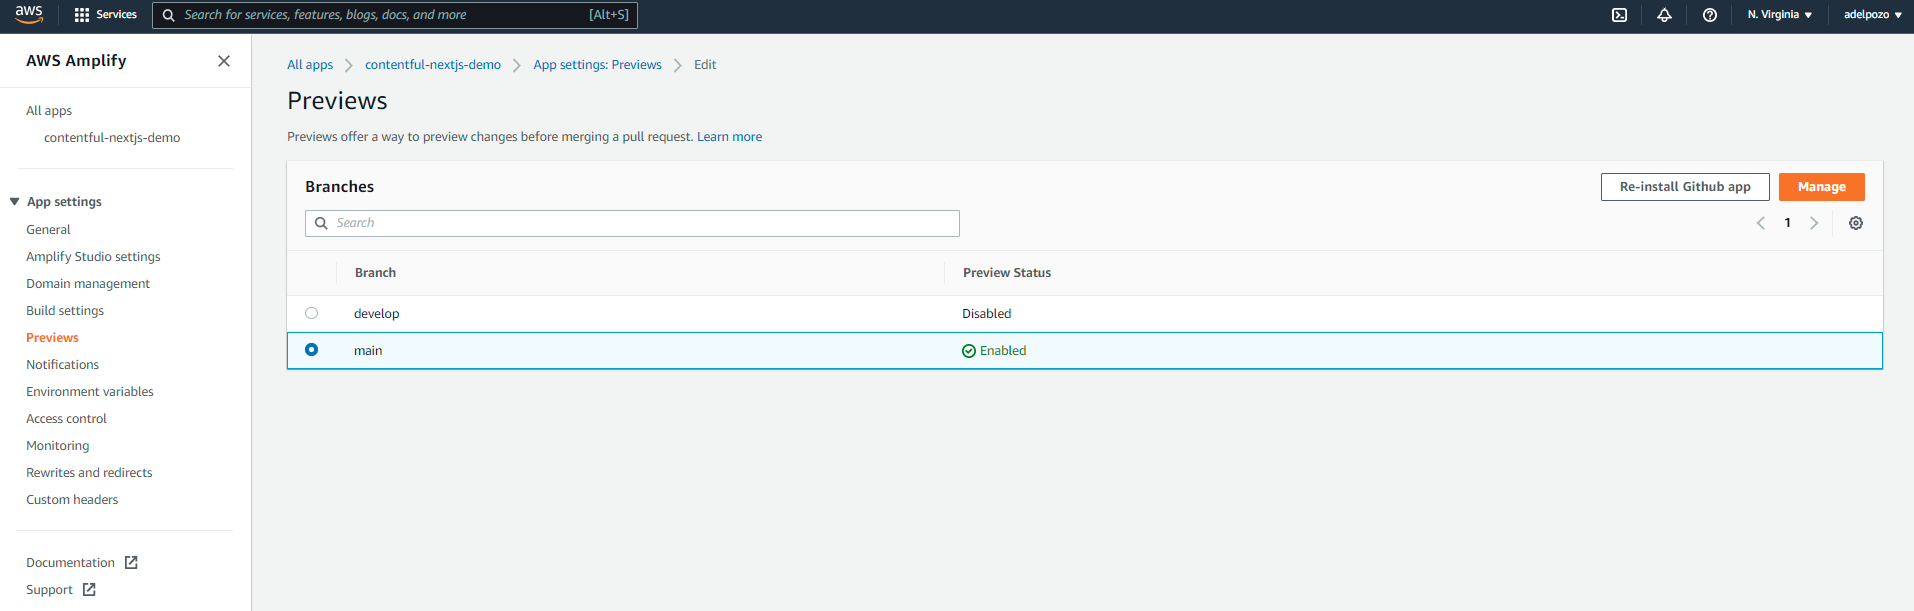
Amplify provides the possibility to preview changes from pull requests before merging the code to a branch through the Previews functionality.
This way, the functionality can be visually reviewed before releasing it.
![AWS Amplify Contentful NextJS tutorial previews screenshot](https://www.xtivia.com/wp-content/uploads/aws-amplify-contentful-nextjs-tutorial-previews-screenshot25.png)
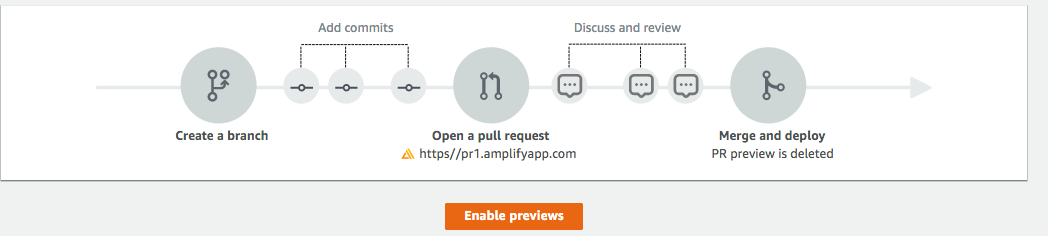
A web preview deploys every pull request made to your GitHub repository to a unique preview URL which is completely different from the URL your main site uses. For apps with backend environments provisioned using the Amplify CLI, every pull request spins up an ephemeral backend that is deleted when the PR is closed.
![AWS Amplify Contentful NextJS tutorial previews screenshot](https://www.xtivia.com/wp-content/uploads/aws-amplify-contentful-nextjs-tutorial-previews-screenshot26.png)
However, for security purposes, previews only work with private repositories for fullstack apps using the Amplify CLI.
Always Have A Safe Playground!
It is recommended to add a Web Application Firewall (WAF) in front of the API.
So we are going to set an example on how to use WAF to restrict access to particular places of our application. In this case, we are going to limit access to /api/hello (in fact, anything under /api). In our case, hidden in the Github code there is a small API so when you access https://main.q1w2e3r4t5y6u7i8o9p0.amplifyapp.com/api/hello, the application will return a simple json:
![AWS Amplify Contentful NextJS tutorial json](https://www.xtivia.com/wp-content/uploads/aws-amplify-contentful-nextjs-tutorial-json-27.png)
Let’s configure WAF to block this!
Identify the Hosting Environment
AWS Amplify leverages the Amazon CloudFront Global Edge Network to distribute the web app globally, so the first step is to identify which one is the Cloudfront ID linked to the hosting we created manually.
There are different ways to identify the Cloudfront ID (all Cloudfront ids linked to hosting environments seem to be displayed in the Rewrites and Redirects section). The method we show in this documentation will help to identify it for a particular hosting environment.
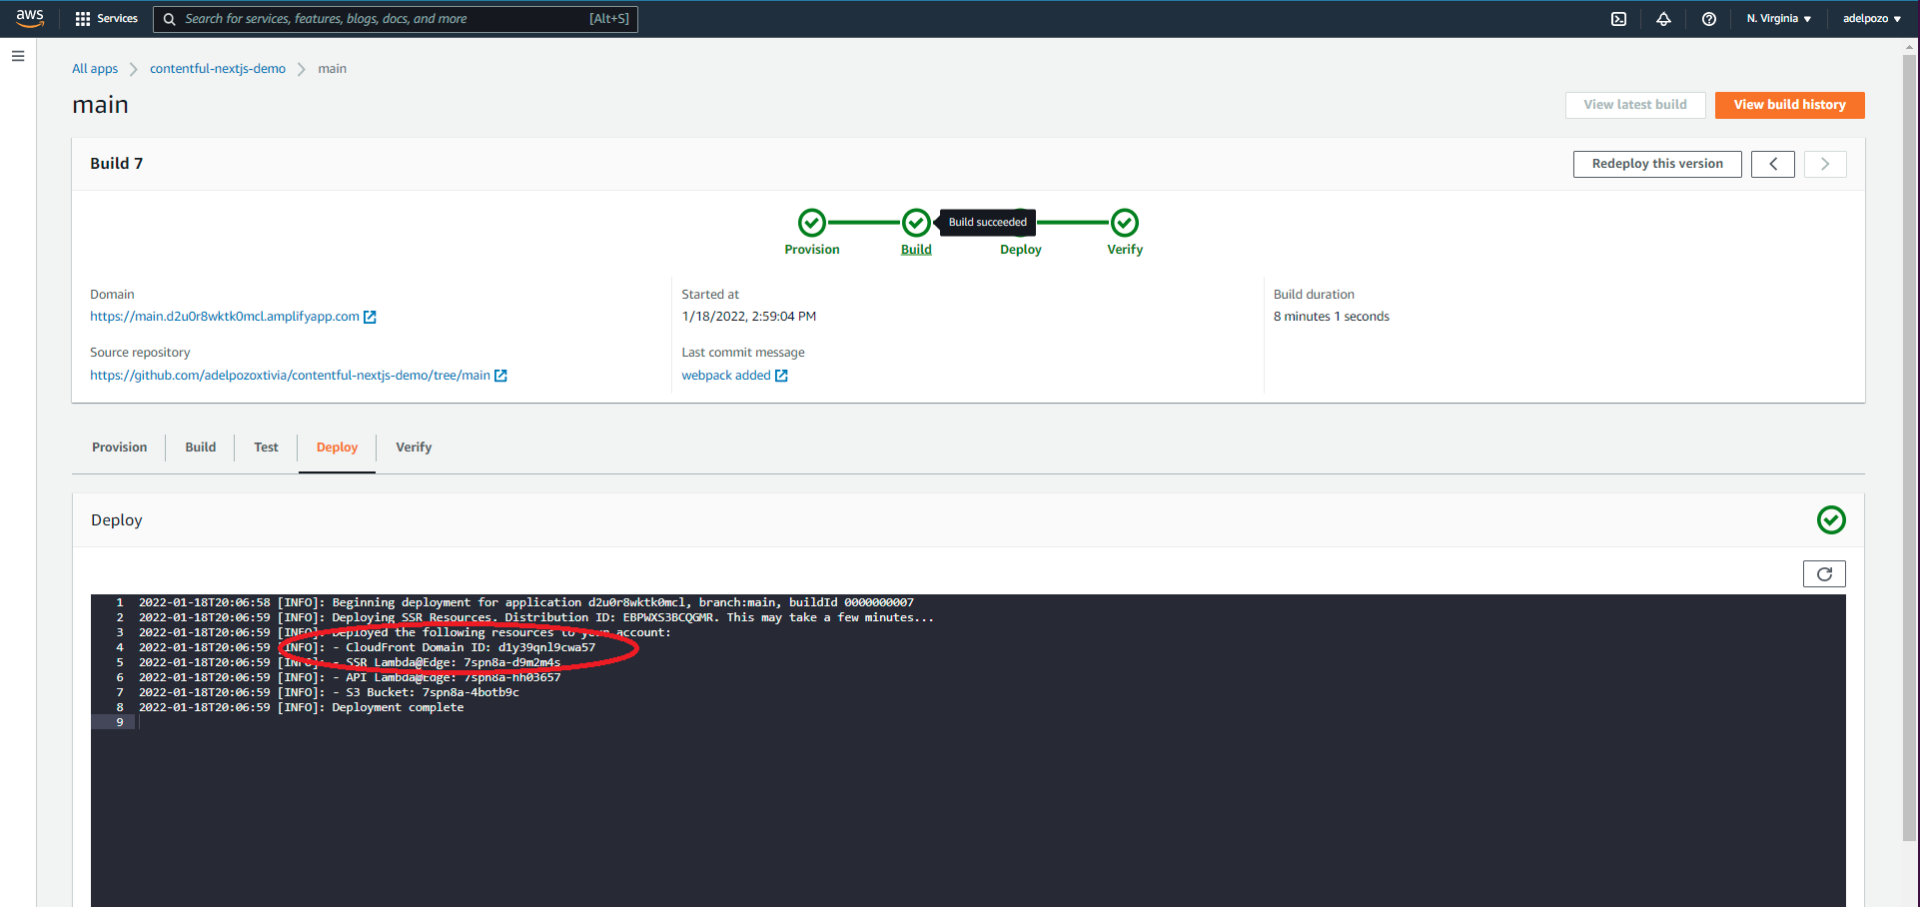
Open the app for which you want to create the WAF (in this case, “contentful-nextjs-demo”).
![AWS Amplify Contentful NextJS tutorial identify hosting environment WAF screenshot](https://www.xtivia.com/wp-content/uploads/aws-amplify-contentful-nextjs-tutorial-identify-hosting-environment-waf-screenshot28.png)
Select the hosting environment you want to identify. In our case, we are going to be working with the “main” branch hosting. Open the deploy section. The Cloudfront domain id will be displayed there:
![AWS Amplify Contentful NextJS tutorial CloudFront domain ID WAF screenshot](https://www.xtivia.com/wp-content/uploads/aws-amplify-contentful-nextjs-tutorial-cloudfront-domain-id-waf-screenshot29-1920x907.png)
Create A Web ACL
Then open the WAF & Shield service. You can search for it in the Services search box at the top of the screen.
![AWS Amplify Contentful NextJS tutorial WAF & Shield service screenshot](https://www.xtivia.com/wp-content/uploads/aws-amplify-contentful-nextjs-tutorial-waf-shield-service-screenshot30.png)
Click on Create Web ACL
![AWS Amplify Contentful NextJS tutorial create web ACL screenshot](https://www.xtivia.com/wp-content/uploads/aws-amplify-contentful-nextjs-tutorial-create-web-acl-screenshot31.png)
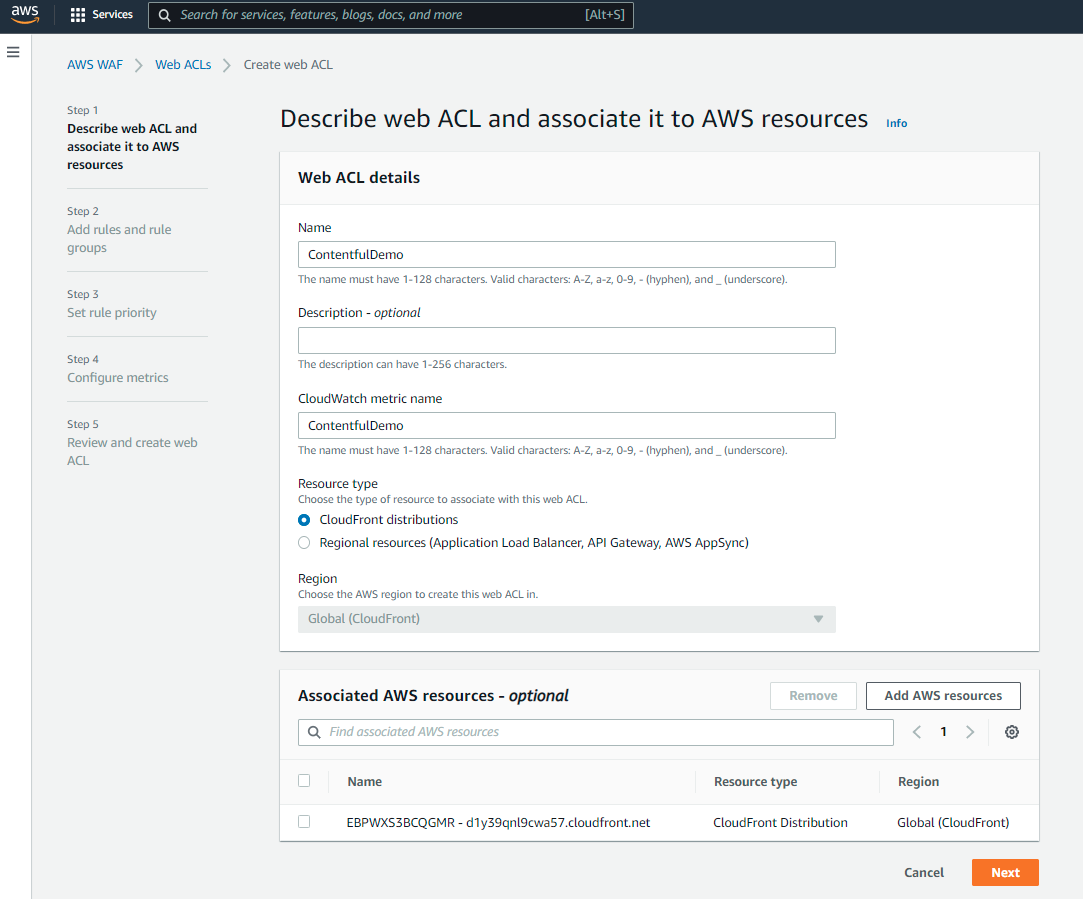
Describe Web ACL and Associate It to AWS Resources
Name the Web ACL and select Cloudfront distributions
![AWS Amplify Contentful NextJS tutorial name web acl cloudfront distributions screenshot](https://www.xtivia.com/wp-content/uploads/aws-amplify-contentful-nextjs-tutorial-name-web-acl-cloudfront-distributions-screenshot32.png)
Click on Add AWS resources
![AWS Amplify Contentful NextJS tutorial add AWS resources screenshot](https://www.xtivia.com/wp-content/uploads/aws-amplify-contentful-nextjs-tutorial-add-aws-resources-screenshot33.png)
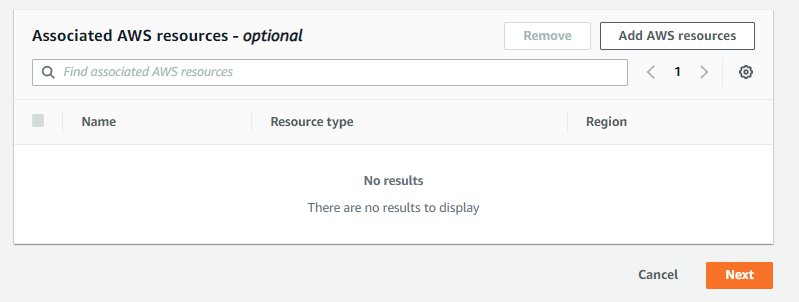
You will see the AWS resources linked to your account.
![AWS Amplify Contentful NextJS tutorial AWS resources linked screenshot](https://www.xtivia.com/wp-content/uploads/aws-amplify-contentful-nextjs-tutorial-aws-resources-linked-screenshot34.png)
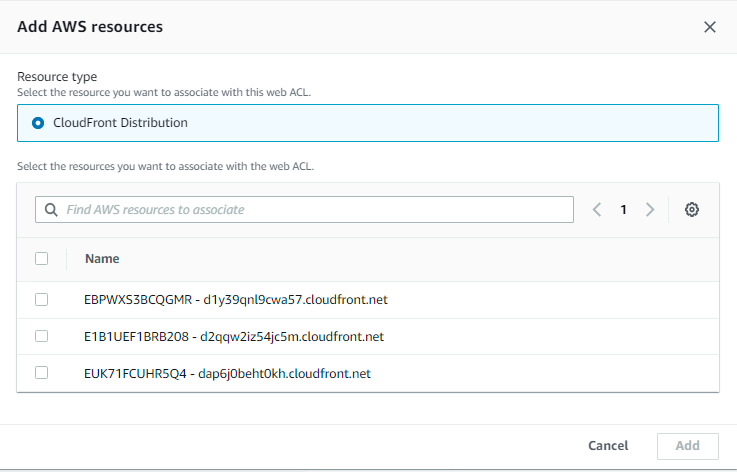
Identify the cloudfront distribution resource you are looking for. In this example, we were looking for d1y39qnl9cwa57. Notice that the distribution ID matches:
![AWS Amplify Contentful NextJS tutorial distribution ID match screenshot](https://www.xtivia.com/wp-content/uploads/aws-amplify-contentful-nextjs-tutorial-distribution-id-match-screenshot35.png)
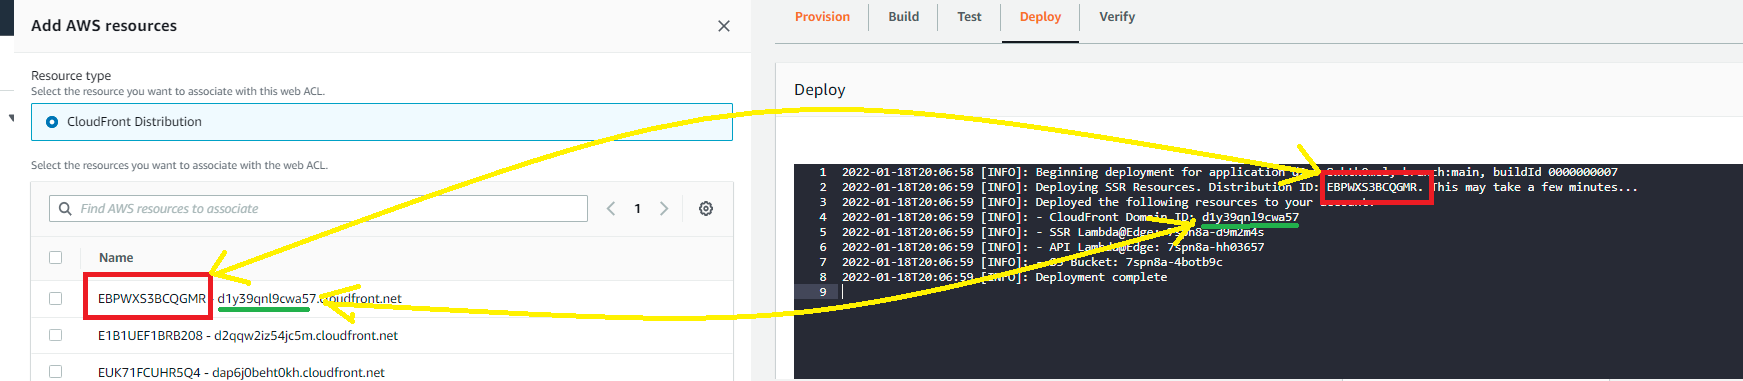
Add and associate the distribution to the Web ACL:
![AWS Amplify Contentful NextJS tutorial add and associate web ACL screenshot](https://www.xtivia.com/wp-content/uploads/aws-amplify-contentful-nextjs-tutorial-add-and-associate-web-acl-screenshot36.png)
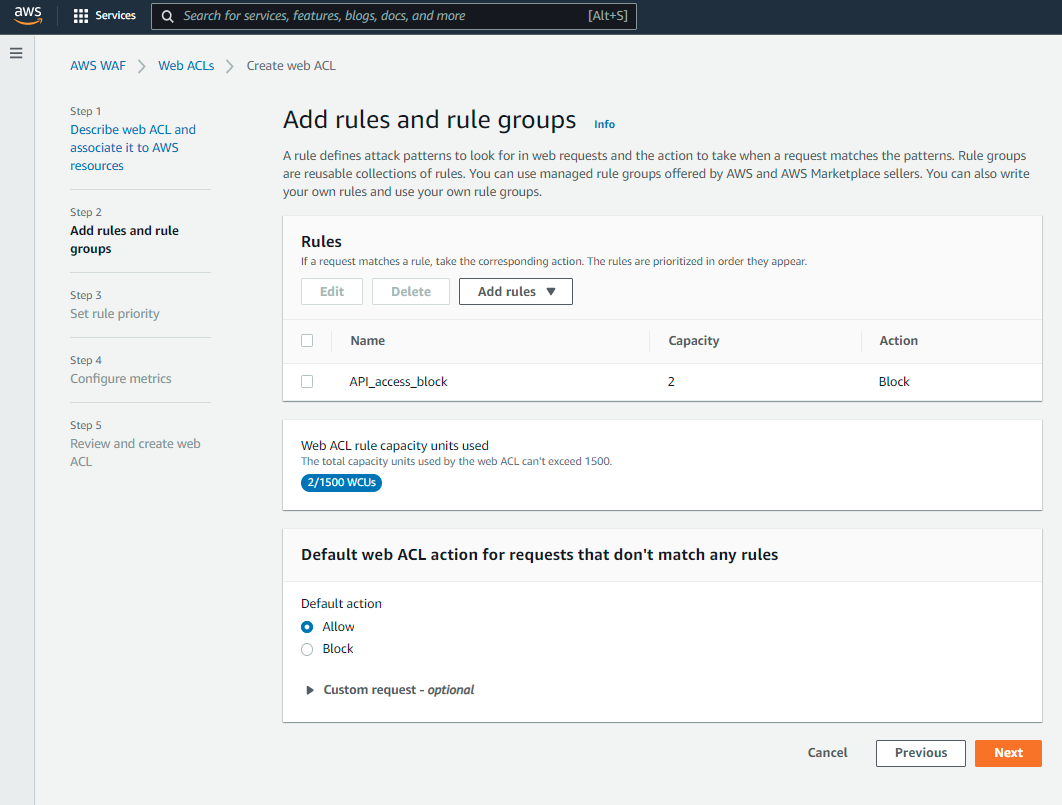
Add Rules and Rule groups
You can add a set of pre generated rules, or create new ones. In this example we are going to create a custom one.
Make sure to validate the rule name, as it is restricted!
![AWS Amplify Contentful NextJS tutorial add rule and rule groups screenshot](https://www.xtivia.com/wp-content/uploads/aws-amplify-contentful-nextjs-tutorial-add-rule-rule-groups-screenshot37.png)
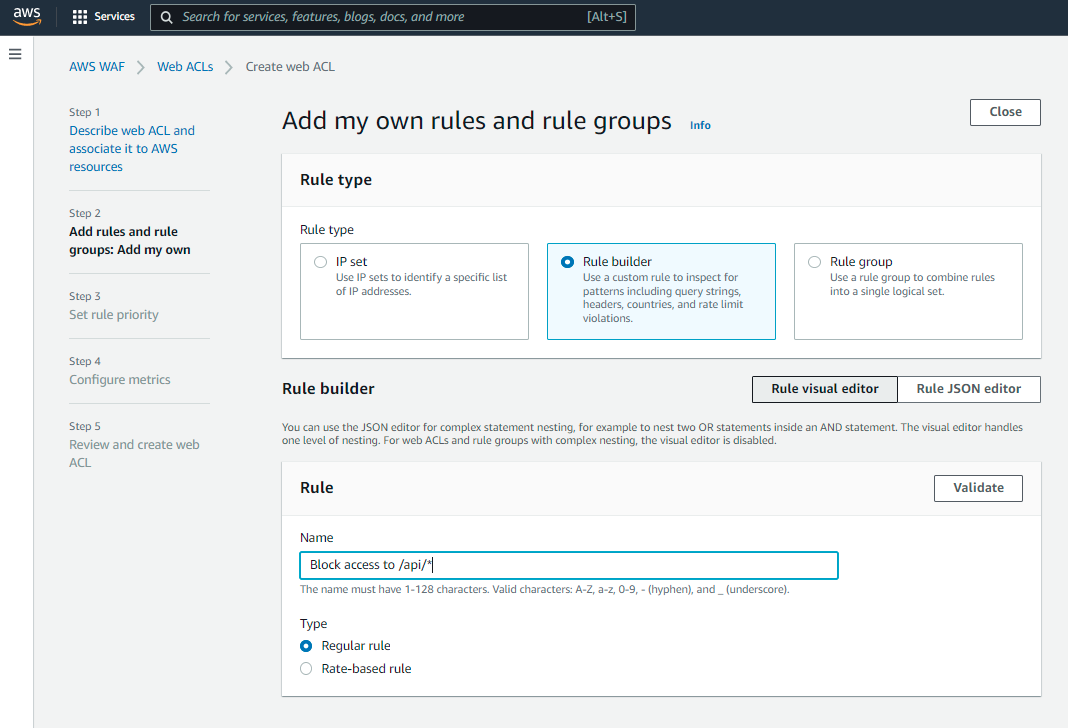
Create the rule. In this case, if a request uri starts with api (as in https://main.q1w2e3r4t5y6u7i8o9p0.amplifyapp.com/api/hello) we want to block it.
![AWS Amplify Contentful NextJS tutorial create rule screenshot](https://www.xtivia.com/wp-content/uploads/aws-amplify-contentful-nextjs-tutorial-create-rule-screenshot38.png)
![AWS Amplify Contentful NextJS tutorial create rule screenshot](https://www.xtivia.com/wp-content/uploads/aws-amplify-contentful-nextjs-tutorial-create-rule-screenshot39.png)
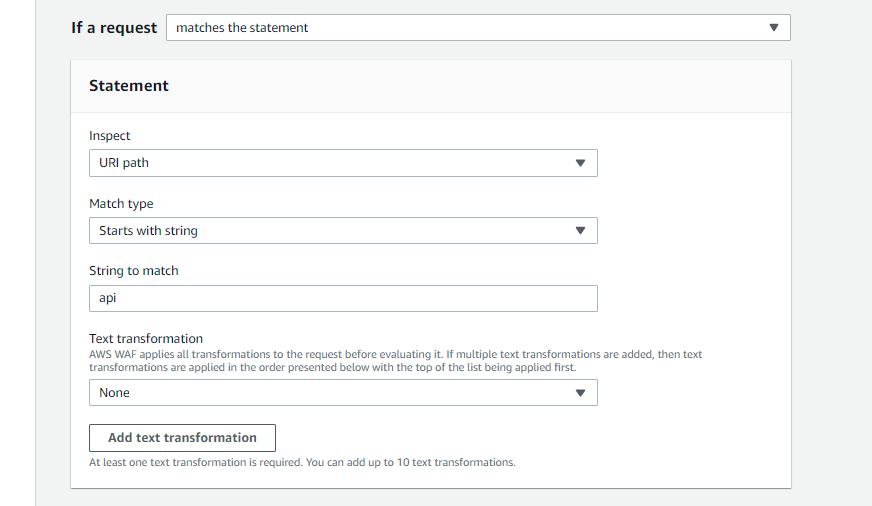
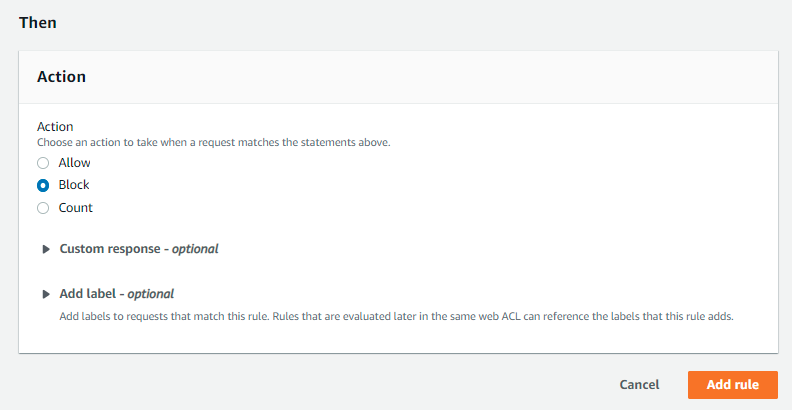
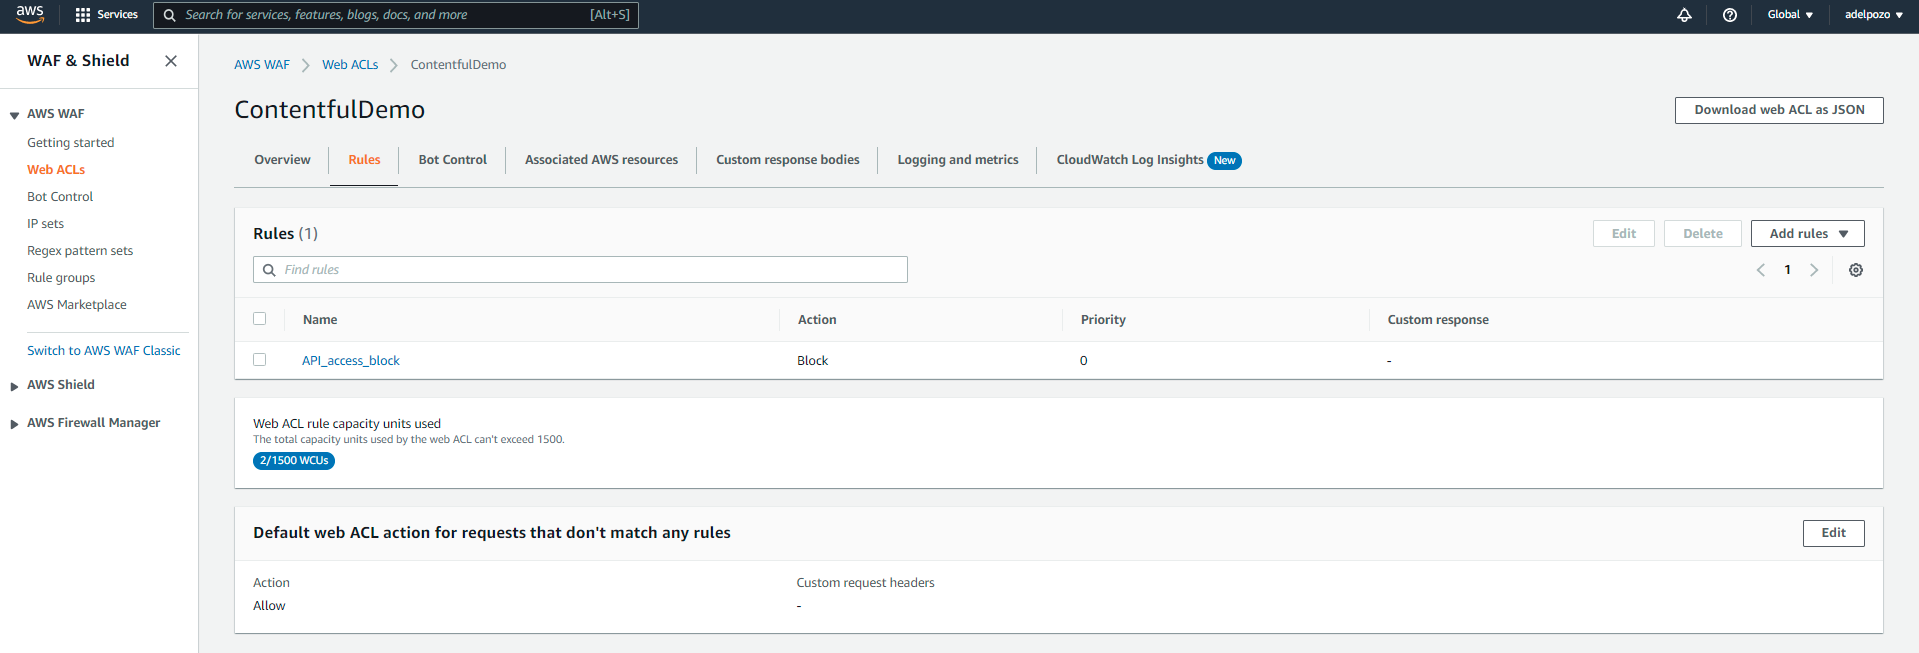
Save and check that all looks good:
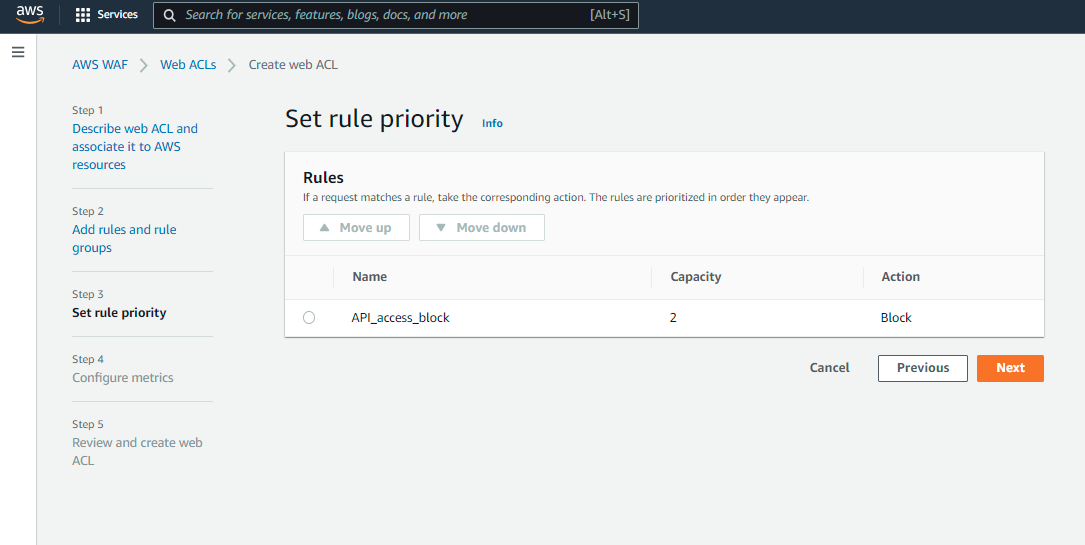
![AWS Amplify Contentful NextJS tutorial review rules screenshot](https://www.xtivia.com/wp-content/uploads/aws-amplify-contentful-nextjs-tutorial-review-rules-screenshot40.png)
Set Rule Priority
Once the rule has been created, we need to set the rule priority. As this is the only rule so far we will keep it by default, and move to the next screen.
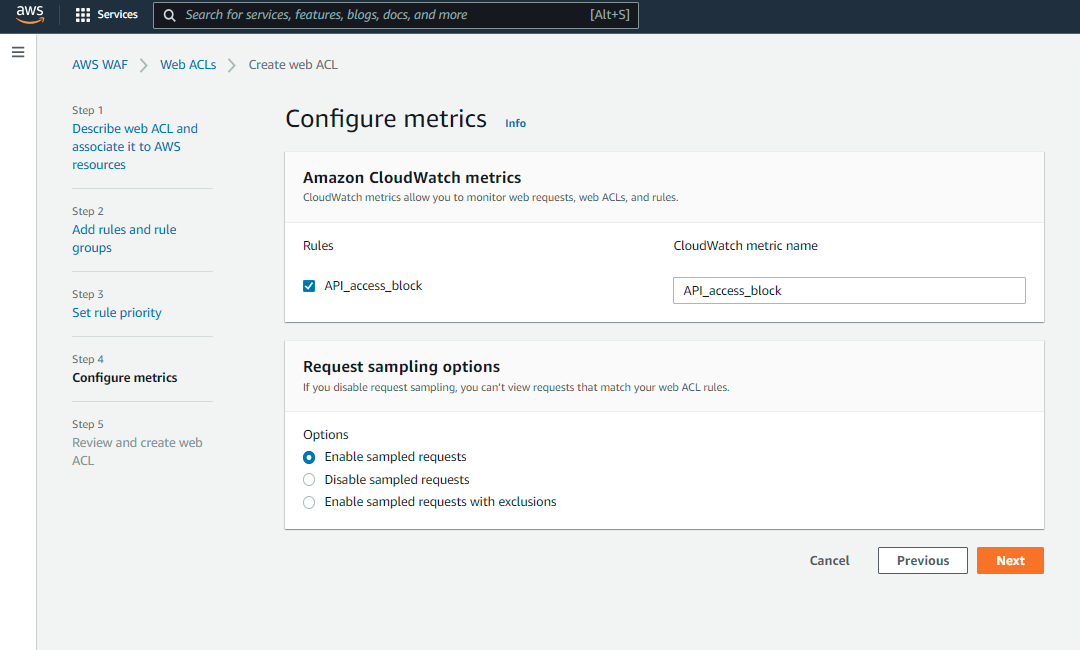
![AWS Amplify Contentful NextJS tutorial set rule priority screenshot](https://www.xtivia.com/wp-content/uploads/aws-amplify-contentful-nextjs-tutorial-set-rule-priority-screenshot41.png)
Configure Metrics
Time to configure metrics! For this example, also by default. Just click on Next.
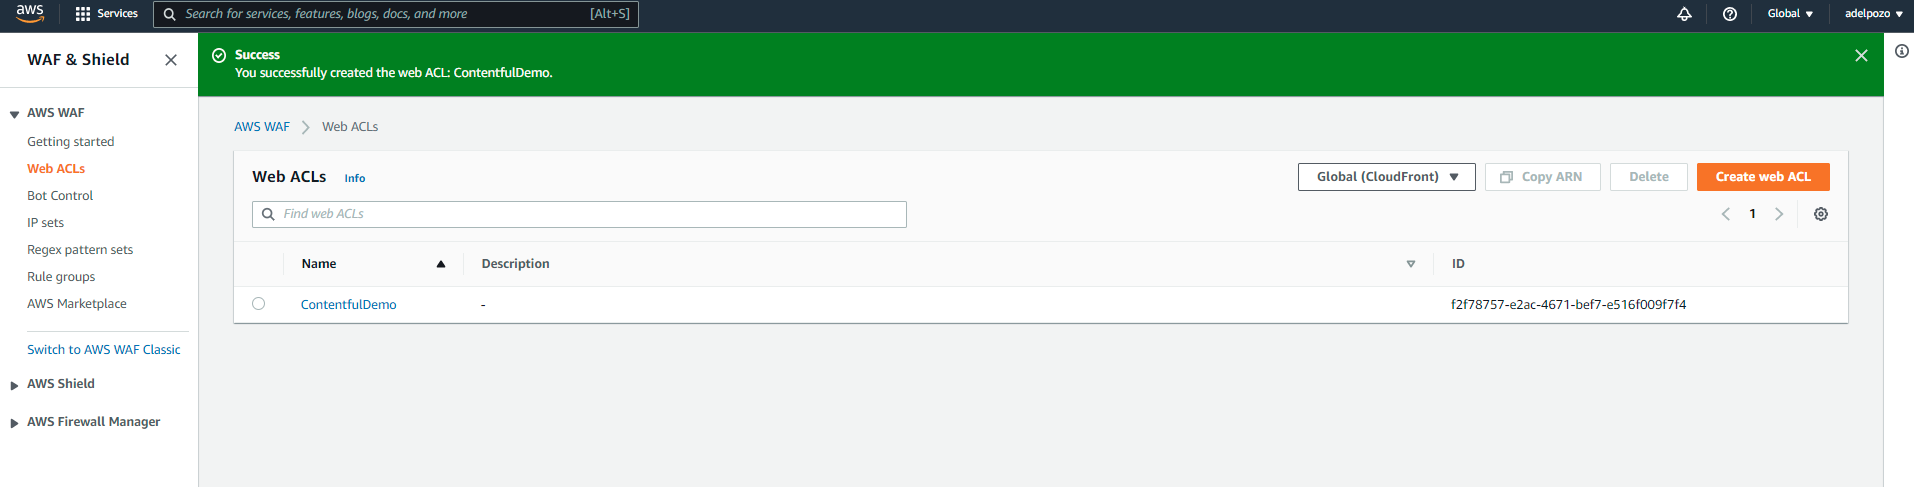
![AWS Amplify Contentful NextJS tutorial configure metrics screenshot](https://www.xtivia.com/wp-content/uploads/aws-amplify-contentful-nextjs-tutorial-configure-metrics-screenshot42.png)
Review and Test
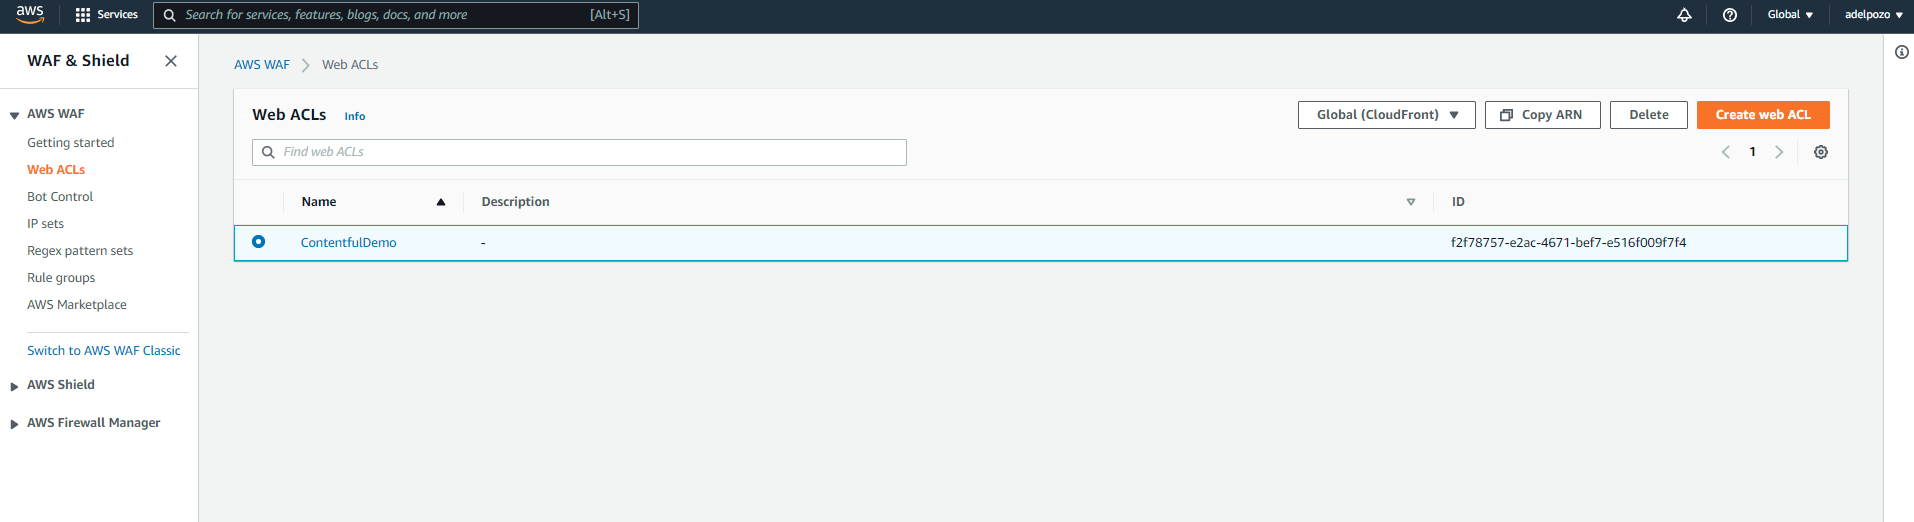
Check that everything looks good, and save. You will see the newly created web ACL in your list.
![AWS Amplify Contentful NextJS tutorial review and test screenshot](https://www.xtivia.com/wp-content/uploads/aws-amplify-contentful-nextjs-tutorial-review-test-screenshot43.png)
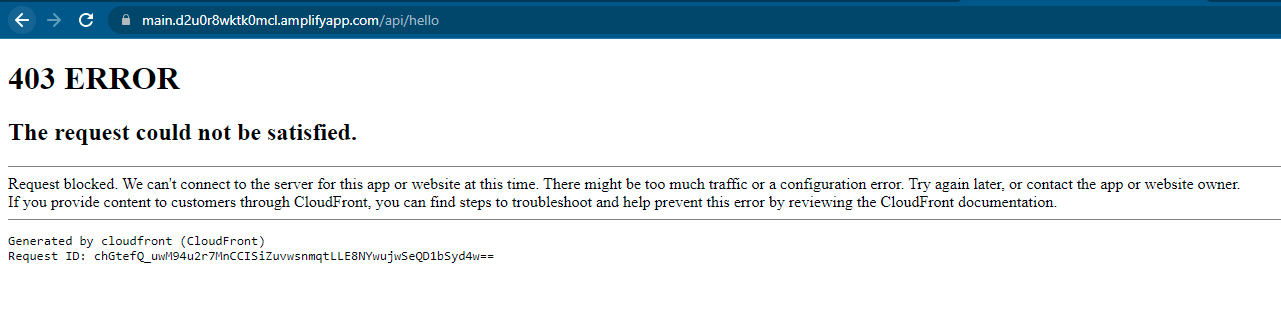
The only thing remaining is to test it! Check the url and see that a default 403 error is coming up:
![AWS Amplify Contentful NextJS tutorial 403 error screenshot](https://www.xtivia.com/wp-content/uploads/aws-amplify-contentful-nextjs-tutorial-403-error-screenshot44.png)
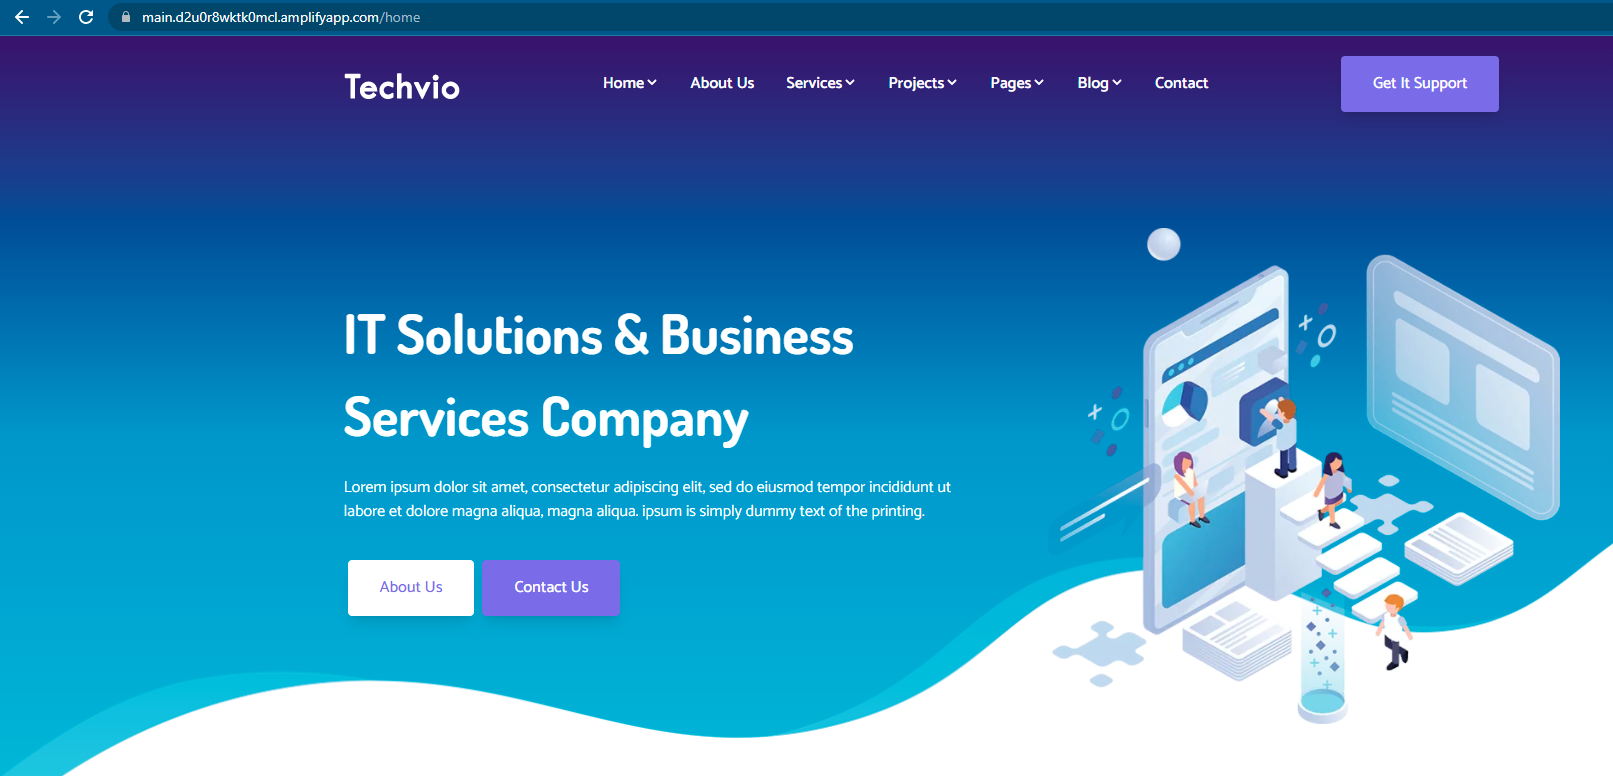
If we compare it with the development branch outcome:
![AWS Amplify Contentful NextJS tutorial compare dev branch outcome screenshot](https://www.xtivia.com/wp-content/uploads/aws-amplify-contentful-nextjs-tutorial-compare-dev-branch-outcome-screenshot45.png)
And, of course, the rest of the pages can be accessed with no issues:
![AWS Amplify Contentful NextJS tutorial page test screenshot](https://www.xtivia.com/wp-content/uploads/aws-amplify-contentful-nextjs-tutorial-page-test-screenshot46.png)
Adding Complexity
Let’s suppose that you want to block access to /api* unless there is a particular header in the request. We can do this with a simple update.
Select the Web ACL we just created:
![AWS Amplify Contentful NextJS tutorial complex access block screenshot](https://www.xtivia.com/wp-content/uploads/aws-amplify-contentful-nextjs-tutorial-complex-access-block-screenshot47.png)
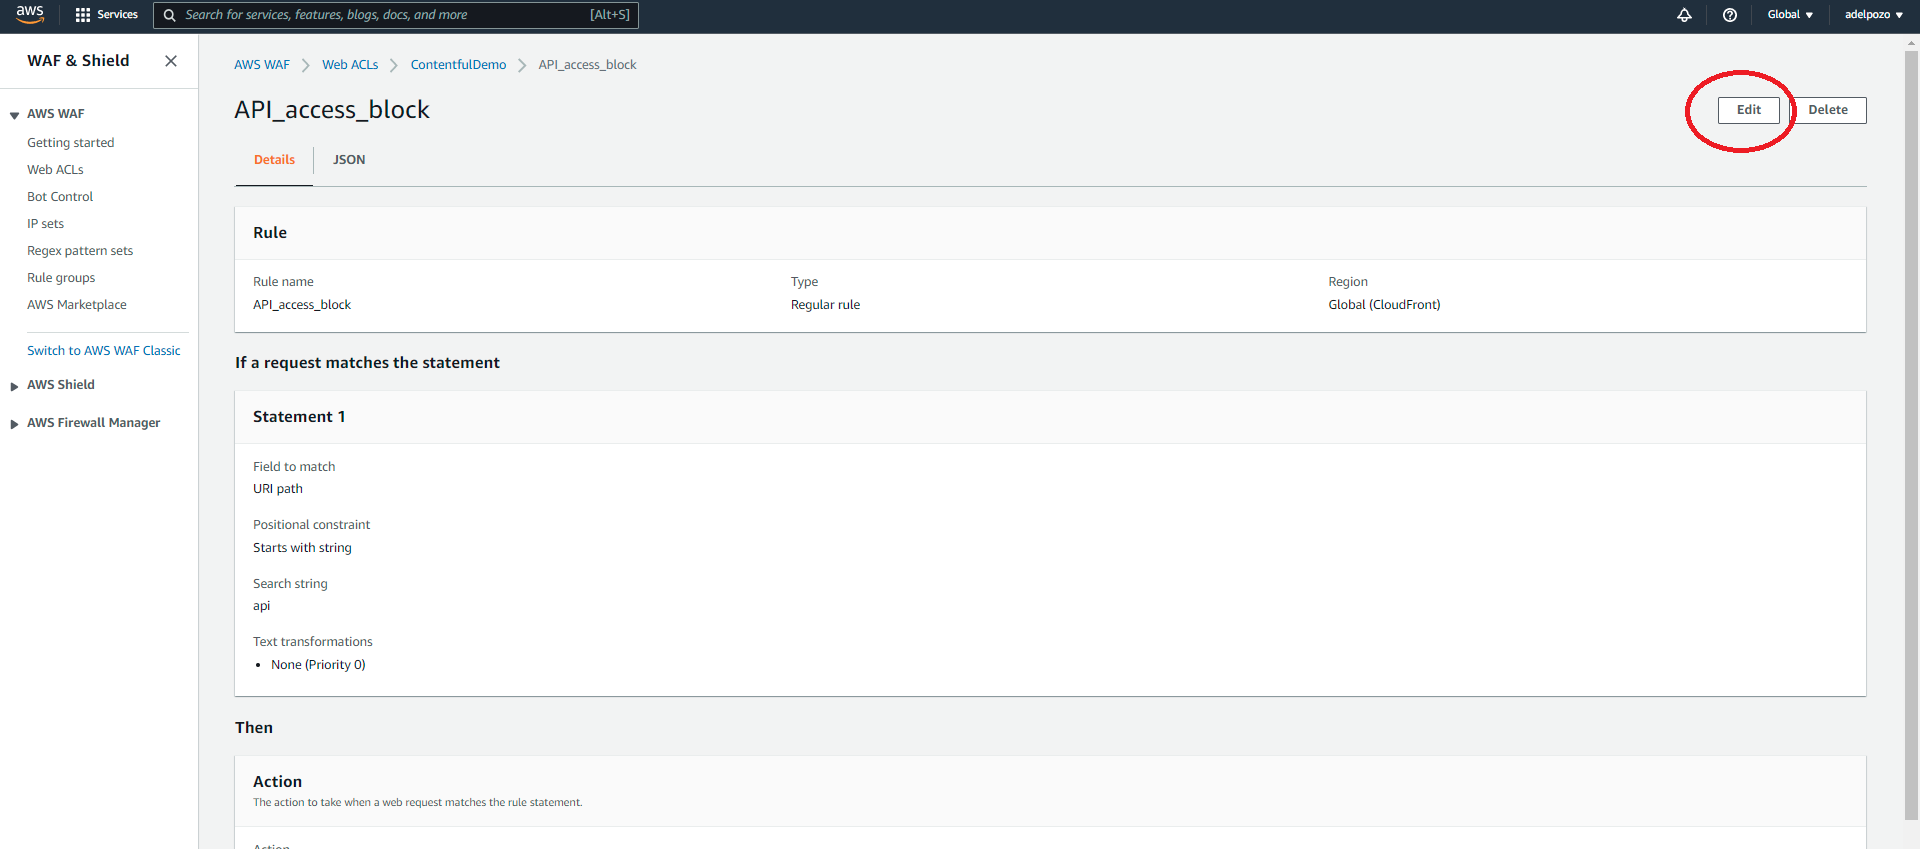
Go to Rules, and click on the rule we just created:
![AWS Amplify Contentful NextJS tutorial complex access block screenshot](https://www.xtivia.com/wp-content/uploads/aws-amplify-contentful-nextjs-tutorial-complex-access-block-screenshot48.png)
Edit it:
![AWS Amplify Contentful NextJS tutorial complex access block screenshot](https://www.xtivia.com/wp-content/uploads/aws-amplify-contentful-nextjs-tutorial-complex-access-block-screenshot49.png)
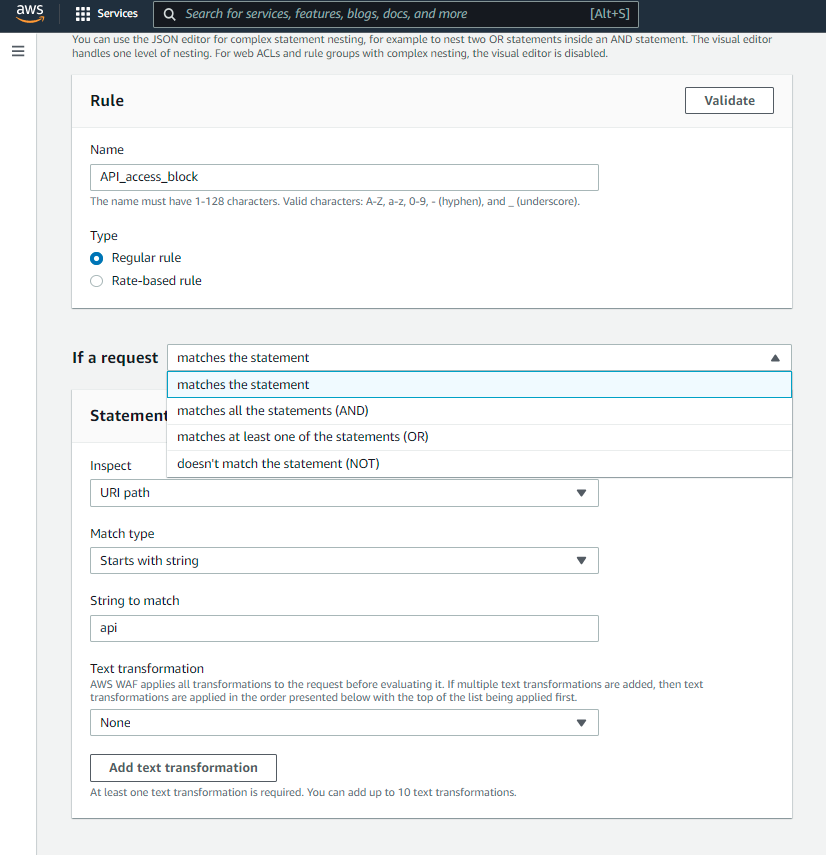
Change the request from “Matches the statement” to “Matches all the statements (AND)”
![AWS Amplify Contentful NextJS tutorial complex access block screenshot](https://www.xtivia.com/wp-content/uploads/aws-amplify-contentful-nextjs-tutorial-complex-access-block-screenshot50.png)
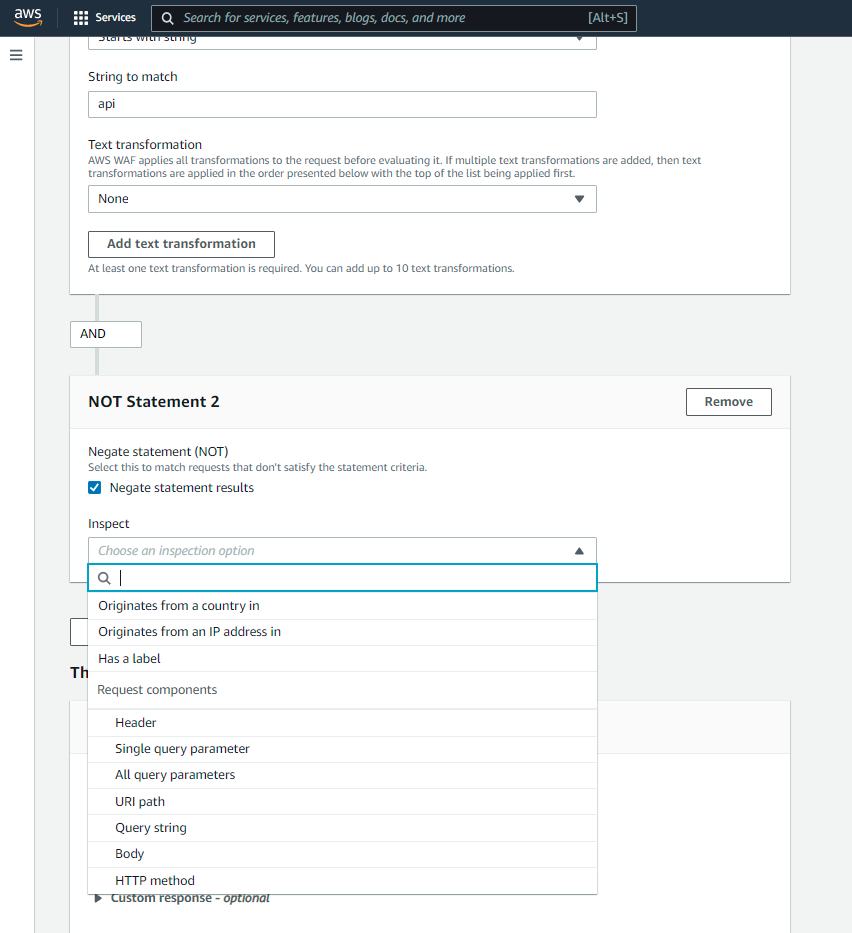
Negate the new statement, and add a header:
![AWS Amplify Contentful NextJS tutorial complex access block screenshot](https://www.xtivia.com/wp-content/uploads/aws-amplify-contentful-nextjs-tutorial-complex-access-block-screenshot51.png)
Add your custom header with the value that you expect:
![AWS Amplify Contentful NextJS tutorial complex access block screenshot](https://www.xtivia.com/wp-content/uploads/aws-amplify-contentful-nextjs-tutorial-complex-access-block-screenshot52.png)
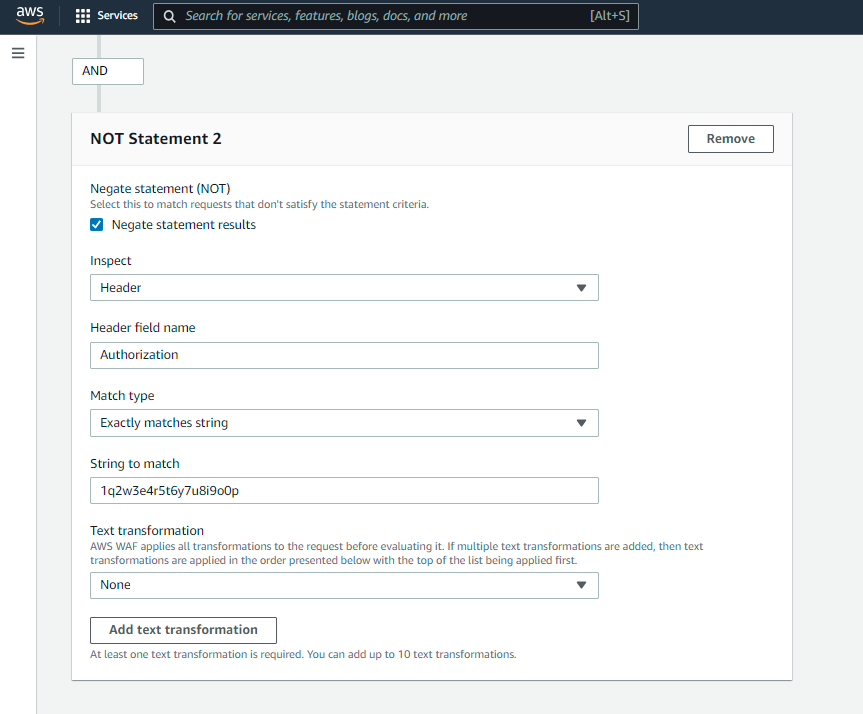
And save the rule. Now test it again. You will see that you still receive the same error message:
![AWS Amplify Contentful NextJS tutorial 403 error screenshot](https://www.xtivia.com/wp-content/uploads/aws-amplify-contentful-nextjs-tutorial-403-error-screenshot44.png)
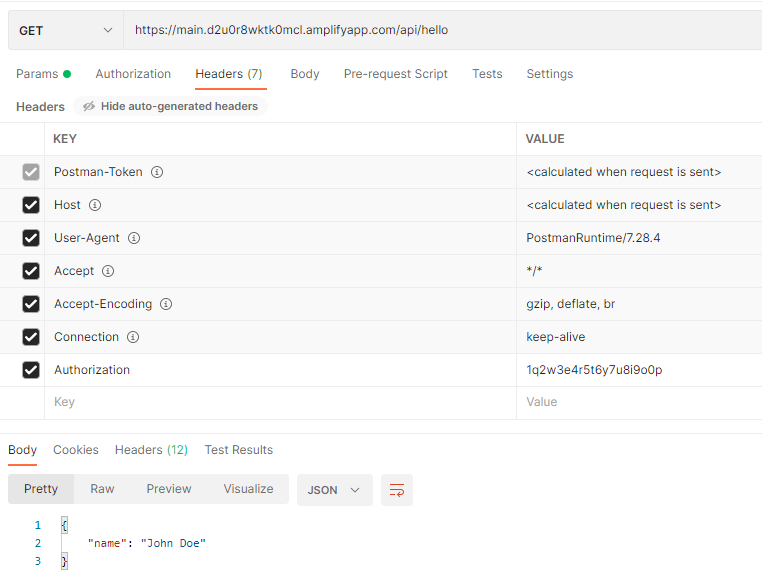
However, if you send the Authorization header, i.e. using Postman, you will be granted access to the original result!
![AWS Amplify Contentful NextJS tutorial headers screenshot](https://www.xtivia.com/wp-content/uploads/aws-amplify-contentful-nextjs-tutorial-headers-screenshot54.png)
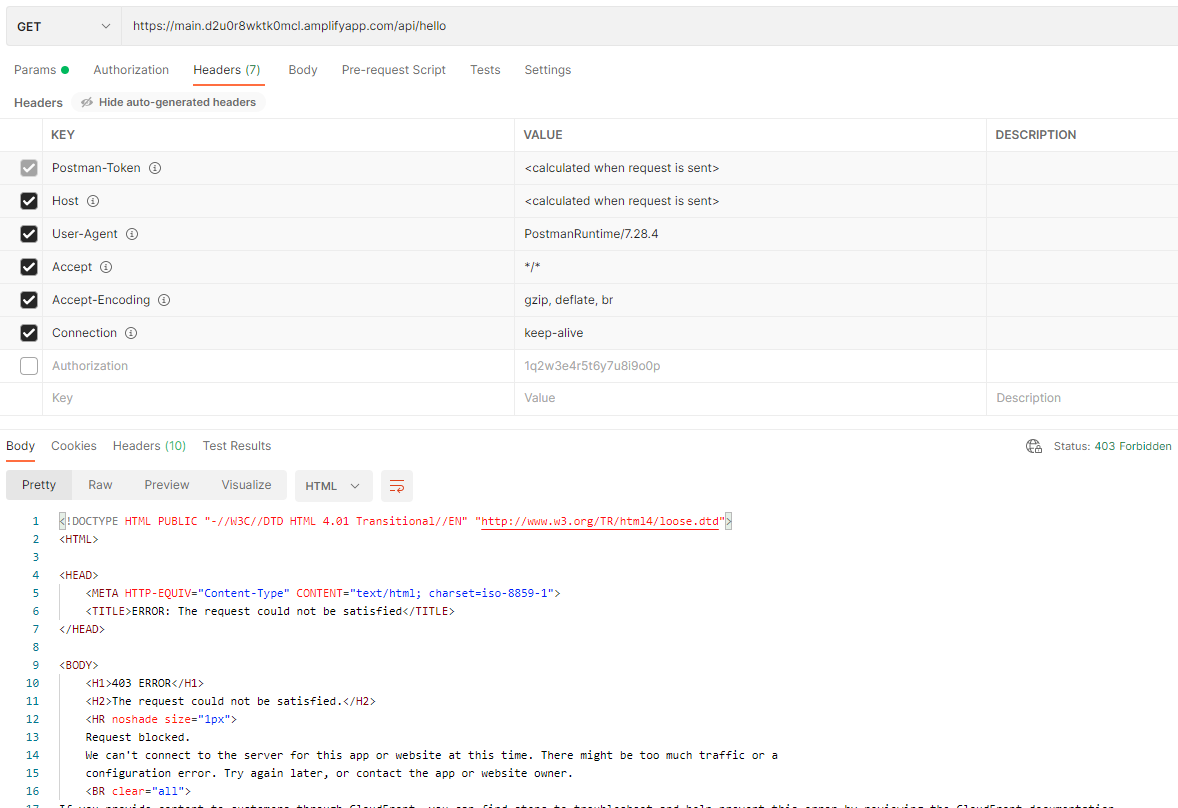
And if you don’t send the header:
![AWS Amplify Contentful NextJS tutorial headers screenshot](https://www.xtivia.com/wp-content/uploads/aws-amplify-contentful-nextjs-tutorial-headers-screenshot55.png)
Play!
And that’s all you need to have a playground for the kids!
It doesn’t matter if you pick NextJS or any other of the top Javascript frameworks, if you choose Contentful or any other of the top headless CMS, you will always need a playground for them, and building it may be something fun!
For more information on our AWS Cloud Services, please contact us!