Amazon Web Services Elastic Load Balancing automatically distributes incoming application traffic across multiple targets, such as Amazon EC2 instances, containers, IP addresses, and Lambda functions. It can handle the varying load of your application traffic in a single Availability Zone or across multiple Availability Zones. Elastic Load Balancing offers three types of load balancers that all feature the high availability, automatic scaling, and robust security necessary to make your applications fault tolerant.
Recently, during one of their security audits a customer’s environment set up in AWS received terrible scores. The website was vulnerable even to the poodle attack that was discovered way back in 2014! That’s a light year in terms of technology.
Discovery phase
During our conversations with the customer during the initial discovery phase of the project, the customer gave us detailed information about the hardening procedures they took on the WebServers. During this phase, we also learned that the team did nothing on the AWS ELB. Diving a little deeper into the topology and looking at the configuration, we quickly realized that the ELB configuration had been left untouched since 2012!
The process to fix the vulnerabilities
Review
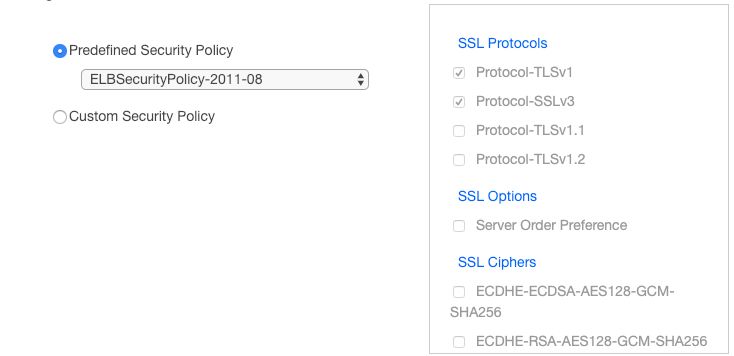
The immediate next step was to review the existing configuration. On our initial review, sure enough, all of the customer’s ELBs were configured with a pre-defined ELB security policy (defined by AWS) in August of 2011!

As you can see, the cipher suite was extremely weak and vulnerable. The customer’s configuration exposed them to all kinds of SSL vulnerabilities.
Research
The immediate next step was to configure all of the customer’s ELBs with the latest available pre-defined ELB security policy that only allows TLS v1.2. To set this via the UI, navigate to the AWS Console’s EC2 dashboard. Navigate to Load Balancers, and select the Load Balancer for which the policy needs to be updated. Once there, select Listeners and click on the “Change” link under the HTTPS port’s “Cipher” column.

Once there, select the latest TLSv1.2 pre-defined ELB security policy “ELBSecurityPolicy-TLS-1-2-2017-01” as a stop-gap measure. And click on “Save”.

Fix
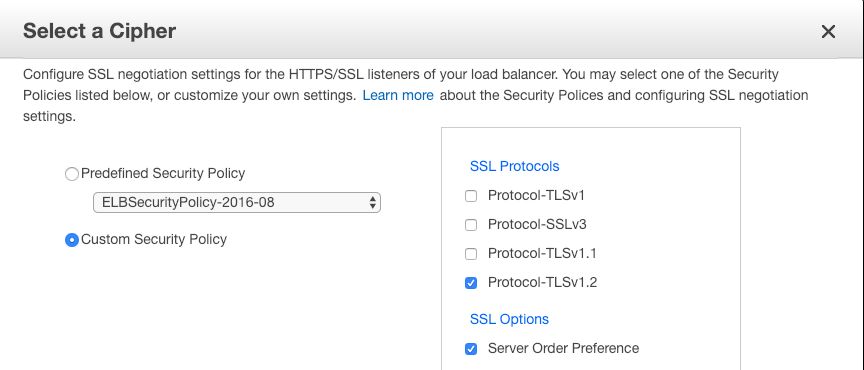
For our next steps, we requested that the customer ask their internal security team to re-scan the site for vulnerabilities; they then rescanned the site for vulnerabilities and provided us with a list of weak SSL Ciphers that they wanted us to disable. Using this list, we set up a custom ELB policy that only allows TLSv1.2 and had the weak SSL Ciphers disabled as per the customer’s request. To set up a custom policy via the UI, navigate to the AWS Console’s EC2 dashboard, navigate to Load Balancers, and select the Load Balancer for which the policy needs to be updated. Once there, select Listeners and click on the “Change” link under the HTTPS port’s “Cipher” column. Select a “Custom Security Policy” and select only the Ciphers that you want to be enabled for the ELB.

It’s important to note that the SSL Ciphers that are enabled really depend on the type of application and the business requirements of the application. We won’t list the specific SSL Ciphers that were enabled for this customer because the list that we used might not be relevant to all use cases.
Summary
Any application is only as secure as the weakest component; it is extremely important to determine if the applications are exposed to any vulnerabilities via a security audit. Even without security audits in place, a good practice for Enterprise engineers is to always keep an eye on the ball for any new vulnerabilities that a site could be exposed to and be proactive in fixing them.
If you have questions about our AWS Cloud Services, how you can best leverage your experience, would like further examples, and/or need help with your Cloud-based environment, check out our blog post on 5 Common Gotchas with Serverless Development in the Enterprise please engage with us via comments on this blog post, or reach out to us.
Additional Resources
You can also continue to explore our Cloud Expertise by checking out the following posts.

